
You are here:
Set Up Data 360 for B2B Commerce
Integrate B2B Commerce with Data 360 to gain key business insights and unlock valuable analytics, personalization and automation capabilities for your store.
Required Editions
-
At the top of the page, click
 , and then select Setup.
-
To add customer engagement data from your active stores to the dashboards, connect your
web and mobile apps to Data 360.
- In the Quick Find box, enter Digital Experiences, and select All Sites.
- Select a site, and click Builder.
- In the website builder, click Settings and select Integrations.
- On the Data 360 card, select Add to Site.
- Enable Share site data with Data Cloud.
-
Select a data space and save your changes.
If you've assigned your store to a data space under Commerce Setup Assistant, only that data space is available. The data space selected in Experience Builder and the data space selected under Commerce Setup Assistant must be the same.
The integration process can take up to 60 minutes. You receive an email for confirmation when the setup is complete.
- When you receive your confirmation email, publish your site.
-
If you're adding web and mobile app engagement data to your existing Intelligence
Analytics setup, go to the Data 360 for Commerce Setup page.
In the Install Intelligence Analytics step, click Update.
Connecting web and mobile app engagement data to your existing Intelligence Analytics setup overrides customizations to your dashboards. You can reapply the customizations after completing this step.
- From Setup, in the Quick Find box, find and select Commerce Setup Assistant.
- On the Salesforce Commerce Setup tile, click Get Started.
- On the Basic Setup tab, expand Features, and enable Commerce and Order Management.
- Click Home to return to the Commerce Setup Assistant home page.
- On the Set Up Data 360 for Commerce tile, click Get Started.
-
In the Data 360 Prerequisites section, next to Set Up
Data 360 Connections, click Set
Up.
 Data 360
If you have an Enterprise or Unlimited edition, this step begins automatically. ClickComplete Setup to finish the process.
These permission sets are assigned to the currently logged in user: Data 360 Admin, Commerce Intelligence Admin, and Einstein Analytics Admin. With these permissions, you can create data streams and access Data 360 for Commerce features. Setup also configures Data 360 and connects it to Commerce.
-
(Optional) To add inventory data to the dashboards, install the Omnichannel Inventory
connector for Data 360 and for the data space assigned to your
store. The Omnichannel Inventory dashboard is supported only on the home org.
This step imports your Omnichannel Inventory data into
Data 360
and creates the necessary data streams and relationships between data model objects.Connecting inventory data to your existing Intelligence Analytics setup overrides customizations to your dashboards. Reapply the customizations after completing the setup.
- From Setup, in the Quick Find box, find and select Omnichannel Inventory.
- Click Connect.
-
Select the data space from the drop down list and then click
Connect.
The data space selected in Omnichannel Inventory and the data space selected under Commerce Setup Assistant must be the same.
- From Setup, in the Quick Find box, find and select Data Kits.
- Click Salesforce Omnichannel Inventory.
-
Click Data Kit Deploy.
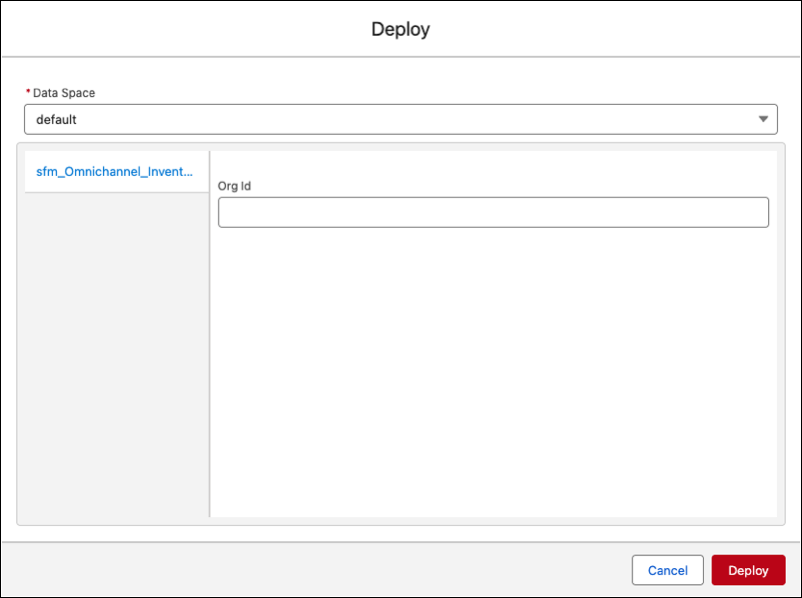
- Select the data space from the drop down list, enter the Org Id, and then click Deploy.
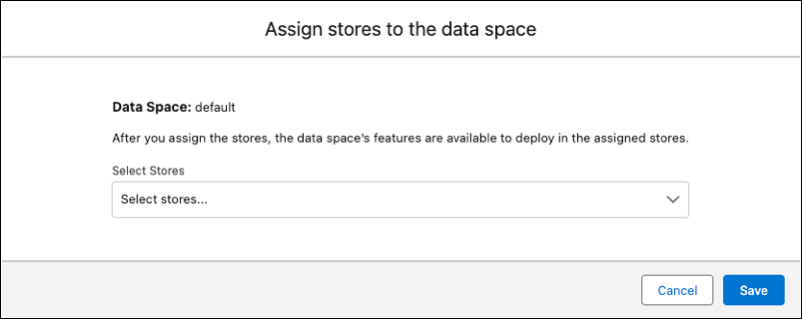
-
Under Data Spaces, assign stores to data spaces.
If you're using Marketing Cloud for B2B to send automated emails to your customers, assign the store to the same data space that Marketing Cloud uses.
-
Select a data space and click Assign.
If you've already assigned a data space to your store from Experience Builder, then only that data space is available for selection under Commerce Setup Assistant.
-
Select the store you want to assign to the data space from the drop down menu, and
then click Save.
Once you assign a store to a data space, you can't unassign it.
If you're using a companion org, and you don't see any data spaces listed, share data spaces with the companion org fro the home org. You must have at least one data space shared with your companion org to use Data 360 on that org.
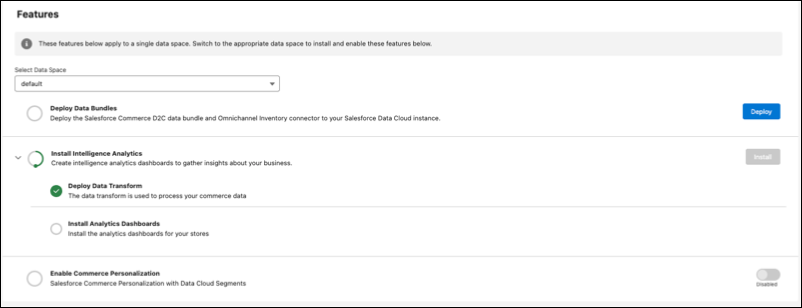
Some tasks under Features must be configured individually for each data space.
-
Select a data space and click Assign.
-
Next to the Install Intelligence Analytics step, click
Install.
The installation takes several minutes. To view the status, refresh the page. When the installation is complete, click View Intelligence Analytics to access the Intelligence Analytics dashboards.
- (Optional) To see the site conversion rate insights on the Insights Overview page, click Configure for the Configure Site Conversion Rate step. You must have customer consent to collect information for this dashboard. See Capture Engagement Events from Experience Cloud Using Data Cloud.
-
(Optional) If you have buyer groups based on Data 360 segments
and want to create targeted content on your storefront, complete the steps to enable
Commerce Personalization.
- Under Features, enable Commerce Personalization.
- In the App Launcher, find and select Data 360.
- In the Data Model tab, find and select the Sales Order data model object.
- Click Relationships.
- Check whether a relationship exists within these details: Sales Order as the object, Bill to Account as the field,N:1as the cardinality, Individual as the related object, and Primary Account as the related field. If not, edit and add a relationship with these details.
- Save and activate the relationship.
Enabling Commerce Personalization requires buyer groups based on Data 360 segments. See Create a Buyer Group Based on a Data Segment.
