
You are here:
Example: Limit Product Visibility in a B2B Store Based on Qualification Rules
Alpine Coffee sells to retailers across the United States. Two of the distributors for Alpine Coffee are Alpine Distributor and Go Coffee Distributor. This example uses disqualification rules to specify that buyers for Alpine Coffee see products and product categories that are specific to Alpine Coffee, and buyers for Go Coffee see products and product categories that are specific to Go Coffee.
Required Editions
To enable this scenario, we’ve created a custom field, AccountCategory, on the Account object to differentiate between distributors in our store. See Create a Custom Field. For Alpine Distributor, the value of AccountCategory is AlpineSupply, and for Go Coffee Distributor, the value is GoSupply. The goal is for buyers for Alpine Distributor to see products from only the category AlpineSupply, and buyers for Go Coffee Distributor to see products from only the categories GoBar, GoBrew, and GoGoo. Category disqualification rules can specify the appropriate visibility for the two distributors.
These are steps to implement this example.These steps assume that qualification rules are enabled in the store. See Enable Qualification Rules in Your B2B Commerce Store.
-
Create an account category field for product and product category disqualification
rules.
-
At the top of the page, click
 and select Setup.
- Select Object Manager, and in the Quick Find box, enter and select Product Category Disqualification.
- Click Fields & Relationships.
- Create the field AccountCategory of the type Picklist, and save your changes.
-
At the top of the page, click
-
Create the product category disqualification rule.
- In the App Launcher, find and select Product Category Disqualification.
- Click New.
- Select the product, and the effective from and effective to dates for the disqualification rule.
- Save your changes.
-
Extend the context definition and map the AccountCategory attribute.
-
At the top of the page, click and select Setup.
- In Quick Find, find and select Context Definitions under Context Service.
- Select Extend from the quick actions menu for CommerceProductDiscoveryContext.
-
Enter ExtendCommerceProductDiscoveryContext as the name of the
extended context definition, and save your changes.
The extended context definition is listed in the Custom Definitions tab under Context Definitions. Add the
AccountCategory attribute to the extended context definition. Changes made to the context are visible within the Structure tab of the extended context definition.
- Click Map Data.
- Select Edit SObject Mapping from the quick actions menu for CommerceProductQrMapping.
-
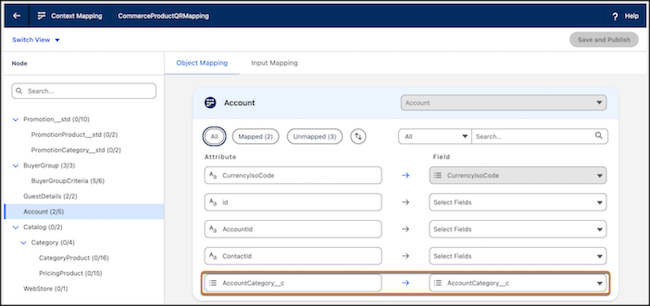
Select the account node, and map the AccountCategory attribute.
- Save your changes, and activate the extended context definition.
-
At the top of the page, click
-
Update decision tables to look up the qualification rules.
- In the App Launcher, find and select Lookup Tables.
- Select Commerce Category Disqualification Decision Table.
- Deactivate the decision table. You cannot edit an active decision table.
- Click Edit.
-
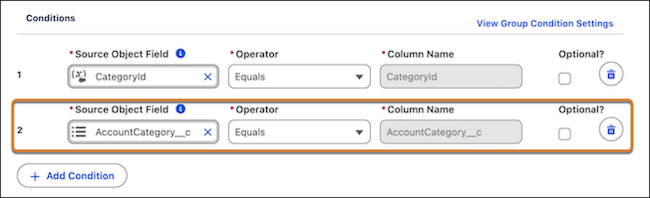
Add a lookup field corresponding to the AccountCategory attribute you created
earlier.
-
Save your changes.
You can view the updated table from the Table tab of the decision table.
- Activate the updated decision table.
-
Associate the extended context definition with a qualification procedure.
- In the App Launcher, find and select Qualification Procedures.
- Select Commerce Default Qualification Rule Procedure.
- Click Edit.
- Select the context definition you created earlier, to associate it with the qualification procedure.
- Save your changes.
-
Add the custom attribute to the qualification procedure.
- Click Commerce Default Qualification Rule Procedure under Qualification Procedure Versions.
- Add the AccountCategory attribute to the Category Disqualification element.
- Save your changes and activate the qualification procedure.
-
Update the procedure plan.
-
At the top of the page, click and select Setup.
- In Quick Find, find and select Procedure Plan Definitions.
- Select Default PQ Procedure Plan Definition.
- Deactivate the procedure plan.
- Select the updated context definition and qualification procedure.
- Save your changes and activate the procedure plan.
-
At the top of the page, click