
You are here:
Configure Salesforce Managed Checkout for a D2C Store
Reduce store setup time with managed checkout by using Salesforce’s native merchant services for payment, taxes, and shipping. These integrated merchant services, called managed checkout, eliminate the need for third-party providers.
Required Editions
Note Managed checkout doesn't support customizations. If you'd like to make any
customizations to the checkout experience, we recommend that you use custom checkout.
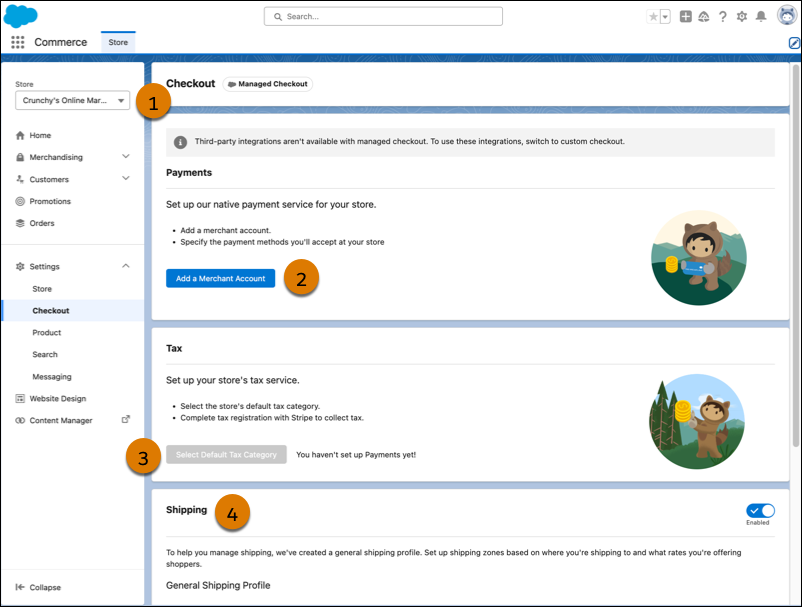
- In the navigation sidebar, select a store from the Store dropdown (1).
- Select Settings | Checkout.
-
To set up Payments:
-
Click Add a Merchant Account (2), and follow the guided
setup.
If the
Add a Merchant Account button is disabled, the Salesforce Payments setup hasn’t finished. Make sure your org has a Salesforce Payments license, then rerun the Commerce Setup Assistant. See Set Up a Store for B2B Commerce.
If you’re using Salesforce Payments in a trial org, you can only create a Stripe account in test mode. To process live transactions, you must purchase a Payments license. -
(Optional) Select payment methods for the merchant account. Credit cards are
included by default.
If you add PayPal as a payment method, modify your PayPal account so that customers have to provide a contact phone number during checkout. Log in to your PayPal account from your account settings., select Website payments | Website preferences, and turn on Contact Telephone Number.
- (Optional) Enable manual capture instead of using auto capture for more control of payment processing.
-
Click Add a Merchant Account (2), and follow the guided
setup.
-
To set up your store’s tax service, click Select Default Tax
Category (3).
Your store’s tax category associates your products with the correct tax rates. The Tax Policy ID is populated based on the tax category. The tax policy applies to all products in the store. See Assign a Tax Policy to a Product.
-
Click Configure Tax Registrations.
On the Stripe dashboard, add registrations to start calculating and collecting tax for a specific location. See Track Your Registrations in the Dashboard.
-
Review your shipping profile (4).
The shipping profile is based on your store’s default settings. You can set up different shipping zones and the rates that you want to offer by clicking Manage Shipping.
-
To preview your checkout page, in the navigation menu, click Website
Design to open Experience Builder and go to the Checkout page.
Managed checkout uses the Salesforce: Checkout Layout component on the Checkout page. This component includes a one-page checkout layout with the sections needed for customers to complete their purchases. You can't customize this page.
Did this article solve your issue?
Let us know so we can improve!