
You are here:
Use Custom Fields in B2B Pricing Procedure
Customize pricing rules by integrating custom fields into your pricing procedure. Extend the standard Commerce context definition to add your custom Account and Product attributes, such as Loyalty Status or Product Capacity. Map these attributes to the pricing context so they're available for use in your pricing procedure.
Required Editions
| View supported editions. |
Which Salesforce Commerce Product Do I Have?
Important To extend the standard context definitions, you need these licenses:
- Salesforce Commerce Growth or Advanced
- Salesforce Revenue Cloud Advanced
For details about context definitions and their role in pricing procedures, see Context Definitions.
To include custom fields in a pricing procedure, you must first create those fields. For details, see Create a Custom Field.
- From your store, go to Settings | Store and select the Pricing tab.
- Turn on Advanced Pricing for Commerce Powered by Revenue Cloud. See Enable Advanced Pricing for Commerce Powered by Revenue Cloud.
- Turn on Pricing Context Extension Service.
-
Click
 and select Setup.
- From Setup, in the Quick Find box, find and select Context Definitions.
-
On the Standard Definitions tab, find
CommerceCartContextDefinitionand then click and select Extend.
- Enter a name for the extended context definition and save it. The extension process takes up to a few minutes to complete.
- On the Custom Definitions tab, select the extended definition you created. If you don’t see it in the list, refresh the page.
-
To edit your extended custom definition, click Edit. Add the
account fields within the
SalesTransactionnode. Make sure that Type is set to Input for the newly added fields. For Data Type, selectString,Number,Boolean,Date,Date Time, orPercent. For instructions, see Edit Context Definitions.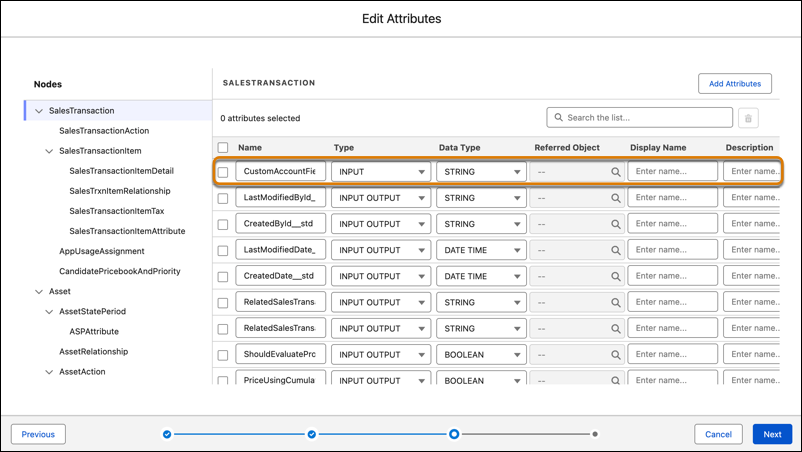
-
Similarly, add the product fields within the
SalesTransactionItemnode. - After you create a context definition, go to the Map Data tab to define where the data is fetched from.
-
For
CommerceCartMapping, click and select Edit SObject Mapping.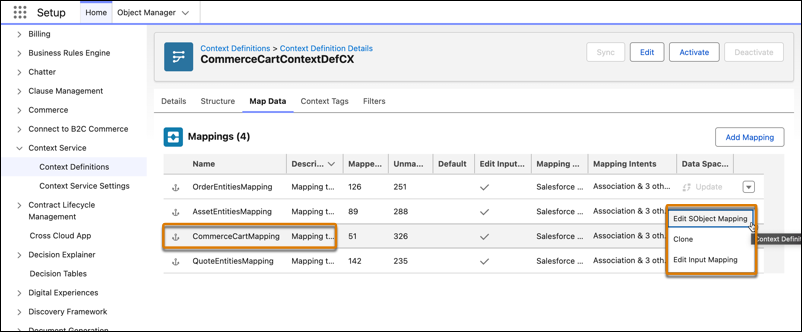
- In the Edit Mapping page, click Map.
-
Map the fields in the
SalesTransactionnode to the corresponding attribute in the Account object. For more information on mapping attributes to fields, see Map Context Definitions.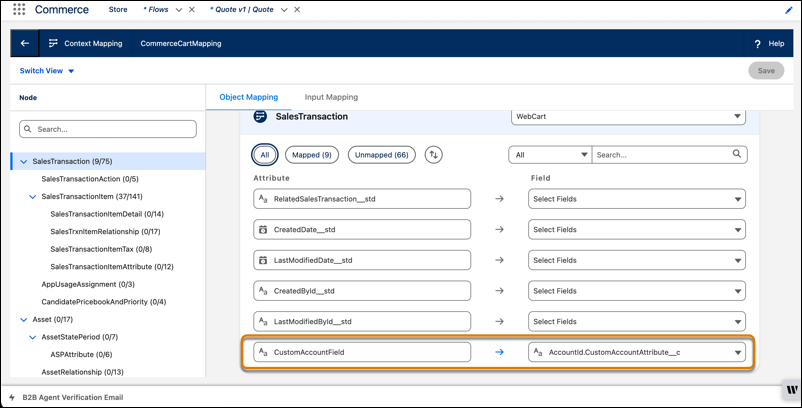
-
Similarly, map the fields in the
SalesTransactionItemnode to the corresponding attribute in the Product object.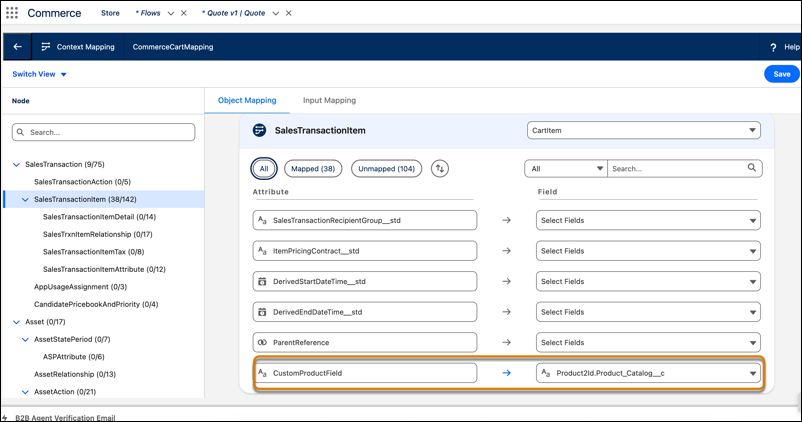
- Save your changes.
-
For
OrderEntitiesMapping, repeat steps 12–16 to map your custom fields. -
Similarly, for
QuoteEntitiesMapping, click and select Edit Input Mapping. Add an input-mapping for
your custom field. For the Fieldvalue, enter the same field tag used for the custom field inCommerceCartMapping. Save the mapping. - Activate the context definition.
-
Update your pricing procedure to define custom pricing logic by using the custom
fields.
- From the App Launcher, find and select Pricing Procedures.
- Select the pricing procedure of your org.
- Create a new version of the pricing procedure.
- For Context Definition, select the extended context definition from the previous steps.
- Save your changes and activate the pricing procedure. Now, you can modify your pricing procedure by using the newly created custom attributes.
Did this article solve your issue?
Let us know so we can improve!