
You are here:
Set Up Product Configurator for B2B Stores
Use the product configurator to offer configurable products and bundles to your buyers. To set up the product configurator, configure Revenue Cloud features, permissions, and advanced pricing. Then, create a configurator flow and republish your store.
Required Editions
| View supported editions. |
Which Salesforce Commerce Product Do I Have?
- Salesforce Commerce Growth or Advanced with Advanced Pricing for Commerce Powered by Revenue Cloud enabled
- Salesforce Revenue Cloud Advanced
Enable Revenue Cloud Features and Billing for Product Configurator
Enable Revenue Cloud features and turn on billing to prepare your org for the product configurator.
-
At the top of the page, click
 and select Setup.
- In the Quick Find box, search for and select Revenue Settings.
- Make sure that Enable Revenue Cloud Features is selected.
-
In the Quick Find box, enter
Billing, and then select Billing Settings. - Turn on Billing.
To avoid access issues after turning on billing and before setting up billing features, assign the Billing Admin and Billing Operations User permission sets to users with the System Administrator profile.
Assign Permission Sets to Product Configurator Users
Assign these permission sets to users who set up the configurator and create configurable products or bundles.
| Permission Set Name | Description |
|---|---|
| Billing Admin | Gives permission to configure billing policies, treatments, and legal entities, define policies, manage org defaults, and assign user permissions. |
| Billing Operations User | Gives permission to schedule invoice runs and manage invoice-related operations. |
| Context Service Admin | Gives permission to create and manage all context service objects and context definitions. |
| Product Configuration Constraints Designer | Gives permission to create and manage constraint types and rules in Configurator with Constraint Rules Engine. |
| Product Catalog Management Viewer | Provides read access to Product Catalog Management objects and APIs, and browse products by using Product Discovery. |
| Product Discovery User | Provides read access to Product Catalog Management objects and APIs, and permission to browse products by using Product Discovery. |
| DecimalQuantityRuntime | Gives view access to the Decimal Quantity Feature for runtime users. |
Assign this permission set to buyers who configure and purchase configurable product bundles.
| Permission Set Name | Description |
|---|---|
| Product Catalog Management Viewer | Provides read access to Product Catalog Management objects and APIs, and permission to browse products by using Product Discovery. |
To assign permission sets:
- From Setup, in the Quick Find box, search and select Users.
- Click the user.
- Scroll down to Permission Set Assignments, and click Edit Assignments.
- From the available permission sets list, select the permission sets listed in the table and add them to the enabled permission sets list.
- Save your changes.
Assign Additional Permission Set to Buyers Who Use Configurable Products or Bundles
Create an additional permission set for buyers to access product configurator features.
- From Setup, in the Quick Find box, search and select Permission Sets.
- Click New to create a permission set.
-
For Label, enter
B2B Buyer - Revenue Cloud Management. - Leave the other fields as their default values, and save.
- On the new permission set page, click System Permissions.
-
Click Edit, and then select
Manage Revenue CloudandProduct Configuratorpermission sets. Deselect all other permissions. - Save your changes.
- Click Manage Assignments.
- Click Add Assignments, select the buyer user from the list, and click Assign.
Configure Advanced Pricing and Enable Subscriptions for Product Configurator
To enable the product configurator, configure Advanced Pricing for Commerce powered by Revenue Cloud and enable subscriptions.
- Turn on and configure Advanced Pricing for Commerce Powered by Revenue Cloud. For details, see Configure Advanced Pricing for Commerce Powered by Revenue Cloud.
-
Enable Subscriptions for your org.
- From your store, go to Settings and select Store.
- Go to the Pricing tab.
- Under Subscription Management, enable Subscriptions. If you don’t see the setting enabled, refresh your browser.
-
(Optional) If pricing information doesn't appear in your store, refresh your price book
entries.
-
Click and select Setup.
- In Quick Find, search for and select Salesforce Pricing Setup.
- Click Sync to sync all the pricing data into your pricing tables.
-
Click
Turn On Configure Product at Run Time
Enable buyers to configure products and bundles in the store.
- In Setup, in the Quick Find box, search for and select Revenue Settings.
- Turn on Configure Products at Runtime.
Create a Commerce Product Configurator Flow
Assign a flow that defines the bundle configuration experience for buyers. This flow applies to all pages where the configurator is used.
- From Setup, in the Quick Find box, search for and select Flows.
- Select Default Product Configurator Flow.
-
Click Save As New Flow.

- Enter a name for the flow.
-
For Flow API Name, enter
Commerce_Product_Configurator_Flow. -
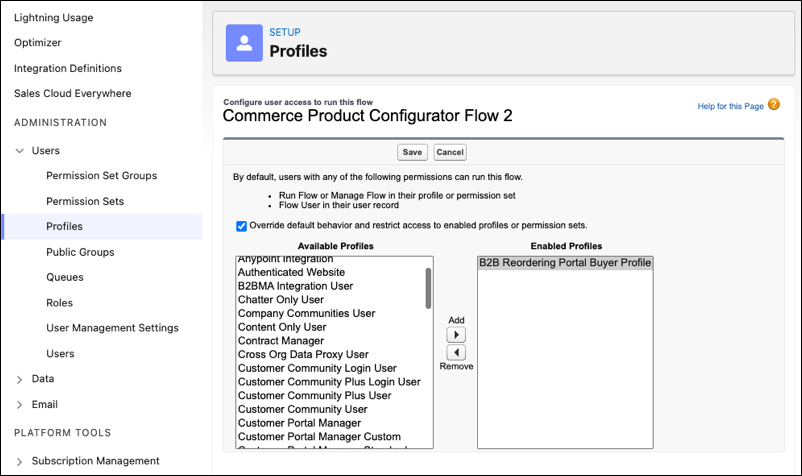
From the Flows page, click
 for the flow you created and select Edit Access.
-
If Override default behavior and restrict access to enabled profiles or
permission sets is selected, add the B2B buyer profiles to the enabled profiles
list. Include both the default and any custom profiles that you created.
Republish Your Store
After you modify a flow, republish your store to make the changes live.
- From the App Launcher, find and select Commerce.
- From your store, go to Website Design | Experience Builder.
- Select the Product page.
-
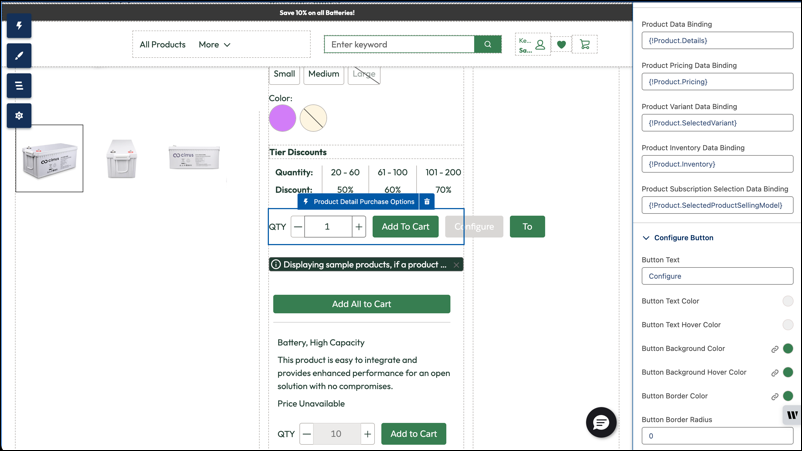
Select the Product Details Purchase Options component and modify
the fields in the Configure Button section to control how the button appears on your
store.
-
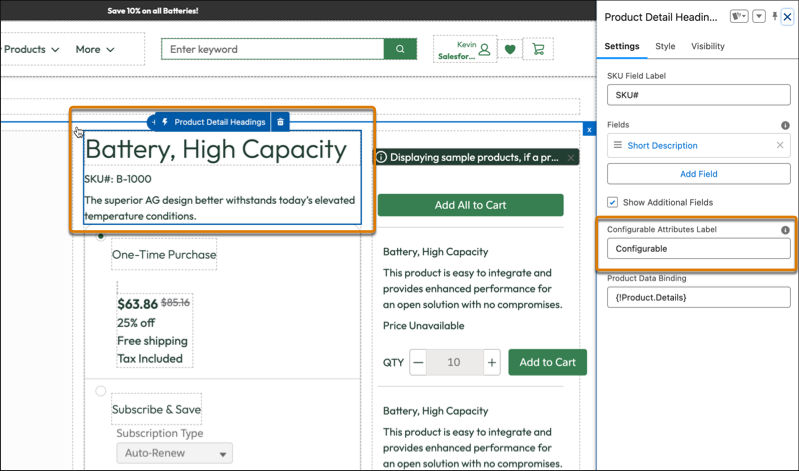
Select the Product Detail Headings component and enter a
configurable attributes label. This label identifies configurable products.
 Note The Publish button is enabled only after the system detects a change. If you don’t plan to modify any fields, make a small change and then revert it.
 - Publish your store.