
You are here:
Add a Payment Link to a Salesforce Record
To create a Pay Now payment link, use the Generate Payment Link flow. This flow guides you through the link creation process. How you incorporate a link into your business application and share it with your customer is specific to your work flow.
Required Editions
This procedure assumes knowledge of Salesforce declarative tools and working with objects.
-
Establish a lookup relationship between the Payment Link object and the object
that you want to accept payments for.
The lookup relationship creates a record of what the payment link is for. For example, to collect payment for an invoice or work order, add a lookup field on the Invoice or Work Order object.
- From Setup, go to Object Manager and locate the Payment Link object.
- Select Fields & Relationships.
- Click New, and select Lookup Relationship.
- Follow the prompts, and select the object that you want the Payment Link to relate to.
-
In Flow Builder, the Generate Payment Link flow automates payment link
generation. Use the flow as is or customize it. If you want to customize the
flow, complete these tasks. Otherwise, go to the next step.
- In Setup, and in the Quick Find box, enter flows, and select Flows.
- Select the Generate Payment Link flow, save it under a new name, then modify it.
You can also build your own application workflow using the Payment Link object and a Salesforce declarative tool, such as Flow or Quick Actions. You can also use a developer tool, like Apex invocable actions. -
(Optional) Add the payment link flow as an action to an object’s page
layout.
You don't have to create an action, but it's an efficient way to generate a link.
- From Object Manager, choose the object that you want to create a payment link from.
- Select Buttons, Links, and Actions, and then click New Action.
- For Action Type, select Flow and select the payment link flow.
- Enter a label and name for the link, and save your changes.
- Select Page Layouts.
-
From Mobile and Lightning Actions, drag the action that you created to
the Salesforce Mobile and Lightning Experience Actions section of the
page layout.
A button to generate a payment link is added to all record pages for the object. You can generate as many payment links as you want for a single object.
Pay Now doesn’t perform post-processing logic, so you must configure automation for post-payment processing. For example, when a payment is received, add a process to mark an invoice as paid with the amount sent. -
Test your action button to ensure that it triggers the flow. When the flow
starts, select which link you want to create.
- Predefined Amount —sends the customer to a page that shows only an amount owed.
- With Products —sends the customer to a payment page that shows a list of products, provides shipping options, and calculates the tax based on the shipping address and products purchases.
If your payment link takes you to an error page, go to the Payments Link list view and verify that the link’s status is active. Next, open the link in your browser’s private or incognito browsing mode. - Test the generated payment link to make sure that it takes you to the correct Pay Now page. If you accept payments with Apple Pay, test the link by opening it in a Safari browser.
Example In Object Manager, modify the Quote object. Add an action named Generate Payment
Link to the Quote page layout. When you click the new Generate Payment Link button on
the page, the flow starts and walks you through payment link creation. Copy the
resulting link and share it with your customer.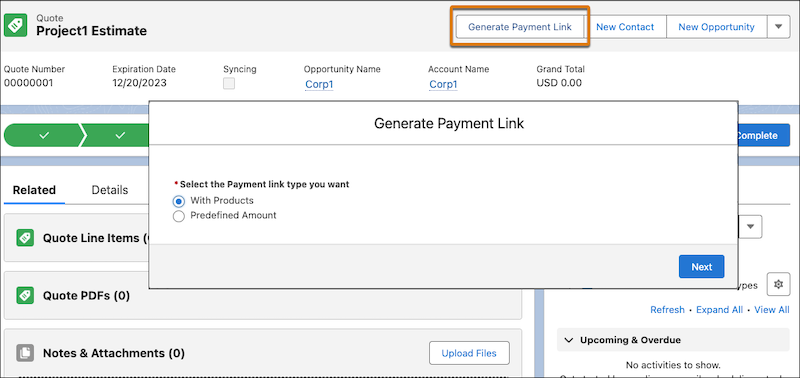
Did this article solve your issue?
Let us know so we can improve!