
You are here:
Epson IP Printer Setup
Configure your Epson IP printer in Point of Sale CMS, connect it to the Point of Sale (POS) app, and switch to DHCP to connect to the network and print receipts.
Prerequisites:
- Modern POS App Build: 7.1.0 or later
- Platform Support: iPhone & iPad
- Offline Support: yes
- Certified Models: TM-T88IV, TM-T88V, TM-T88VI, TM-m30II, TM-m30II-H, TM-m30II NT, TM-m30III, TM-m50, TM-m50II-H
To enable App Config settings in Point of Sale CMS:
- In CMS, go to.
- Edit your selected app config and go to .
- Turn on the flag.
- Under, select .
- Turn on the flag.
- Back in CMS, go to .
- Select your store and edit a register by clicking on the pencil to the right.
- Under , go to and select your printer model.
- Go to and select .
- Save your changes.
Epson TM-T88V Configuration and Setup
The Epson TM-T88V, by default, comes with a static IP address. To connect to your network, switch it to DHCP.
Switch to DHCP
- Plug in the printer to power.
- Plug the Ethernet cable from the printer to your computer.
- Set your computer to a static IP address.
Change IP Address
- Go to the Mac System preference and select the pane.
-
If you're using a different network interface than the cash drawer, change the IP address
manually to:
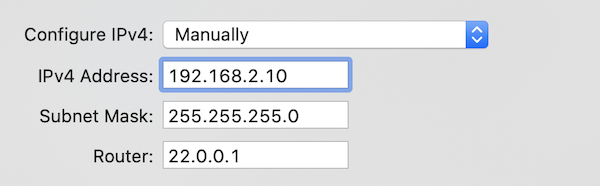
- 192.168.192.5 (can be any IP address from 1–254 other than 168)
- Subnet Mask: 255.255.255.0
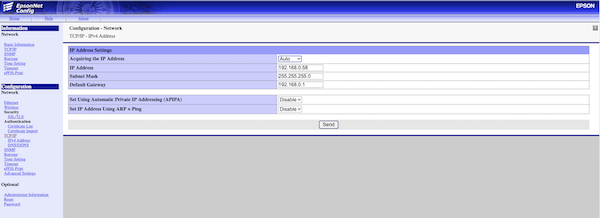
- On your computer, go to http://192.178.192.168, this is the default address for the printer and launches the Epson Admin Tool.
-
In the Epson Admin Tool:
- The username and password for the Epson printer is epson/epson.
- Go to .
- Change to and press to reboot the printer.
-
- Plug your printer into your router or ethernet hub. It retrieves an IP address from your network. You can check this by pressing the button on the back of the printer with a pen.
TM-m30/TM-m30II/TM-m30III
- Plug the power cable into the back of your printer.
- Plug one end of the Ethernet cable into the back of your printer and the other into the back of your router.
Resetting Printer
- If you have a selected printer in the Device Manager, disconnect and remove it by selecting the trash can.
- Plug the power cable into the back of your printer.
- Plug one end of the Ethernet cable into the back of your printer and the other into the back of your router.
- On your device, download from the App Store.
- Select , select your model, and select Next.
- Follow the instructions.
- It is recommended you update the Firmware.
- Go to the screen and check to see the printer entry.
- Select your printer.
Epson IP Printer Setup in the POS App
Connect an Epson IP printer to the POS app so you can print from your device. The device manager screen auto-detects the printer when it's on the same network as the iPod or iPad.
Connect Epson IP Printer to POS app
Go to the Device Manager screen. Make sure the iPod or iPad and the printer are on the same network. The device manager screen auto-detects the printer if it's on the same network as the iPod/iPad
If the
printer doesn't appear automatically, try hitting refresh on the top right or select Add
Printer. You'll be shown an interstitial to enter the IP Address. Enter the IP address here
(for example 192.168.1.5).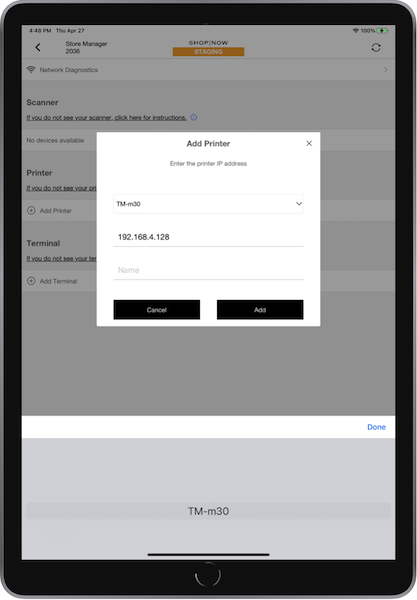
This adds the printer to the list of printers. Select the printer
in the list and select .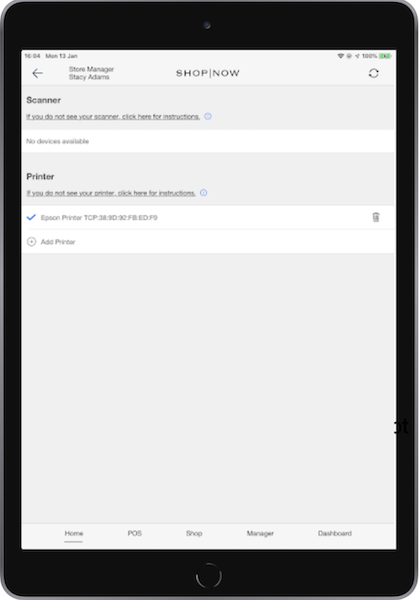
Printer Topology Setup
For instructions on printer topology setup, see Printer Topology Setup.
Troubleshooting
For information on troubleshooting and solutions, see Epson Printer Troubleshooting
Epson IP Printer Setup Known Issues
Understand common problems and limitations with configuring an IP Address Printer in Point of Sale.
Device Manager Printer Status
Modern POS only has an active connection to an IP-connected printer at the time of use. Modern POS establishes the connection at the start of a task (printing receipts or opening a cash drawer) and closes at the end of the task. Because of this, the printer state in Device Manager won't change unless a printer task is requested. For example, if the user turns off, the printer, Device Manager won't reflect this state change until the printer is needed to perform a task.
No Detection if Drawer Opened
Epson printers are unable to determine if the cash drawer is open. Make sure the drawer is closed before initiating a cash transaction.