
You are here:
Manage Return to Vendor Transfers in Point of Sale
Facilitate the movement of merchandise from a store back to either a vendor or a warehouse.
Prerequisites
- Modern POS App Build: 5.11.3 and later
- Platform Support: iPhone & iPad
- Offline Support: no
Configure Return to Vendor Settings in Point of Sale CMS
Set up the store in Point of Sale CMS to handle Return to Vendor (RTV) transfers.
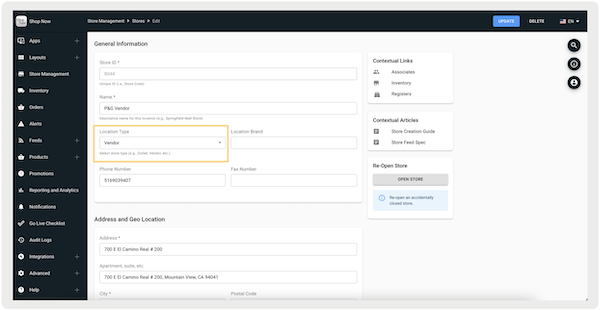
Before using RTV, set up the store in Point of Sale CMS (). This setup includes specifying the Location Type as either "" or "". Notably, RTV isn't intended for stores set up as "" or "" and won't ship to these location types.
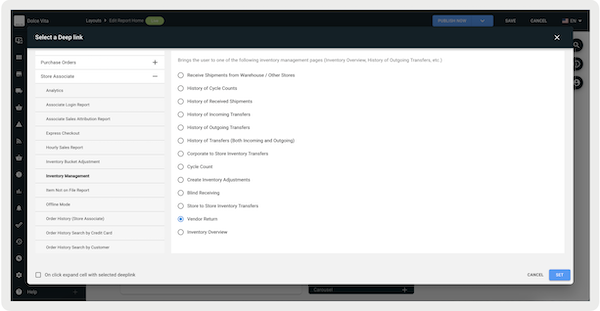
Configure Deep Link
In order to access RTV on the app, configure a deep link.
- Create a layout or use an existing one.
- Select a cell and select in the toolbar menu on the right.
- Go to .
- Select .
-
Set and save your changes.

Accessing Return to Vendor in the POS App
Use the Point of Sale (POS) app to view the Return to Vendor (RTV) options.
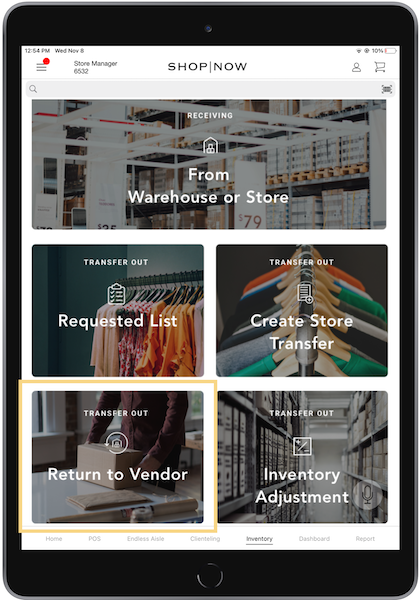
On the app, tap the deep link you've previously configured in Configure Deep Link. In the example, the deep link was configured as a tile on the Inventory tab.
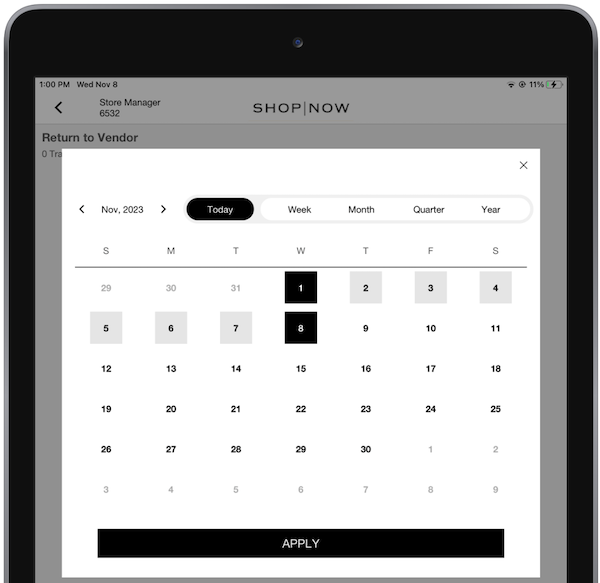
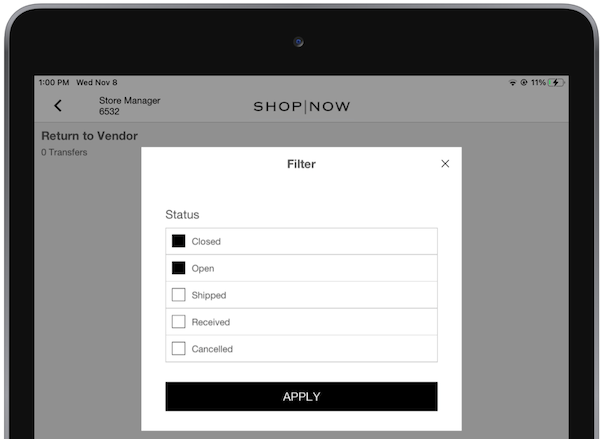
On the next screen, you'll see a list of transfers. At the bottom of the screen, you'll see a filter and calendar icons. Tap them to filter the list by status or date.
Creating RTV
After tapping , a new screen appears, prompting you to select a vendor for the return. You can
search by location, ZIP or Postal code, or store ID. Searching by store ID is for app builds
9.6.1 and later. 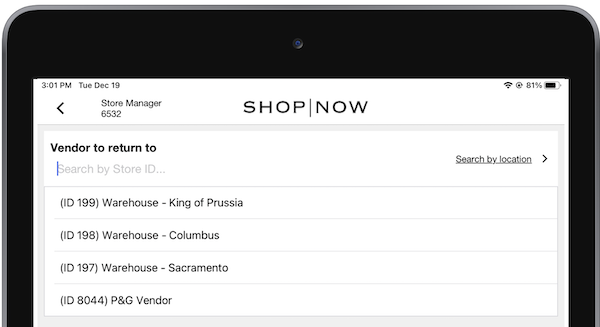
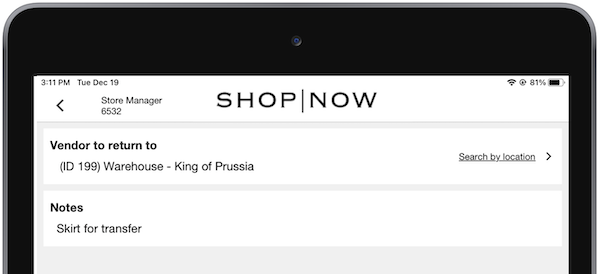
Optionally, you can also add notes regarding the reason for generating the return.
Initiate Return to Vendor Transfer in the POS App
Start the Return to Vendor (RTV) process by scanning items or entering them manually in the Point of Sale (POS) app.
Entering Products
To enter products for transfer, you can use an
external scanner which auto-populates the quantity on the RTV screen. Alternatively, you can use
the device's camera, as noted by the scanner icon at the top right corner. If using the device's
camera, tap the back button to return to the RTV screen. 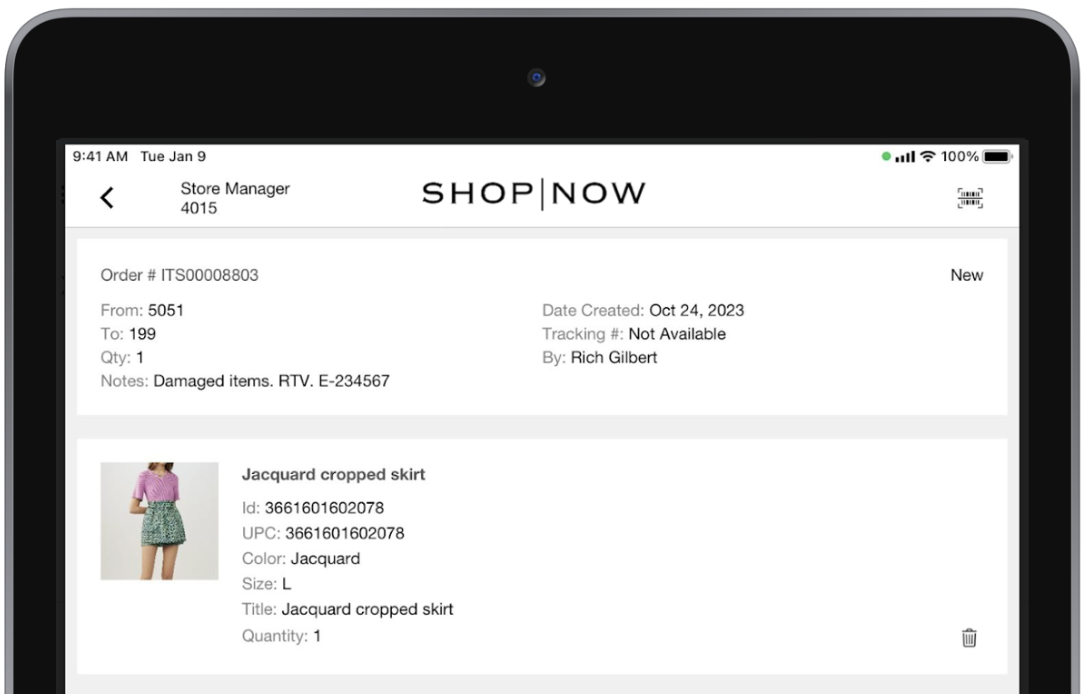
For app builds 9.7.1 or greater, users can add items manually by tapping the
search icon at the top right. The product catalog shows up, allowing users to search for items
by entering text. Alternatively, using an external scanner populates the search field with the
product's barcode value.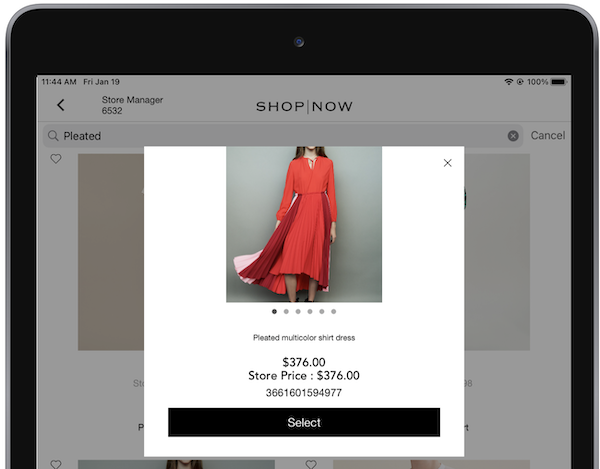
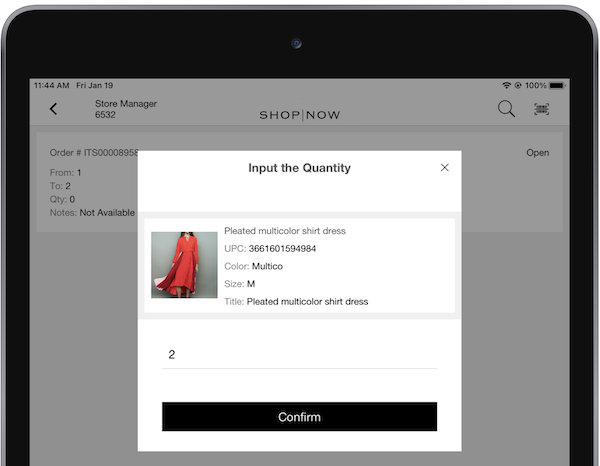
After selection, the quantity can be inputted and will be added to the transfer.
After you create an RTV and add items, it'll first decrease the “Return” inventory bucket. However, if the return quantity is higher than that, it'll then deduct it from "Available". Inventory is moved out of the store after it's shipped, which is at the time the tracking number is entered.
Serialized Inventory
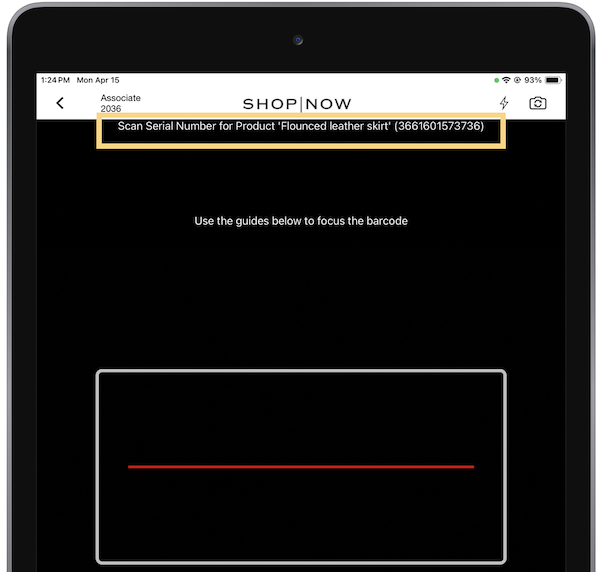
Ifserialized
inventory is enabled, scanning a serialized product triggers a prompt to scan its
serial number. Serialized products are identified by the '' attribute, which can be configured via Product Feed. If
this attribute is set to and the flag is turned on, the prompt appears. However, if the flag is turned on
but the product attribute is set to , no prompt is triggered. If using the device’s camera, this prompt appears at the
top of the screen as shown in the screenshot. Scan again to add the product for the transfer.
However, if you're using an external scanner or manually adding a product through the product
catalog, a serial number entry window appears instead.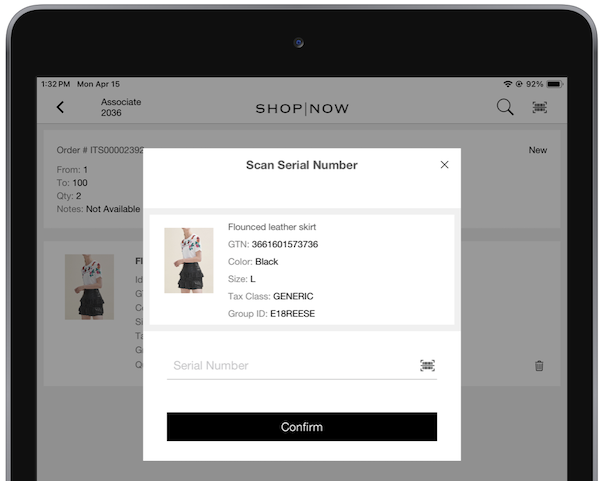
Entering multiple serial numbers appends them to the list. Each serialized product can be individually removed using the delete option. If all serialized products are deleted, the product itself is removed.

After the receiving process is complete, details can be exported through event exports by mapping the field . Serial numbers for each product are listed using a pipe delimiter.
Complete the Return to Vedor Transfer in the POS App
Close a Return to Vendor transfer, print packing slips, and add tracking numbers.
After scanning all the necessary products into the RTV, you can tap . The POS app prompts you to select whether to or .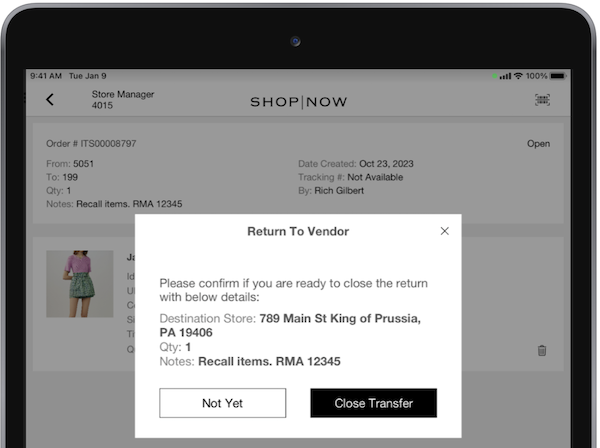
Selecting returns you to the main RTV screen with your RTV displaying an open status.
Transfers with an open status allow the user to go into it to edit or add more products.
Transfers with a closed status won't allow the user to edit or add more products. They can only
print a packing slip or ship the transfer. 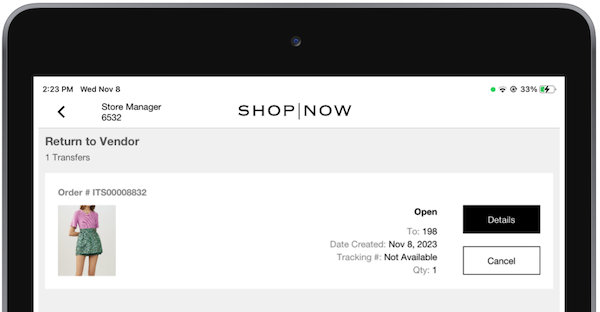
Printing Packing Slips and Adding Tracking Numbers
If you select , you'll be presented with options to print a packing slip, add a tracking number,
or create another transfer.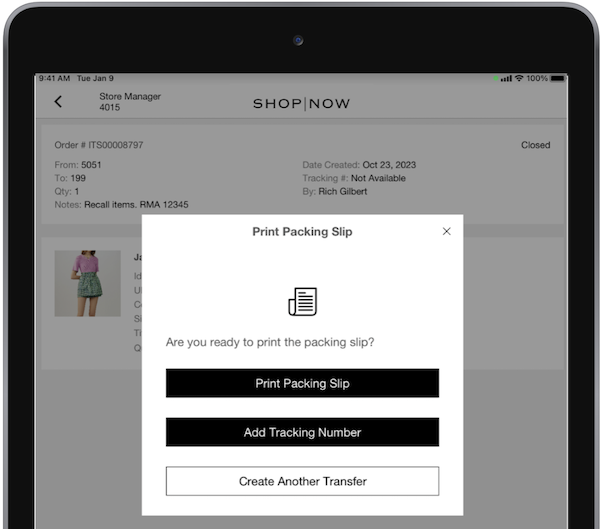
Creating another transfer takes you to a new RTV with the process of selecting a
return vendor. If you select to print a packing slip, you'll be prompted to print the packing
slip. In the case of adding a tracking number and not printing the packing slip, the app issues
a warning: "" ![]()
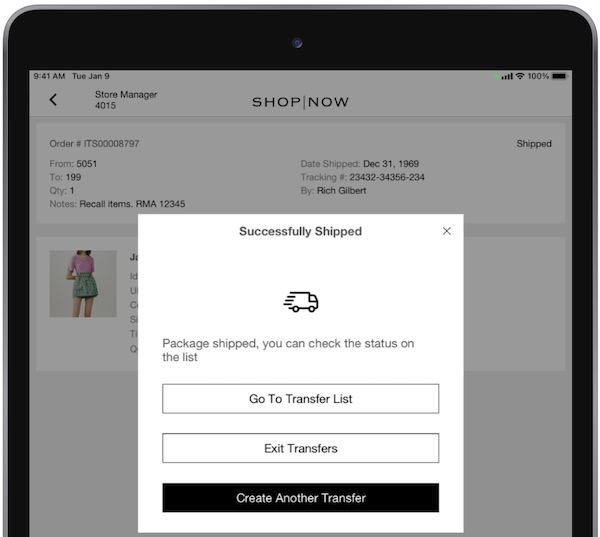
Selecting returns you to the printing page. Selecting Yes prompts you to enter a tracking number, which is a mandatory field. You can manually type in the tracking number. Alternatively, you can also use the device's camera or an external scanner to scan the number.
After the tracking information is entered, the app brings you to a Successfully Shipped screen with options to:
- brings you back to the main RTV screen
- brings you back to the Inventory screen
- allows you to create another transfer
Generate Shipping Labels for Return to Vendor Transfers
Create labels in the POS app to use for Return to Vendor (RTV) transfers.
For app builds 9.8.1 or greater, shipment labels can be generated. Refer to Configuring & Generating Shipment Labels via
SPI. 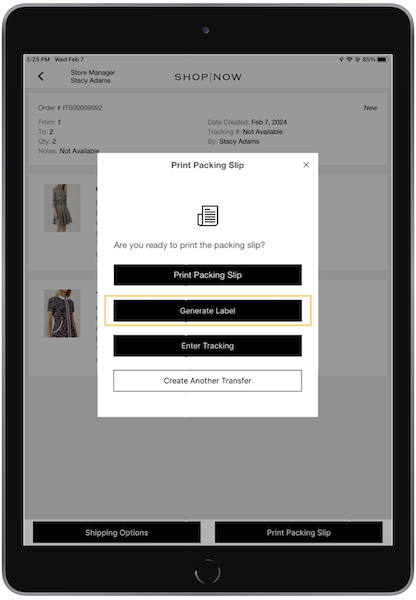
View Known Issues with Return to Vendor Transfers in Point of Sale
Understand known issues with the Return to Vendor (RTV) feature in Point of Sale.
- For app versions less than 9.8.1, while receiving, failure to save your progress can result in the loss of all work, including scanned items, if you tap the merchant logo in the POS app. However, for versions 9.8.1 or greater, users are provided with the option to save before exiting.
- RTVs are structured to correspond to single shipments - one RTV number per shipment. For example, if you're returning three items to the same vendor, they are put in one box, scanned under one RTV number, and sent with one tracking number. However, if these three items are going to different sellers, package them in three boxes. Each box has its own RTV number and tracking number. Our system doesn't support assigning multiple tracking numbers to a single RTV number.
-
If a transfer includes a serialized item, users can't select "Receive All" and they individually scan each product in the transfer. Even after scanning the serialized items, the "Receive All" action remains blocked for the remaining items.