
You are here:
Create a Batch Data Transform
Create a batch data transform with data lake objects or data model objects by using the in-app builder.
Required Editions
| Available in: All Editions supported by Data 360. See Data 360 edition availability. |
| User Permission Sets Needed | |
|---|---|
| To create batch data transforms | Permission set:
|
-
In Data Cloud, on the Data Transforms tab, click New.
If the Data Transforms tab isn’t visible, click More and select Data Transforms.
- Select Batch Data Transform, and then click Next.
-
Select the data source.
If you selected data model objects as the source, select a data space from the dropdown menu. The data transform output applies only to the specified data space.
 Note A data transform that runs on data model objects is restricted to a data space. You can't associate a data transform that runs on data lake objects with a data space.
 -
Select the initial input data for the batch data transform.
- Click Add Input Data, and select the objects that you want to add.
-
Under Selected Columns, choose which of the object’s columns to include in your
input data, or select Name to select all columns.
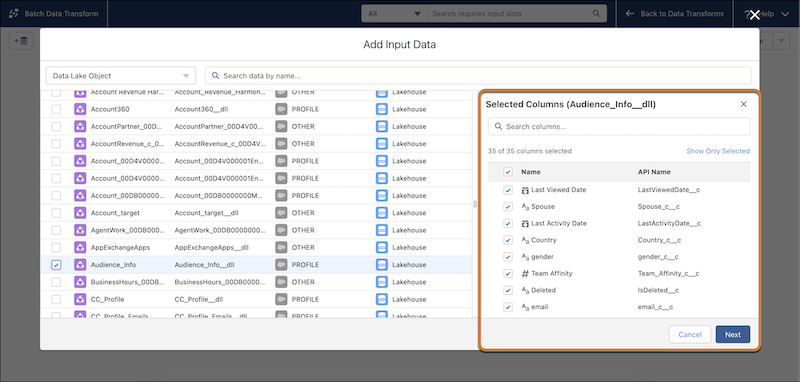 If you added multiple source objects, select each object one at a time and then choose its columns. Selected Columns shows only the columns for the selected object.
 -
Click Next.
An input node for each input data selection is added to the canvas.
- To set a currency for the transform, click settings and select Set Currency.
-
Add a node to the batch data transform by clicking the Add Node button (
 ) between two nodes or at the end of the batch data transform. Then, select the
node type.
To show the Add Node button between two nodes, hover the cursor on the connecting line.
) between two nodes or at the end of the batch data transform. Then, select the
node type.
To show the Add Node button between two nodes, hover the cursor on the connecting line. -
Preview the results of each node and transformation that you added by selecting the
node or transformation in the canvas.
To edit or delete a node, select the node, click
 , and then select the appropriate action. To edit or delete a transformation in a
Transform node, select the Transform node, select the transformation step, and then click
, and then select the appropriate action. To edit or delete a transformation in a
Transform node, select the Transform node, select the transformation step, and then click
 or
or  .
. -
To connect, join, or append nodes in the canvas, drag the Add Node button () next to a node or Branch button (
 ) on top of another node in the canvas. Select one of the Connect Nodes
options.
) on top of another node in the canvas. Select one of the Connect Nodes
options.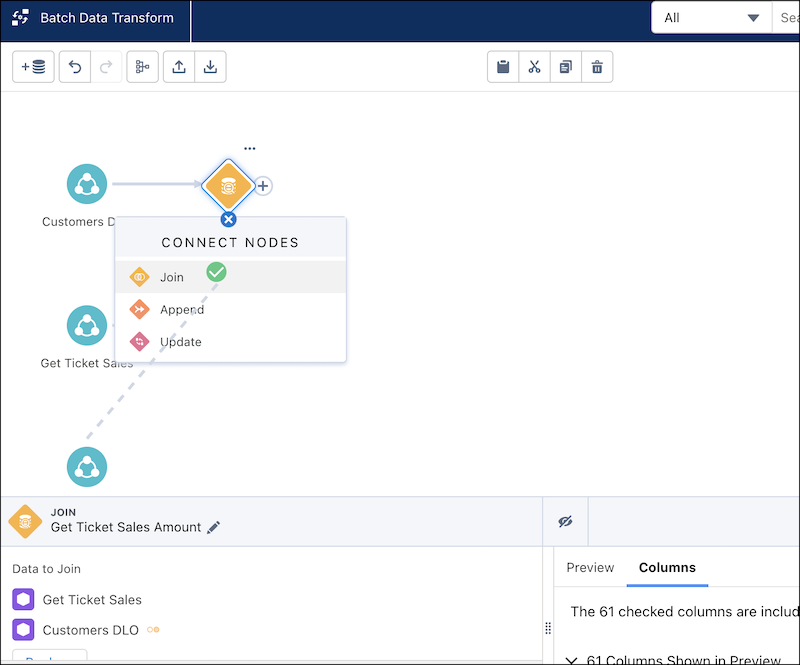
- End the data transform with one or more output nodes.
-
Select either Replace or Upsert for the
output Write Mode.
Upsert loads all input data in every run, merging it into the output. Replace attempts incremental transforms, loading only changes from previous runs into the output. For more information, see Write the Batch Data Transform Results to a Data Lake Object Output Node.
-
Select the object to write the results to.
- If your data source is a data lake object, select the object to write the results to, and then click Apply.
- If your data source is a data model object, select the object to write the results to or create a new object.
- From the Batch Transform canvas, click Save.
- Enter a descriptive name that indicates the specific manipulation or operation being performed on the data. A definition name is auto-populated in the Definition Name field. One transform can be associated with up to five transform definitions and are combined into a single composite transform. Each definition distinguishes the particular manipulation that definition applies to the transform.
- Click Save.
See Also
Did this article solve your issue?
Let us know so we can improve!
