
You are here:
Create an Audience for an Aura Site
You define an audience by selecting criteria and the conditions under which the criteria apply. After you create an audience, you can assign it to a page variation, branding set, or component. You also can assign an audience to a component variation to personalize the content that different user segments see in the CMS Collection, Navigation Menu, and Tile Menu components.
Required Editions
| Available in: Salesforce Classic and Lightning Experience |
| Available in: Enterprise, Performance, Unlimited, and Developer Editions |
| Applies to: Aura sites |
| User Permissions Needed | |
|---|---|
| To customize or publish an Experience Cloud site: |
|
You can follow the basic steps to create an audience or, for more complex audience creation, you can build an audience with a custom formula that uses AND and OR statements.
These steps walk you through how to create an audience in the New Audience window, which you can open from the Assign Audience window. How to access the Assign Audience window depends on whether you start from a page variation, branding set, or component. See these topics to learn how to navigate to the Assign Audience and New Audience windows from those different site locations:
- Assign an Audience to a Page Variation
- Assign an Audience to a Branding Set
- Assign an Audience to a Component
- Assign an Audience to a Component Variation

Create an Audience—Basic Steps
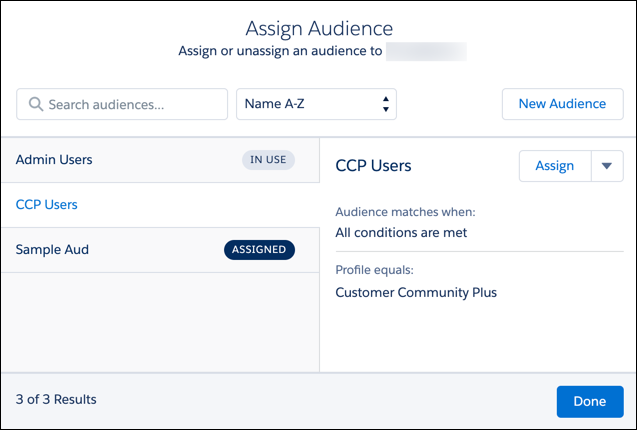
- In the Assign Audience window, click New Audience.
- Name the audience. For example, California Partners.
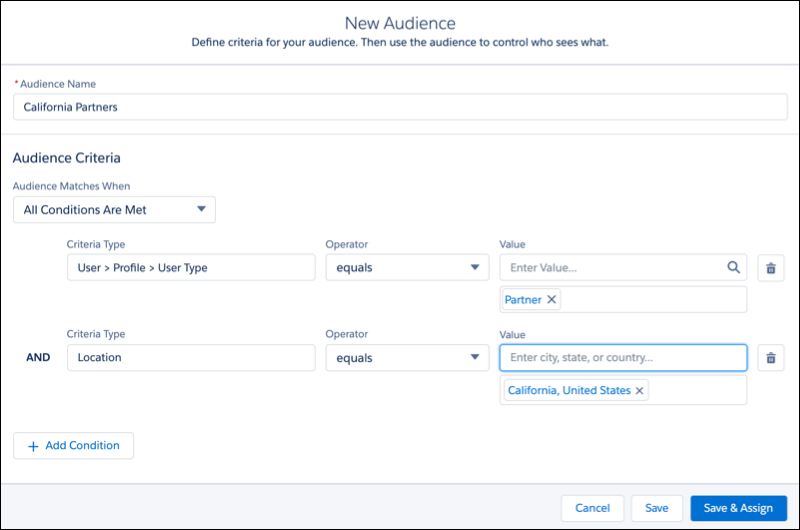
- Under Audience Matches When, select which conditions are required for the audience to apply. For example, All Conditions Are Met.
- Click the Criteria Type field, and select a criteria type from the menu. For example, Location or User | Profile | User Type.
- Select an operator. For example, equals.
- Enter a value for this criterion. For example, enter a location or select Partner from the menu.
- To add more criteria, click Add Condition.
- After you set all the criteria that you want to define the audience, save your changes.
Now you can assign the audience.
Create an Audience with Custom Logic
Let’s say you want to create a highly targeted audience, such as marketing managers in California and sales managers in New York. You can create one audience with multiple user and location criteria and use parentheses and the AND operator to group the related criteria. Then you can separate the groups with the OR operator.
- In the Assign Audience window, click New Audience.
- Name the audience. For example, CA Marketing and NY Sales
Mgrs.
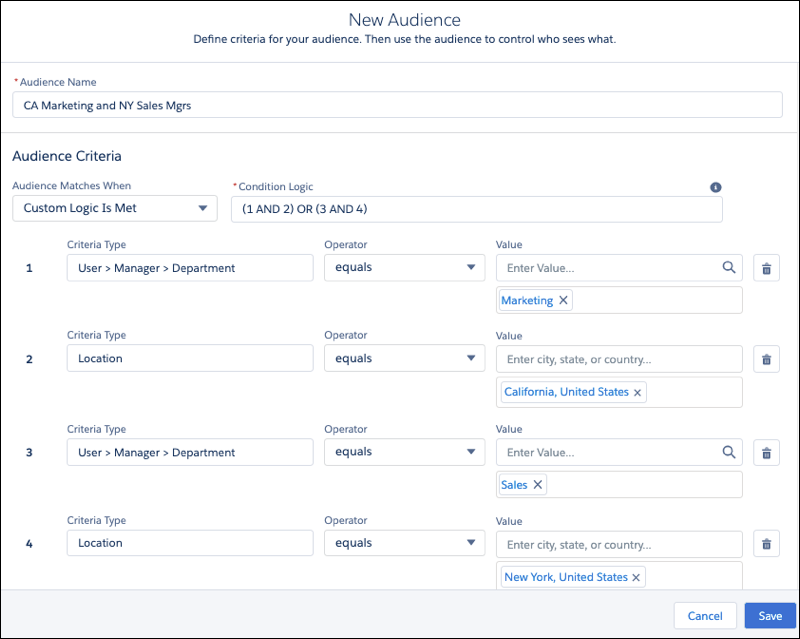
- Under Audience Matches When, select Custom Logic Is Met.
- Add the user and location criteria.
- User > Manager > Department equals Marketing
- Location equals California, United States
- User > Manager > Department equals Sales
- Location equals New York, United States
- In the Condition Logic field, group the criteria using parentheses, pairing each
targeted role and location with AND, and separating the groups with OR: (1 AND
2) OR (3 AND 4).
For example, pairing (1 and 2) puts the marketing managers in California in one group, and (3 and 4) puts the sales managers in New York in another group. When you assign the audience, these criteria apply to users who fit in either group.
- Save your changes.
Now you can assign the audience.
- Criteria Types and Conditions for Audience Creation
You can use several types of criteria to define an audience and determine the conditions under which the criteria apply.
