You are here:
Customize the Email Address Change Template
You can customize the email template you send to users when they change the email address they use with Salesforce. Change the look to match your brand and the wording of the message.
Required Editions
| Available in: Experience Builder sites |
| Available in: Enterprise, Performance, Unlimited, and Developer Editions |
| User Permissions Needed | |
|---|---|
| To customize or publish an Experience Cloud site: |
|
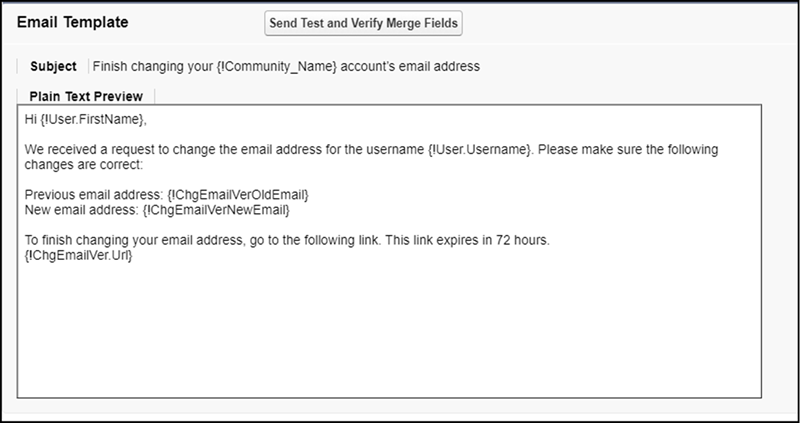
Salesforce sends two verification emails to a user when the user changes their email address. One is sent to the user’s old email address, and one is sent to the new one. The user clicks the verification URL in the email sent to the new address, and completes the email address change. You can customize those emails. If you change a user’s email address for them, no email change verification email is sent.
The Email Address Change Verification email templates are available to Experience Builder sites as of Winter ’21.
- From Setup, enter All Experiences in the Quick Find box, and select All Experiences. Next to your site, click Workspaces.
- Select Administration, and then select Emails.
-
Under Email Templates, click
 next to Old Email Address Change
Verification and select Experiences: Old Email - Change Email
Verification.
next to Old Email Address Change
Verification and select Experiences: Old Email - Change Email
Verification.
-
Under Email Templates, click next to New Email Address Change
Verification and select Experiences: New Email - Change Email
Verification.
-
Click Save.
Your site is set up to send notifications to users when their email addresses change.
-
To make customizations, edit the email template.
 Note You can use the
{!ChgEmailVer.NewEmail},{!ChgEmailVer.OldEmail}, and{!ChgEmailVer.URL}merge fields.- From Setup, enter Email Templates in the Quick Find box, then select Classic Email Templates.
- Next to Experiences: Old Email - Change Email Verification or Experiences: New Email - Change Email Verification, select Edit.
- Edit the text in the email body. To personalize your email content, use the available merge fields listed at the top of the page.
- Click Save.