
You are here:
Insights for Engagement
Insights are reports that help community managers monitor activity and take action on that activity. Insights make it easier to manage day-to-day moderation tasks, encourage engagement, and drive member adoption. You can set up Insights to monitor new members, unanswered questions, newly created groups, trending topics, and even recent Chatter contributions. The main difference between Engagement Insights and dashboards are that Insights let you take immediate action on recent activity in your Experience Cloud site, and the reports in dashboards let you see trends.
Required Editions
| Available in: Salesforce Classic and Lightning Experience |
| Available in: Enterprise, Performance, Unlimited, and Developer Editions |
| Applies to: LWR, Aura, and Visualforce sites |
Insight reports provided in the package are 100% customizable. You can change the default page names, report folder mappings (except moderation report folder mappings), and even the report columns and filters at any time. So don’t be afraid to customize or change what you get in the package.
To map Engagement Insights dashboards, in a site’s Workspaces, click Dashboards | Engagement.
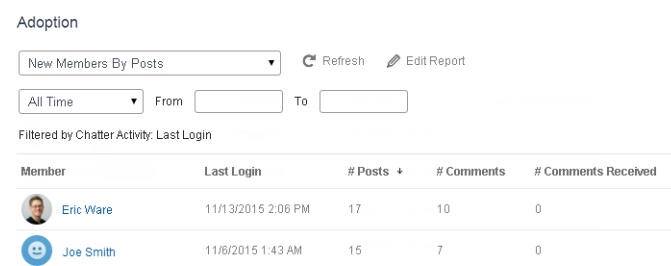
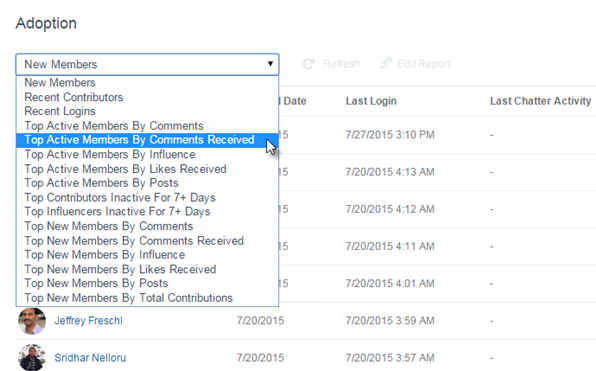
They can also access other reports about members directly from the Insights page using the drop-down menu.
View and Customize Engagement Insights
Use Engagement Insights to monitor recent activity and immediately take action. Engagement Insights help you manage day-to-day moderation tasks and keep up on adoption and engagement in your Experience Cloud site.
Required Editions
| User Permissions Needed | |
|---|---|
| To view Engagement Insights in Experience Workspaces: | Access Experience Management OR Manage Experiences OR Create and Set Up Experiences AND Is a member of the Experience Cloud site |
| To customize Engagement Insights reports: | Create and Customize Reports |
Each Engagement Insights page includes multiple reports. You can access these reports using the dropdown menu on the page. On the Engagement Insights page, links are automatically created for report fields such as Created By or Group Name. For posts, comments, and messages, you can even see the contents directly on the page.
Engagement Insights are powerful tools that you can use to perform mass-actions. For example, if a spammer attacks your site, you can select all the offending posts and click Delete Post.
- Open Experience Workspaces.
-
Click Dashboards or Moderation.
 Note Your admin maps Engagement Insights pages. If the Dashboards or Moderation section doesn’t include any Engagement Insights pages, your admin hasn’t mapped them yet.Pages with mapped report folders appear when you expand the sections.
 - Click the Engagement Insights page you want to view.
- To access other Engagement Insights reports, use the dropdown menu.
- Take action! Only the first two actions are displayed on the page. To see more actions,
click
 next to the displayed actions. You can select up to 100 rows at
a time.
next to the displayed actions. You can select up to 100 rows at
a time. - To filter the report by relative and custom date ranges, use the dropdown date filter. Select one of the following relative date ranges: All Time, This Week, This Month, Last Month, Today, Yesterday, Last 7 Days, and Last 30 Days. You can also enter your own custom date range.
- To sort the report by a specific column, click the column heading. An arrow on the column indicates whether the report is sorted by ascending or descending order.
- To edit or customize the report, click
 to open the report in your internal org.
From there you can customize the report to fit your needs, such as adding or removing
columns and updating the report filters.
to open the report in your internal org.
From there you can customize the report to fit your needs, such as adding or removing
columns and updating the report filters. - To edit the actions assigned to a page, click
 to open the Edit Engagement Insights
Actions page.
to open the Edit Engagement Insights
Actions page.Actions that appear on the Engagement Insights report are displayed based on the data returned in the report. For example, if the report returns data about a user, the Freeze Member and Unfreeze Member actions are displayed. If the report stops returning data, actions aren’t removed. However, when you go to update the actions, we let you know that some are no longer appropriate.
Each Engagement Insights report can have its own actions. You can edit these actions at any time, but keep in mind that an Engagement Insights report must have at least one action. Actions displayed in the picklist on the Edit Engagement Insights Actions page are all the available and appropriate actions for your report, including custom actions.
Engagement Insights reports are automatically refreshed when you access them. You can also force an update.
Create Custom Actions for Insights
Do more with Insights reports with custom actions. Say a spammer attacks your Experience Cloud site. You can create and use a custom action to remove all the spammer’s posts and comments with just one click. Custom Insights actions work with standard objects and custom objects.
Required Editions
| User Permissions Needed | |
|---|---|
| To create, edit, and set version settings for Visualforce pages: | Customize Application |
| To edit custom Visualforce controllers: | Author Apex |
When you click an Insights action in the report, behind the scenes a Visualforce page drives the action. The Visualforce page links to standard or custom objects using standard controllers or standard list controllers.
Here are the high-level steps of how to create a custom Insights action.
-
Create a Visualforce page.
There are a few options you can use:
- Use a standard controller
Choose this option to create a Visualforce page that contains the same functionality and logic used in standard Salesforce pages. For example, if you use the standard Accounts controller, clicking a Save button in a Visualforce page results in the same behavior as clicking Save on a standard Account edit page.
- Use a standard list controller
Choose this option to create a Visualforce page that can display or act on a set of records. Examples of existing Salesforce pages that work with a set of records include: list pages, related lists, and mass action pages.
- Use a controller extension that uses Apex
Choose this option if you want to expose new functionality, customize the navigation through an application, use callouts or web services, or if you need finer control for how information is accessed for your page.
For detailed information about these options, see the Visualforce Developer Guide.
- Use a standard controller
-
Add your custom action to the Insights report.
Actions are displayed based on the data returned in the report. Make sure that you have a report that is currently returning the data your action needs.
- Open Experience Workspaces.
- Navigate to the Insights report that you want to apply your new custom action to.
-
On the report, click
 and then add your custom action from the
picklist.
and then add your custom action from the
picklist.
- Ensure that your users have the correct permissions to complete your custom action.
Depending on how you set up your custom action, after the action is executed, the user either stays on the Insights page or is redirected to a page in your internal org. Unlike our standard Insights actions, users don’t receive the standard success or failure message for custom actions.
Here’s an example of a custom action to delete all activity from an Experience Cloud site member. This custom action is great for cleaning up thesite after a spam attack.
Create a custom controller extension using an Apex class and use it in your Visualforce
page. The following DeleteAllActivityControllerExtension class is an example of a custom controller
extension.
public with sharing class DeleteAllActivityControllerExtension {

    private List<Id> ids;
    private String retURL;
    private Database.DeleteResult[] deleteResult = null;
    private Map<String, String> resultMap;
    private String success = 'success';
    private String failure = 'failure';

    public DeleteAllActivityControllerExtension(ApexPages.StandardController controller) {
        resultMap = new Map<String, String>();
        /* The IDs you select on the Insights page are stored in a comma separated string of IDs.
        This string is passed in a parameter called "idsList" */
        String idsList = ApexPages.currentPage().getParameters().get('idsList');
        //The return URL to the Insights page is passed in a parameter called "retURL"
        retURL = ApexPages.currentPage().getParameters().get('retURL');
        ids = idsList.split(',');
    }

    public PageReference deleteAllActivity() {
        deleteFeedPosts();
        deleteFeedComments();
        //Include these two lines of code to be redirected to the Insights page after you click the action.
        PageReference retPage = new PageReference(retURL);
        retPage.setRedirect(true);
        Integer failureCount = calculateFailureCount();
        Integer successCount = ids.size() - failureCount;
        retPage.getParameters().put(success, String.valueOf(successCount));
        retPage.getParameters().put(failure, String.valueOf(failureCount));
        return retPage;
   }

   private void deleteFeedPosts() {
        List<FeedItem> feedItems = [Select Id, CreatedById FROM FeedItem WHERE CreatedById IN :ids];
        deleteResult = Database.delete(feedItems, false);
        //Update the resultMap with failures to calculate the failureCount
        if(deleteResult != null) {
            for(Integer i=0;i < deleteResult.size();i++) {
                if (!deleteResult.get(i).isSuccess()) {
                    for(Database.Error error : deleteResult.get(i).getErrors()) {
                        resultMap.put(string.valueOf(feedItems.get(i).CreatedById), failure);
                    }
                }
            }
        }
   }

   private void deleteFeedComments() {
        List<FeedComment> feedComments = [Select Id, CreatedById FROM FeedComment WHERE CreatedById IN :ids];
        deleteResult = Database.delete(feedComments, false);
        //Update the resultMap with failures to calculate the failureCount
        if(deleteResult != null) {
            for(Integer i=0;i < deleteResult.size();i++) {
                if (!deleteResult.get(i).isSuccess()) {
                    for(Database.Error error : deleteResult.get(i).getErrors()) {
                        resultMap.put(string.valueOf(feedComments.get(i).CreatedById), failure);
                    }
                }
            }
        }
   }

   private Integer calculateFailureCount() {
       Integer failureCount = 0;
       for (String result : resultMap.values()) {
            if (failure == result) {
                failureCount++;
            }
        }
        return failureCount;
   }

}
This code creates a Delete All Activity button in your Insights report. This button deletes all posts and comments for any selected members. If you wanted to delete all private messages and files too, you could expand the code.
- This code example doesn’t include any permission checks. This custom action only works for admins.
- The IDs for the items you selected on the Insights report are passed to the
Visualforce page using the
idsListparameter.
The following Visualforce markup shows how the custom controller extension can be used in a page.
<apex:page standardController="User"
extensions="DeleteAllActivityControllerExtension" action="{!deleteAllActivity}"
/>