
You are here:
Create a Custom robots.txt File for Your Experience Builder Site
The robots.txt file for your site is automatically generated. It allows search engines to crawl your entire site. However, if you want to tell search engines not to crawl certain pages of your public site, you can create a custom robots.txt file.
Required Editions
| Available in: Salesforce Classic (not available in all orgs) and Lightning Experience |
| Available in: Enterprise, Performance, and Unlimited Editions |
| Applies to: LWR and Aura sites |
| User Permissions Needed | |
|---|---|
| To create a Visualforce page and robots.txt file for your site: | Create and Set Up Experiences |
Use a Visualforce page to create a custom robots.txt file. Then add the URLs of the pages that you want search engines to crawl to the Allow section, and add the URLs that you don’t want search engines to crawl to the Disallow section. A common way to use a custom robots.txt file is to disallow your entire site and then selectively allow search engines to crawl individual pages.
Disallow: /   # hides everything from ALL bots
Allow: /<path-prefix-1>/s  # add path you want to open to bots
Allow: /<path-prefix-2>/s  # add path you want to open to bots
Sitemap: http://<site_URL>/s/sitemap.xml
Pages whose URLs you add to the Disallow section can still appear in search results. For example, if an allowed web page points to a disallowed URL, a search engine can index the URL when it’s crawling the allowed web page. Learn more in Google’s Search Central Documentation. To hide or block a public site page from search results use the noindex meta tag.

-
In a text file, create a list of include (Allow) and exclude (Disallow) directives for
the areas of your site that you want to expose to or hide from search engines. Also
include the path to all sitemaps for the domain—for example,
https://<site_URL>/s/sitemap.xml.Only relative URLs are valid for Allow and Disallow directives. - To create a Visualforce page, from Setup, in the Quick Find box, enter Visualforce Pages. Then select Visualforce Pages, and click New.
-
Give the custom file a name. You can even call it robots.
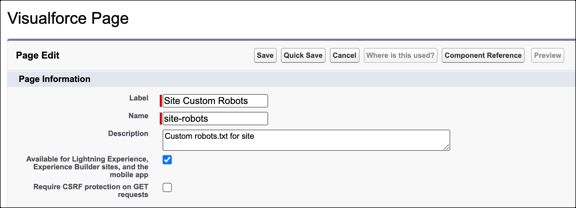
- Select Available for Lightning Experience....
-
Copy your list of indexing directives and the sitemap path from the text file to the
Visualforce page. For example:
<apex:page contentType="text/plain"> User-agent: * Disallow: / Allow: /s Allow: /mycommunity/s Sitemap: https://example.com/s/sitemap.xml Sitemap: https://example.com/mycommunity/s/sitemap.xml </apex:page> -
Save your work.
The Visualforce page is automatically saved at the root-level of the preferred domain.
- From Experience Workspaces, click Administration | Pages, and then click Go to Force.com. Then, on the Site Details page, click Edit.
-
In the Site Robots.txt field, enter the name of the Visualforce page that you created,
or click
 to search for the
file.
to search for the
file.
- Save your work.
