
You are here:
Navigation Menu
The Navigation Menu component extends your site’s navigation beyond navigational topics. Navigation menu items can include Salesforce objects, topics, pages in your site, URLs to external sites, and menu labels. Menu labels are parent headings under which you can nest other menu items. You can also enable the App Launcher to make it easy for members to switch between their sites and their Salesforce org.
- You can add up to 20 navigation menu items. Menu items that don’t fit on the first line of the navigation menu appear in a More overflow menu item.
- If you want to map a navigational topic to a menu item, you must first set it up in Experience Management.
- The Help Center and LWR templates (Build Your Own and Microsites) don’t include generic record pages. So if you create an object or global action type menu item that links to a Salesforce object, make sure that you also create the corresponding object pages. If you don't create the associated object pages, end users can’t see anything when they click the menu item.
To create or modify navigation menu items:
- Select the Navigation Menu component in the page you’re configuring.
- To display the App Launcher in existing sites, clear the checkbox for Hide App Launcher in header.
- To show an icon for Home instead of text, select Replace Home text with icon.
- In the property editor, click Navigation Menu.
 Note In the menu editor overlay, you can edit or delete existing menu items, or add new ones.
 - To add a menu item:
- Click Add Menu Item.
- Enter the name you want to use in the navigation menu for this item.
- Select the type of item you’re navigating to.
Options include:
- Event—Events like log in, log out, and account switcher.
- External URL—Links to a URL outside of your site. For example, https://salesforce.com.
- Global Action—Links to a global action. For example, New Case.
- Menu Label—Adds a parent heading for your navigation menu. Nest items underneath the menu label.
- Navigational Topic—A dropdown with links to the navigational topics in your site. Navigational topics are set up in Experience Management.
- Site Page—Links to a page inside your site using a relative URL. For example, /contactsupport.
- Salesforce Object—Available objects include accounts,
cases, campaigns, contracts, contacts, dashboards, groups,
leads, opportunities, orders, price books, products, quotes,
reports, tasks, work orders, and any custom objects.
 Tip Select this option to create a list view page for the selected object. This option is the easiest way to expose Salesforce record data in your site with minimum configuration.
 - System Link—Links to Experience Builder, Workspaces, and setup.
- Complete the fields based on the type you selected.
- If you selected Salesforce Object, select the default list view to show.
- If you selected Site Page, use the dropdown to select the site page you want to link to. The URL field automatically populates the relative URL for the page based on your selection.
- To add the Messages page to your navigation menu, replace the :recordId parameter with Home.
- If you selected External URL, enter the fully qualified URL. To keep navigation within your site, select the Open link in the same tab checkbox.
- Select Publicly Available if you want the navigation menu item to appear for guest users who aren’t members of the site.
- To move an item, click
 and drag the item to where you
want it to appear in the menu. Nest other menu items underneath a menu label by
dragging them to the right under the menu label.
and drag the item to where you
want it to appear in the menu. Nest other menu items underneath a menu label by
dragging them to the right under the menu label. - To delete a menu item, hover over or click the item and click
 .
. - To save your changes, click Save Menu. Note For these changes to be visible to users, your site must be activated in Experience Workspaces and recent changes must be published.


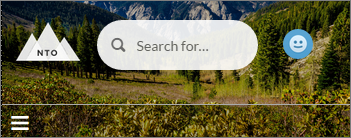
On a mobile device, your site navigation menu collapses to better fit your screen.
Sample Navigation Menu component on a mobile device:
If your site hosts users who speak different languages, you can translate your navigation menu using the Translation Workbench. However, the fallback language setting doesn’t apply to the navigation menu.
For information on using the Translation Workbench, see Translation Workbench in Salesforce Help. Make sure to publish your site after translating so the translations appear to your users.
