
You are here:
Deploy Application Approval Metadata
Download the Application Approval SFDX metadata, and deploy them to your Salesforce org.
In order to deploy the metadata, you must download Visual Code Studio (VS Code), a free, open-source code editor.
- Download and install Visual Studio Code. See Visual Studio Code.
-
Install Salesforce Extension Pack in Visual Studio Code:
- Launch Visual Studio Code.
- Click the Extensions icon.
- Search for Salesforce Extension Pack and click Install.
-
Create a project in Visual Studio Code:
- Press Ctrl+Shift+P (Windows) or Cmd+Shift+P (macOS) to make the command palette appear.
- Type and select SFDX: Create Project with Manifest.
- Select Standard.
- Enter any project name, press enter.
- Select a location on your computer for the project files to go.
- Click Create Project.
-
Authenticate your target org:
-
Press Ctrl+Shift+P (Windows) or Cmd+Shift+P (macOS).
The command palette opens.
- Enter SFDX: Authorize an Org, and then select SFDX: Authorize an Org.
- To accept the default login URL, press Enter.
-
Enter an alias.
For example, enter Astro.A new Salesforce login window opens in a browser.
- Log in to your target org.
-
When you are asked to grant access to the connected app, click Allow, and then close the browser window.
The command-line terminal window shows a message when the authentication is successful.
-
Press Ctrl+Shift+P (Windows) or Cmd+Shift+P (macOS).
-
Download and extract the metadata file.
- Download this datapack to your local desktop: EUC_ProgramApplnApproval_Sfdx_Datapacks.zip.
- Create a ProgramApplnApproval_SFDX folder in your local desktop.
- Extract EUC_ProgramApplnApproval_Sfdx_Datapacks.zip to the ProgramApplnApproval_SFDX folder
-
In the folder, create the file sfdx-project.json which contains the following code:
{ "packageDirectories": [ { "path": "salesforce_sfdx", "default": true } ], "namespace": "", "sfdcLoginUrl": "https://login.salesforce.com", "sourceApiVersion": "59.0" } -
Move the package.xml file from salesforce_sfdx/main/default to the ProgramApplnApproval_SFDX folder.
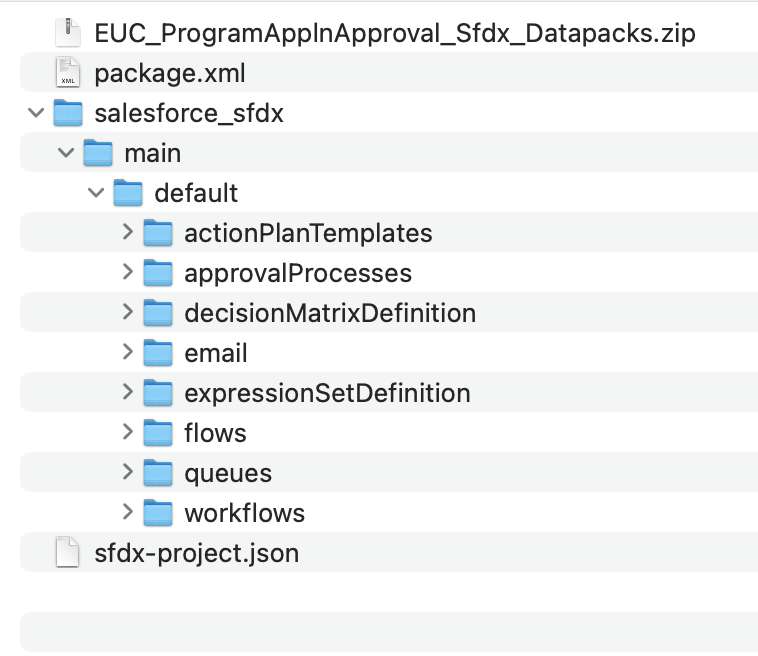
- Open ProgramApplnApproval_SFDX in Visual Studio Code.
-
Deploy components from to your target org.
-
In VSCode, in the left panel, right-click the salesforce-sfdx folder.
For Mac devices, CMD + click the salesforce-sfdx folder.
-
Click SFDX: Deploy Source to Org.
If deployment fails for any component, select the components that failed and deploy them individually.
-
In VSCode, in the left panel, right-click the salesforce-sfdx folder.
Did this article solve your issue?
Let us know so we can improve!
