
You are here:
How to Create an Expression Set That Uses Context Definition
This example shows how to associate a context definition with an expression set, and how to use the local list variables in the expression set version. The example also shows how to verify if the expression set version works as expected.
Required Editions
Consider these recommendations when you design expression sets that use context definitions.
- You can save a version of a context-based expression set without explicitly marking any step as an output step, and manage the output by using the context mapping itself.
- Configure the decimal scale in the expression set version properties to correctly round off the results of the calculations that involve context variables.
- Select a context definition that does not have a reference context definition.
- Create the hierarchy of the context definition in the expression set using local list variables.
| Available in: Lightning Experience |
| Available in: Enterprise, Unlimited, and Developer Editions for Industries clouds that have Business Rules Engine and Context Service enabled |
To encourage writers to publish their blog posts on their platform, a new blogging platform is offering an introductory, short-term income opportunity. Blog writers are entitled to an income based on the number of views, comments, and likes for their blog posts. Each blog post published on the platform is entitled to a flat income of $10. In addition, the writers are entitled to $0.20 per like and comment, and $0.10 per view.
The platform’s marketing team asks their rule designer and Salesforce admin to create an automated rule that instantly shows the writers their earnings in real time.
The rule designer and the platform’s Salesforce admin divide the requirement into these tasks.
- Create a Context Definition to Define the Blog Data Structure
The definition has the complete set of information that’s required to build the expression set to calculate the income based on the views, likes, and comments on each blog post. - Map the Definition to Data Sources and Activate the Definition
After you create the context definition, map the definition’s nodes and attributes to sObjects and their fields. The mapping feeds data into the definition. - Create an Expression Set to Calculate Blogging Income
In this example, the expression set is associated with the BlogDetails context definition. When you open the expression set version, you can use the context definition’s tags as list variables in the version’s steps.
Create a Context Definition to Define the Blog Data Structure
The definition has the complete set of information that’s required to build the expression set to calculate the income based on the views, likes, and comments on each blog post.
Required Editions
| User Permissions Needed | |
|---|---|
| To create and activate a context definition: | Context Service Admin |
- From Setup, in the Quick Find box, enter Context Definitions, and then select Context Definitions.
- Click New.
- For Name, enter BlogDetails.
-
Enter the effective start and end dates for the definition.
To use a context definition in an expression set, enter a start date that’s before the expression set’s start date, and enter an end date that’s after the expression set’s end date.
- Click Next.
-
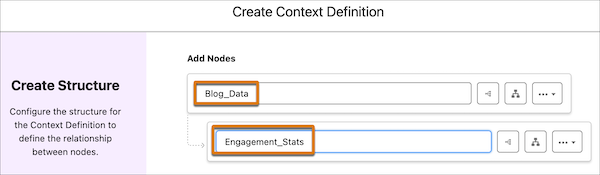
To define the relationship between the definition’s nodes, create the definition’s
structure.
-
Add a top-level node named Blog_Data.
This node represents all attributes related to blogging data, including the child nodes and their attributes.
- Add a child node named Engagement_Stats.
-
Add a top-level node named Blog_Data.
- Click Next.
-
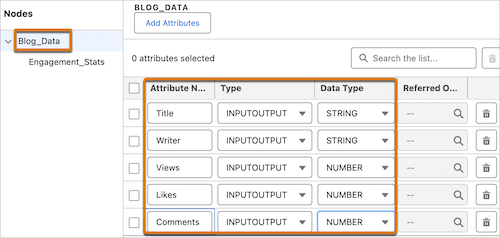
Add attributes to each node, select whether the attribute is used as input, output, or
both, and select the data type for each attribute.
Here are the attributes in the Blog_Data and Engagement_Stats nodes respectively.

-
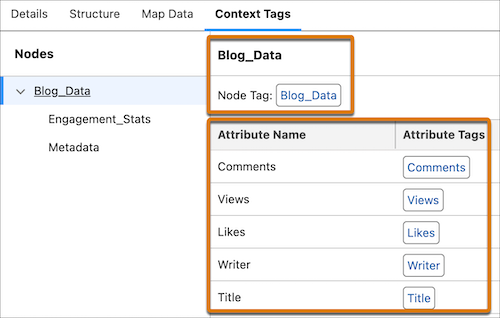
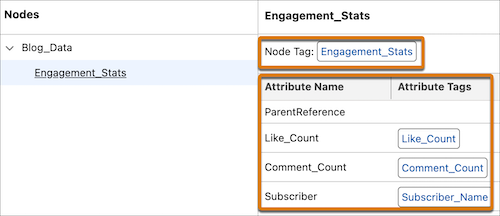
Click Next, and click Generate All
Tags.
Tags appear as list variables in versions of the expression sets that are associated with context definitions.
Here are the tags for the nodes and their attributes.
- Save the definition.
Map the Definition to Data Sources and Activate the Definition
After you create the context definition, map the definition’s nodes and attributes to sObjects and their fields. The mapping feeds data into the definition.
Required Editions
| User Permissions Needed | |
|---|---|
| To create and activate a context definition: | Context Service Admin |
In this example, we’re mapping the BlogDetails context definition’s nodes and attributes to the Blog and Blog Engagement custom objects, which we’ve already created. These objects have fields that are similar to the attributes in the context definition’s nodes.
- From Setup, in the Quick Find box, enter Context Definitions, and then select Context Definitions.
- To open the BlogDetails definition to map the data, select the BlogDetails from the definitions list.
- Select Map Data.
-
Click Add Mapping.
The mapping page opens on a new tab.
-
Provide mapping details.
- For name, enter Blog_Readership.
- Enter a description.
- For Mapping Type, select Automatic sObject mapping.
- Select Mark as Default.
- Click Map.
-
Map the context definition’s nodes and attributes to sObjects and their fields.
- Click Select Objects.
-
Search for the objects.
In this example, we selected Blog__c and Blog_Engagement__c.
 Tip If you can’t find a custom object, search with the object’s API name.
 - Click Done.
- To map the nodes to sObjects, select a node and then select the object. This mapping forms a connection between the node and the object.
-
To map attributes to sObject fields, select an attribute and then select the field.
This mapping forms a connection between the attribute and the field.
 Note Always map the definition’s nodes before mapping the attributes.
 - Save the mapping.
- Return to the context definitions list.
-
To activate the BlogDetails context definition, click
 for the
definition, and select Activate.
for the
definition, and select Activate.
Your context definition is now ready to be used in the expression set.
Create an Expression Set to Calculate Blogging Income
In this example, the expression set is associated with the BlogDetails context definition. When you open the expression set version, you can use the context definition’s tags as list variables in the version’s steps.
Required Editions
| User Permissions Needed | |
|---|---|
| To create an expression set that uses a context definition: | Rule Engine |
| To use the definition’s tags as list variables in the expression set’s version steps: | Rule Engine |
-
From the App Launcher (
 ), find and select Business Rules Engine.
- Click the app navigation menu, and then select Expression Sets.
- Click New.
-
Create the expression set.
- For name, enter Calculate_Blogging_Income.
- Select Default as the usage type.
- For context definition, select BlogDetails.
- Save the expression set.
-
From the Expression Set Versions area, select Calculate_Blogging_Income
V1.
The version opens in Expression Set Builder.
-
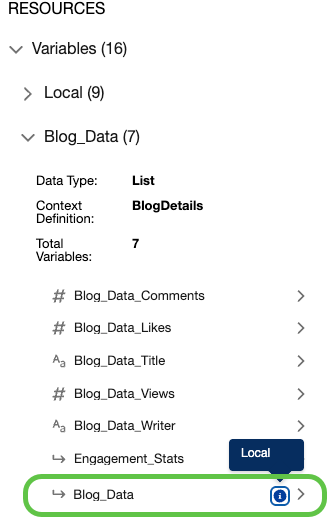
To create local list variables,
- Click icon
- Click Add Resource.
- In Resource Type, select Local List Variable.
- In Level, select Node.
- In Parent Node, select the node in the context definition.
- Enter the Resource Name and Data Type.
- Save your changes.
-
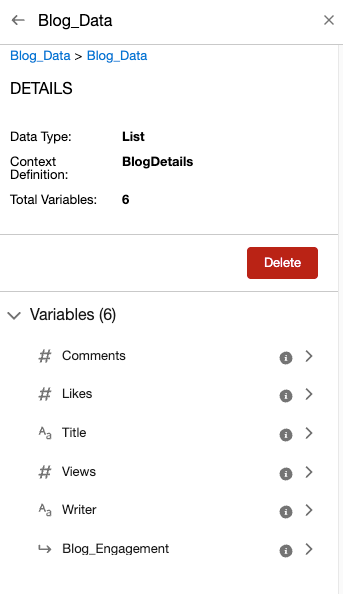
Continue to create the nodes and attributes you need to use in the expression set
version.
The hierarchy of the local list variables appears in the list of tags for the context definition.
-
Create the additional resources to be used in the version.
- Click Add Resource.
-
For the first resource, specify these details, and click Done and
New.
Resource Type: Constant, Resource Name: Blog_Flat_Rate, Data Type: Currency, Default Value: 10.
-
For the second resource, specify these details, and click
Done.
Resource Type: Variable, Resource Name: Blog_Income, Data Type: Currency
-
Set the properties of the expression set version.
-
To open the Expression Set Properties panel, click
 .
.
- Enter a start date time and an end date time for the expression set version.
- Enter a rank number.
-
Enter a decimal scale.
The decimal scale represents the number of decimal places to round off the calculation step results that involve context variables to the required precision.
- Close the Expression Set Properties panel.
-
To open the Expression Set Properties panel, click
-
On the builder canvas, add a step to calculate the number of likes per blog post by the
platform’s subscribers.
-
Click
 , and select Calculation.
- In the Formula field, search for and select LISTSUM.
- Replace ListVariable inside the parenthesis with Like_Count.
- For Output Variable, select Likes.

Here, Like_Count is lower in the context definition’s node hierarchy than Likes. When the LISTSUM function sums the number of likes across subscribers per blog post, the sum is stored in the Likes variable, which is above Like_Count in the node hierarchy.
-
Click
-
Calculate the number of comments per blog post by the platform’s subscribers.
-
Click , and select Calculation.
- In the Formula field, search for and select LISTSUM.
- Replace ListVariable inside the parenthesis with Comment_Count.
- For Output Variable, select Comments.
-
Click
-
Add the condition logic to filter blogs based on their total views, likes, and
comments.
-
Click , and select List Group.
-
In the list filter, for Resource, select Views, for
Operator, select Greater than or Equal, and for Value, enter
100.
This expression represents the condition, Views are greater than or equal to 100.
- To add a condition, click Add Condition.
-
For Resource, select Likes, for Operator, select
Greater than or Equal, and for Value, enter
10.
This expression represents the condition, Likes are greater than or equal to 10.
- To add another condition, click Add Condition.
-
For Resource, select Comments, for Operator, select
Greater than or Equal, and for Value, enter
5.
This expression represents the condition, Comments are greater than or equal to 5.
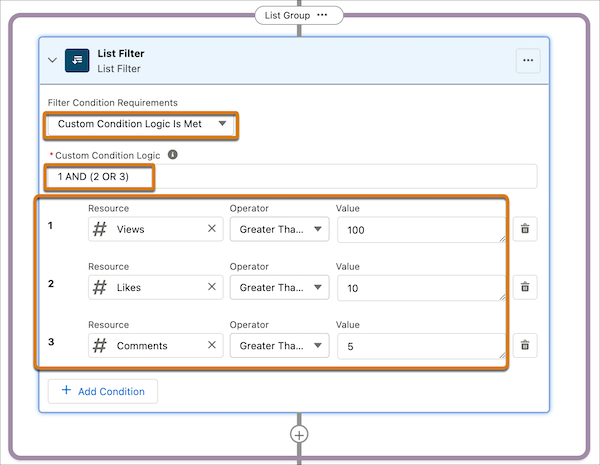
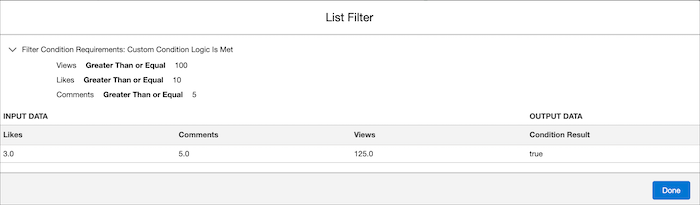
- In the list filter, for Filter Condition Requirements, select Custom Condition is Met.
-
For Custom Condition Logic, enter 1 AND (2 OR 3).
The custom logic indicates that the list filter’s conditions evaluate to true when the first condition and either the second or the third condition are met.
-
Click
-
Calculate the blogging income for the filtered list items.
-
In the list group, after the list filter, click .
- Select Calculation.
-
In the Formula field, enter Blog_Flat_Rate + ( 0.10 * Views ) + 0.20 * (
Likes + Comments ).
The formula represents how the blogging income is calculated. Each blog post earns the writer a flat blog rate of $10, which is stored in the Blog_Flat_Rate resource. The writer is entitled to $0.10 per view on the blog post. The income from the view is calculated by multiplying the number of views with 0.10. The writer is entitled to an additional income of $0.20 per like and comment on the blog post. The income from the likes and comments is calculated by adding the number of comments and likes per post, and multiplying the number by 0.20. The income from the likes, views, and comments is then added to the blog flat rate.
-
In the Output Variable field, select Blog_Income.
The Blog_Income variable stores the output of the calculation formula for the total blog income.
-
In the list group, after the list filter, click
-
To see a version step’s output when the expression set version runs, select the step
element, click
 , and select Include in output.
- Save the version.
-
To verify that the steps work as expected, simulate the version.
- Click Simulate.
-
For Input Mode, select Advanced.
When you use list variables in an expression set, always use the Advanced input mode to pass sample values for simulation.
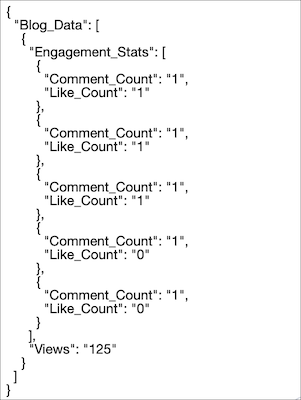
-
Modify the JSON input template with these sample values.
-
Click Simulate.
The list filter returns one matching result based on the filter criteria.
The calculation step in the list group returns the blogging income for the blog post that meets the filter conditions.
