
You are here:
Create a Flow for Prior Authorization Check
A Salesforce Flow brings the Context Service and Business Rules Engine components on a single platform and helps you run the scenario to experience how these components work together to give the expected results. Create a flow to test the Health Cloud scenario and verify if you're getting the expected results. In this flow, you first add a screen component to capture the user inputs. Then, use the Get Records elements to fetch the Context IDs that you use to hydrate context data. Add a loop element to find the prior authorization and benefit details for each service code. Use a Build Context action element inside the loop to hydrate data from the Member Plan object and its child nodes. Then, add an action element to call the expression set that uses the hydrated data to get the prior authorization check status for each service code and the corresponding coverage benefit details and approval status.
Required Editions
| Available in: Lightning Experience |
| Available in: Enterprise and Unlimited Editions for clouds that have Business Rules Engine enabled |
| User Permissions Needed | |
|---|---|
| To create a flow: | Manage Flow |
| To invoke an expression set: | Rules Engine Runtime |
- From Setup, in the Quick Find box, enter Flows, and then select Flows.
- Click New Flow.
- Select Start From Scratch, and then click Next.
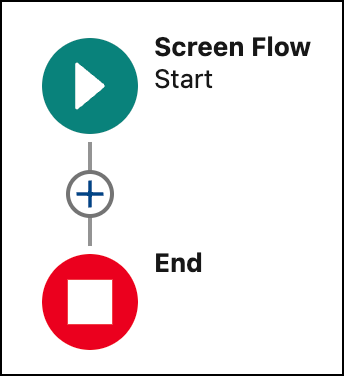
- Select Screen Flow, and then click Create.
Create a User Input Screen
-
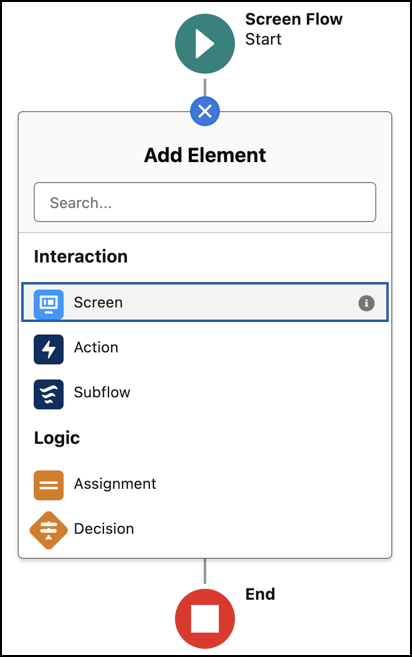
Click
 .
.
- Select the Screen interaction element.
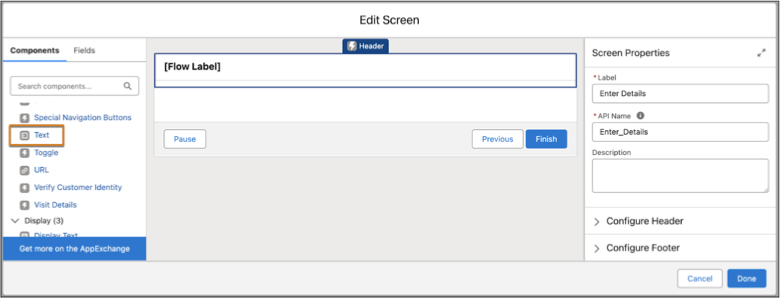
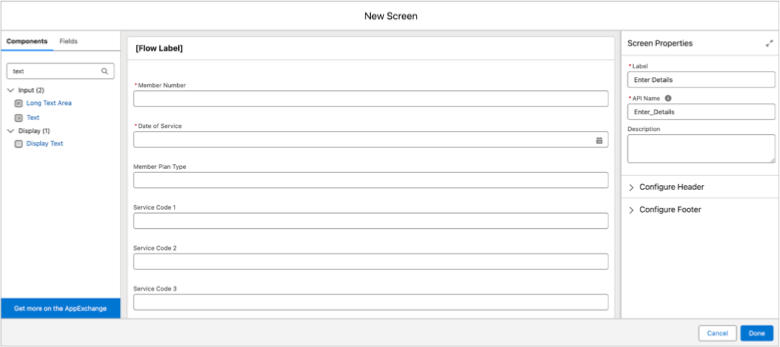
- In the Screen Properties section, enter Enter Details as the label.
- Drag the Text component from the Components list to the Header component.
-
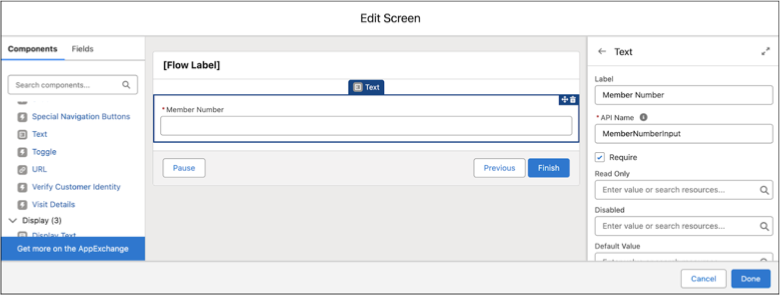
Add the Text details.
- Label: Member Number
- API Name: MemberNumberInput
- Select Require.
- Drag the Date component from the Components list to the Member Number text component.
- Under Date, enter Date of Service as the label.
- Select Require.
- Drag the Text component to the Date of Service date component.
- Under Text, enter Member Plan Type as the label.
- Similarly, add these service code details in sequence.
- Click Done.
- Save your changes.
- Enter Health Care Prior Authorization Check as the flow label.
- Save your changes.
Assign Variables to Service Codes
-
Click after the Enter Details element.
- Select the Assignment element.
- In Label and API Name, enter ServiceCodeList.
-
Enter the variable values.
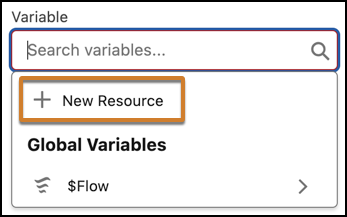
- Click in the Variable field.
- Select New Resource from the dropdown.
- Select Variable as the resource type.
- Enter c_ServiceCode as the API name.
- Select Text as the data type.
- Select Allow multiple values (collection).
- Click Done.
- Select Add as the operator.
- Click in the Value field, and select the Service Code 1 screen component.
- Click Add Assignment.
-
Similarly, add these variable values.
Variable Operator Value c_ServiceCode Add Service Code 2 c_ServiceCode Add Service Code 3 c_ServiceCode Add Service Code 4
Add Context IDs
-
Click after the ServiceCodeList element.
- Select the Get Records element.
- Enter Get Context Definition Id as the label.
- Select Context Definition as the object.
-
Under Filter Context Definition Records, add these details.
- Select All Conditions Are Met (AND) as the condition requirement.
- Select DeveloperName as the field.
- Select Equals as the operator.
- Enter Get_MemberPlan_Details as the value.
- Save your changes.
-
Click after the Get Context Definition Id element.
- Select the Get Records element.
- Enter Get Context Version Id as the label.
- Select Context Definition Version as the object.
-
Under Filter Context Definition Version Records, add these details.
- Select All Conditions Are Met (AND) as the condition requirement.
- Select ContextDefinitionId as the field.
- Select Equals as the operator.
- Enter Context Definition from Get_Context_Definition_Id > Context Definition Id as the value.
- Save your changes.
-
Click after the Get Context Version Id element.
- Select the Get Records element.
- Enter Get Mapping Id as the label.
- Select Context Mapping as the object.
-
Under Filter Context Mapping Records, add these details.
- Select All Conditions Are Met (AND) as the condition requirement.
- Select ContextDefinitionVersionId as the field.
- Select Equals as the operator.
- Enter Context Definition Version from Get_Context_Version_Id > Id (Context Definition Version Id) as the value.
- Save your changes.
Hydrate Member Plan Object and Child Nodes Data
-
Click after For Each.
- Select the Action element.
- Find and select the Build Context action.
- Enter Hydrate data from Member Plan Object and its child nodes as the label.
-
Under Set Input Values for the Selected Action, add these details.
- Select Context Definition from Get_Context_Definition_Id > Context Definition Id as the context definition.
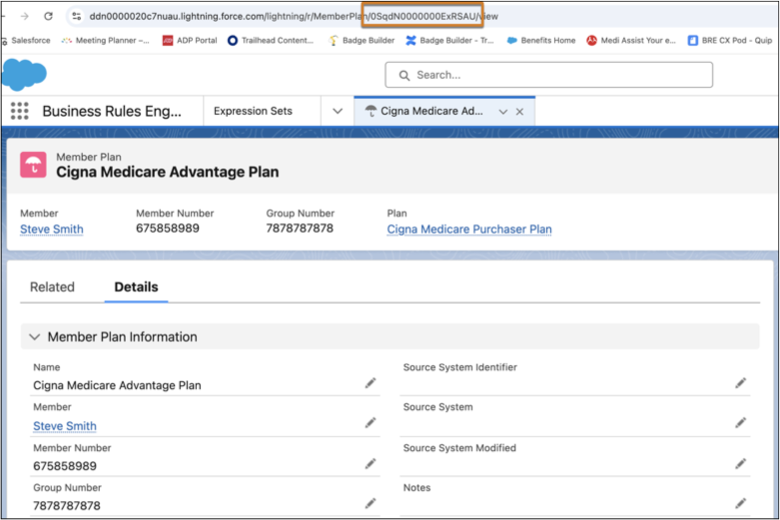
- Turn on Context Data and enter {"MemberPlan":[{"id":"<record id>","businessObjectType":"MemberPlan"}]}. To get the record ID, open the Cigna Medicare Advantage Plan member plan record that you created earlier and copy the record ID from the URL. Paste the record ID in the <record id> placeholder. For example, 0SqdN0000000ExRSAU is the record ID shown in the screenshot.
- Turn on Context Mapping and select Context Mapping from Get Mapping Id > Context Mapping Id as the context mapping.
- In the Show advanced options section, select Let the flow decide (Recommended) as the transaction control.
- Save your changes.
Assign Service Code
-
Click after the Hydrate data from Member Plan Object and its child nodes
element.
- Select the Assignment element.
- In Label and API Name, enter Assign Service Code.
-
Under Set Variable Values, add these details.
- Click in the Variable field.
- Select New Resource from the dropdown.
- Select Variable as the resource type.
- Enter ServCode as the API name.
- Select Text as the data type.
- Click Done.
- Select Equals as the operator.
- Click in the Value field, and select Current Item from Loop Loop_through_Service_Codes.
- Save your changes.
Fetch Expression Set Details
-
Click after the Assign Service Code element.
- Select the Action element.
- Find and select the Member Plan Status Check-Bre action.
- Enter Member Plan Details as the label.
-
Under Set Input Values for the Selected Action, add these details.
- Turn on DateOfService and select Enter Details > Date of Service as the date of service.
- Turn on MemberNumberInput and select Enter Details > Member Number.
- Turn on Get_MemberPlan_DetailsId select Outputs from Hydrate data from Member Plan Object and its child nodes > Context Id.
- Turn on ServiceCode and select ServCode.
- Save your changes.
Assign Output Values
-
Click after the Member Plan Details element.
- Select the Assignment element.
- Enter Output Values from Expression Set as the label.
- Enter OutputValues as the API name.
-
Under Set Variable Values, add these details.
- Click in the Variable field.
- Select New Resource from the dropdown.
- Select Variable as the resource type.
- Enter c_PriorAuthDetermination as the API name.
- Select Text as the data type.
- Select Allow multiple values (collection).
- Click Done.
- Select Add as the operator.
- Click in the Value field, and select Outputs from Member_Plan_Details > PriorAuthDetermination.
- Save your changes.
Show Results
-
Click after the Output Values from Expression Set element.
- Select the Screen element.
- Enter Result Screen as the label.
- Drag a Display Text component to the Header component.
- Enter Results as the API name.
- In the text input field, enter Prior Authorization Determination - and click in the Insert a resource field.
- Find and select Outputs from Member_Plan_Details > PriorAuthDetermination.
- Click Done.
- Save your changes.
- Click Activate.