You are here:
EPC Project Management
You can manage the lifecycle status of EPC Projects, move changes among EPC Projects, review the changes in a Project, remove changes from a Project, change Project owners, and remove projects.
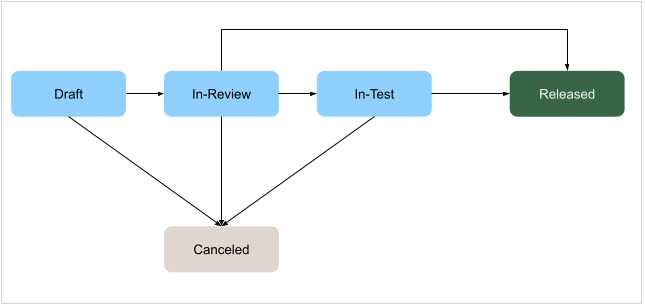
EPC Projects have the following default states.
-
When you change the Lifecycle Status for the project, all referenced project items that are versioned (product, object type, and picklist) are set to the same state.
-
You can’t move an item from one project to another if its Lifecycle Status is set to Released.
-
You can’t delete an item from a project if its Lifecycle Status is set to Released.
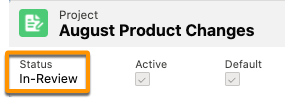
When you open a project, its status is shown in the header area.
You can modify an EPC project as the following table describes.
Task |
Steps |
|---|---|
Change a project. |
From the Projects page, click the arrow on the project row, and select Edit. |
Remove a project. |
From the Projects page, click the arrow on the project row, and select Delete. The change itself isn’t removed. |
Assign the project to a new owner. |
From the Projects page, click the arrow on the project row, and select Change Owner. In the Change Owner dialog box, search for the name of the new owner, select, and click Submit. |
Change a project's status |
You can change a project's status in two ways.
|
Move a change to a different project. |
Move a change from one project to another. You can move only one change at a time. Only the owner of the project can move items. You can’t move an item for a project if its Lifecycle Status set to Released. Only moving of whole bundles starting from root product is supported. Intermediate parents or child items can’t be moved on their own without moving the whole bundle. If any items conflict with existing items, you’re warned and can cancel or continue with the move. If you click Proceed in the dialog box, the matching root is deleted in the root’s hierarchy in the target workset, and the new hierarchy inserted in its place.
|
Remove a change from a project. |
Delete an item from the change history in a project. Only the owner of the project can remove items. You can’t delete an item for a project if its Lifecycle Status set to Released. The change itself isn’t removed.
|
Review the changed item. |
From the list of changes in a project, click the arrow for a change item and select View Item. The object with the change opens on a new page. |