You are here:
Export a Product Report in Product Designer
To help with audits and product reviews, export a report of products with their properties and attributes. The report is saved as a .xslx file.
Before You Begin
Run the Install Datapack for Product Report. Run this job once. Running it again overwrites customized Omnistudio Data Mappers and Integration Procedures that are included for the product report.
The report is limited to 30 products, so you must use filters to limit the products. If you’ve more than 30 products filtered, no report is created. The report is created and downloaded to your computer as a file named report.xslx.
See Export a Product Report in Product Designer for a description of the reports.

-
In the Vlocity Product Designer, click the
 button, and select Products.
-
Select a list view.
The report includes only the products that are included in a filter. Products that don’t match the filter values aren’t exported.
 Note
NoteSelecting the checkboxes for products doesn’t change the products included in the report.
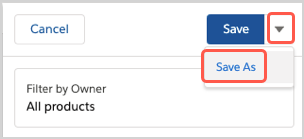
- To create a view, click Show Filters, add filters to show specific products, and click Save As.
-
Click Generate Report.
The report generation time vary depending on the number of products, their attributes, and the Apex governance limits.
-
In the Select Report Options dialog box, choose the data to include in the export, and click Generate.
-
Product with Attributes — This report has two tabs: one that shows a list of products and another that shows attributes by product.
-
Products Only — This report has one tab that shows a list of products.
-
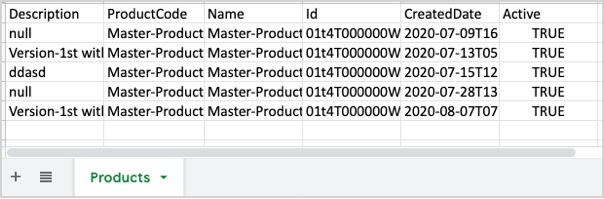
The Product Only report shows all the products and the Description, Product Code, Name, ID, Created Date, and Active columns for each.
The Products with Attribute report shows two tabs:
-
Products — Each product shows the Description, Product Code, Name, ID, Created Date, and Active columns.
-
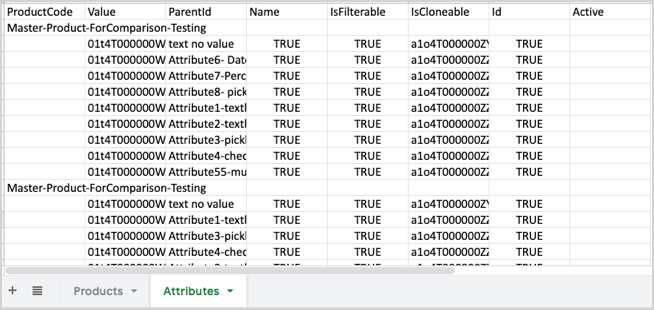
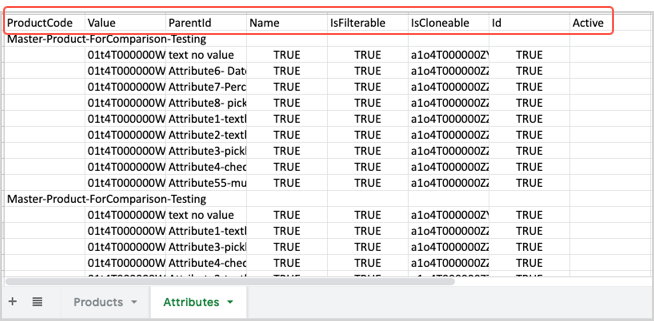
Attributes — The attributes are grouped by product and include the Product Code, Value, ParentID, Name, IsFilterable, IsCloneable, and Active columns.
Configure the Product Attributes Report
For the product attribute report in the Product Designer, you can modify integration procedures to set the columns, or fields, are used for the products and attributes.
Before You Begin
Run the Install Datapack for Product Report. Run this job once. Running it again overwrites customized DataRaptors and Integration Procedures that are included for the product report.
The report includes a list of the products and all their attributes with default columns for each product and attribute. To change what columns are in the report, you can edit the UPC/ExtractProductInformation Vlocity integration procedure. While you can add or remove these columns, you can't select which attributes are reported.
- Open the Vlocity Integration Procedures tab.
- Expand and open the most recent version of UPC/ExtractProductInformation.
- Click Create Version.
- Expand the FilteredProductCondition block.
-
Expand and select the corresponding blocks for the type of report to modify.
Report
Steps
Products and attributes report
-
Expand the ProductsWithAttribute block.
-
Click FilteredProductExtractor.
Products-only report
-
Expand the ProductsWithAttribute block.
-
Click FilteredProductsOnlyExtractor.
-
-
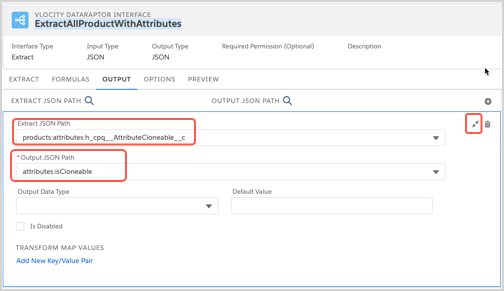
In the Properties tab, click the link icon to open the associated DataRaptor page.
-
ExtractAllProductWithAttributes is for the products and attributes report.
-
ExtractAllProducts is for the products-only report.
-
-
On the DataRaptor page, click the Output tab, and change the mappings.
Task
Steps
Add a report column
-
Click the + icon to add a mapping, and select from the Extract JSON Path list.
-
For the Output JSON Path, enter a value.
-
For attributes, you must use the attributes: prefix, such as attributes:IsFilterable.
-
Product fields don’t require a prefix, such as active.
-
Use a descriptive name of your choice.
-
-
Click the Collapse button.
Remove a report column
Click the Delete icon.
NoteDon’t remove the products:ProductCode extract JSON path because it’s required to match products for the report.
-
- In the Product Information Extractor tab, click Save and, if ready to use, Activate Version.