
Configure and Assign Actionable Lists
Prioritize actionable lists based on business goals, and help agents engage with prospects.
Required Editions
| Available in: Lightning Experience |
| Available in: Enterprise, Professional, Starter, and Unlimited Editions with the required add-ons |
| User Permissions Needed | |
|---|---|
| To configure and assign actionable lists: | Actionable Segmentation permission set |
To help agents prioritize prospects, select a priority for an actionable list. To guide the agents through the business process associated with the actionable list, set up an OmniScript. Finally, assign the actionable list to agents for them to engage with the prospects and do business with them.
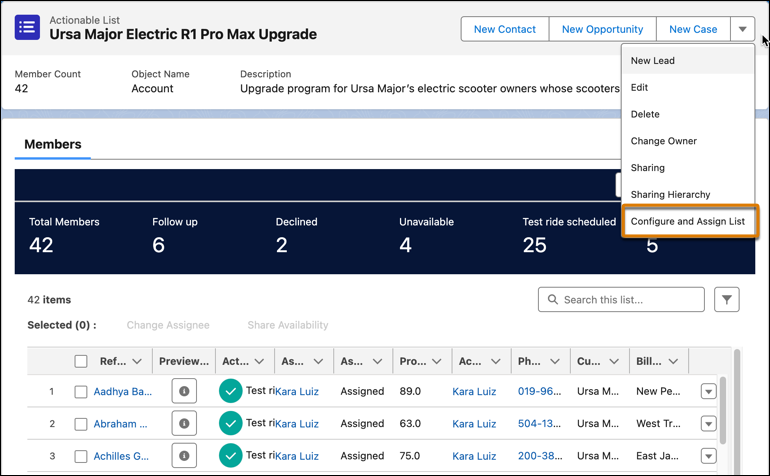
- Click Configure and Assign List on the Actionable List record page.
-
Select a priority for the actionable list:
- Low
- Medium
- High
-
If you want to show an OmniScript in the Actionable List Engagement component,
enter the OmniScript’s key in the CheckType/CheckSubType/Language format.
To find the CheckType/CheckSubType data, from the App Launcher, find and select OmniStudio, and then go to the Type column of the OmniScripts tab. To find the language information, go to the Language column.
The key must be of an active OmniScript.
The key mustn’t be case-sensitive.
- Click Next.
- To assign the entire actionable list to an agent, click User, and then select a user.
-
To assign the actionable list to a queue, click Queue,
and then select a queue.
Before list creators can assign a list to a queue, Omni-Channel must be enabled and the queue must exist in the Salesforce org. To enable Omni-Channel, see Enable Omni-Channel. To create a queue, see Set Up Queues.To configure a queue for routing prospects through Omni-Channel, see Route Work with Omni-Channel.The queue routes prospects to agents. When agents accept the assigned prospects through Omni-Channel, the prospects are added to Outreach List.
-
To assign each prospect in the actionable list to the respective record owner,
click Record Owner.
If the record owner of a prospect isn't active or is of the CSPLitePortal, AutomatedProcess, CloudIntegrationUser, CSNOnly, CSNExternal, DBLite, LicenseManager, SFDCAdmin, PartnerNetwork, ExternalWHO, SelfService, or Guest share type, to assign the prospect to an agent, change the record owner.If the agent isn't active or the share type of the agent is CSPLitePortal, AutomatedProcess, CloudIntegrationUser, CSNOnly, CSNExternal, DBLite, LicenseManager, SFDCAdmin, PartnerNetwork, ExternalWHO, SelfService, or Guest, to assign the prospect, change the agent.
When configuring an actionable list for the first time, list creators can select an assignment type and turn on Future Assignment Rule. In the rule, list creators can select either the current assignment type or a different assignment type. If new prospects are added to the actionable list in the future, the rule assigns the prospects to agents automatically. In a configured list, list creators can modify only Future Assignment Rule. The list creators can't modify the current assignment details.
If list creators decide to turn off Future Assignment Rule, new prospects aren’t assigned to agents automatically any longer. Turning on the rule again starts automatic prospect assignment immediately.
- Click Next.
- To sort the prospects in Outreach List, select a field to sort by, and then set the sort order.
- Click Next.
- To modify the setup or assignees, click Edit.
- Save your changes.
The actionable list is configured and assigned to agents. If the actionable list has more than 200 records, list creators receive a notification email after the configuration request process is completed. List creators can submit a new configuration request only after the previous request is processed.
