
You are here:
Create a Decision Table
Create decision tables to read business rules and use the matching results in expression sets or flows. When you create a decision table, you can set the volume and complexity required for the table to match your data and business needs. You can define the source data for your decision tables as a combination of source objects and related objects, or a CSV file. You can also use ready-to-use, industry-based templates to quickly create a decision table.
Required Editions
| Available in: Lightning Experience |
| Available in: Enterprise, Unlimited, and Developer Editions for clouds that have Business Rules Engine enabled |
| User Permissions Needed | |
|---|---|
| To create, edit, and activate a decision table: | Rule Engine Designer |
| To run decision tables: | Rule Engine Designer OR Rule Engine Runtime |
-
From the App Launcher(
 ), find and select Business Rules Engine.
- Click the app navigation menu, and select Lookup Tables.
- Click New.
-
Select Decision Table, and then click
Next.
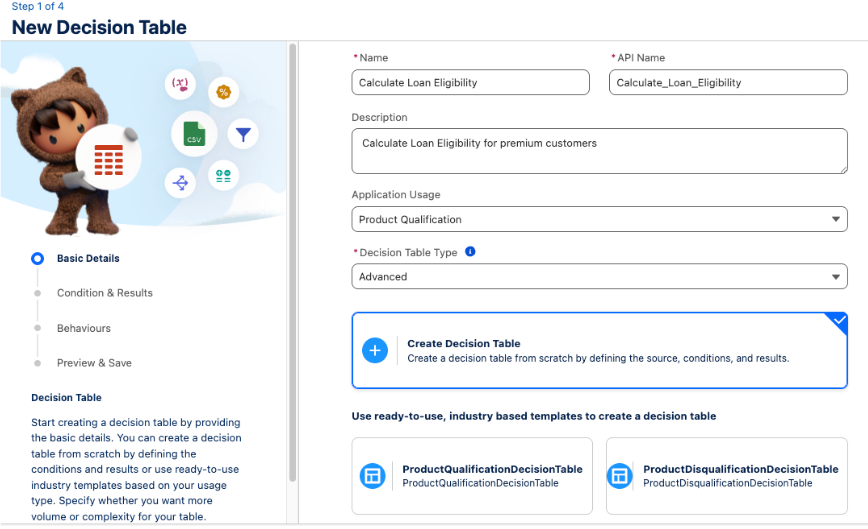
The Basic Details page appears.
-
Provide these details:
Field Description Name and API Name Enter the name of the decision table. The API name is auto-populated from the decision table name that you enter. If necessary, you can change the API name. Description Enter a meaningful description for your decision table. For example, calculate loan eligibility. Application Usage Type Relate your decision table to an existing usage type that is based on your business application. Selecting a usage type categorizes the decision table to that usage type.
When you select a decision table in an expression set version’s lookup table step, you can view only the tables that share the expression set’s usage type and the tables without a usage type.
If your usage type has ready-to-use industry templates related to it, then these templates appear when you select the usage type. You can quickly create a decision table by using these templates. The templates are available in your Salesforce org only if your Industries solution has shipped it.
Decision Table Type Select the type of decision table that you want to use based on whether you want to set your decision table for volume or complexity.
To create a decision table that supports a large volume of rows and lesser complexity, use an advanced decision table. You can include only optional columns in the logic as a combination of AND and OR condition.
In advanced decision tables, if the Equals operator has optional conditions, then the set of all optional conditions is always followed by AND to the remaining effective logic. For example, consider there are four conditions 1, 2, 3, and 4. Conditions 1 and 2 are mandatory, and conditions 3 and 4 are set as optional. The optional conditions also have the operator set as Equals. When you select the condition type as Custom, and include the optional conditions by using OR, the set of optional conditions are added to the effective logic with an AND.
1 AND 2 AND (3 OR 4).
To create a complex condition for this scenario, you can set 1 as mandatory and the remaining conditions as optional. You can then apply the complex logic on the remaining conditions. For example, 1 AND (2 AND (3 OR 4))
To create a decision table that supports complex conditions, use Standard. You can include any column in the logic by using the OR condition.
 Note Decision tables consider null values for the input conditions that are mandatory and have the operator set as Equal.
 Important When creating a decision table, consider this known behavior with advanced decision tables.
An advanced decision table returns Number field values exactly as they are stored in the database, maintaining their full decimal precision. It doesn't round the values to match the field's defined decimal scale. In contrast, a standard decision table rounds decimal values to respect the field's defined precision. For example, if a Currency field has a data type of (16,2) and stores the value 15.4444, a standard decision table returns 15.44, respecting the decimal scale precision. An advanced decision table returns 15.4444, ignoring the decimal scale precision and returning the exact database value.
-
Select Create Decision Table and then click Save
& Next.
Important If you use a ready-to-use industry template based on your application usage type to create a decision table, then all the fields are pre-populated. You can modify only the name, API name, and description. To modify the other pre-populated fields of the template, you must save the decision table, and then modify it.The Condition & Results page appears.
-
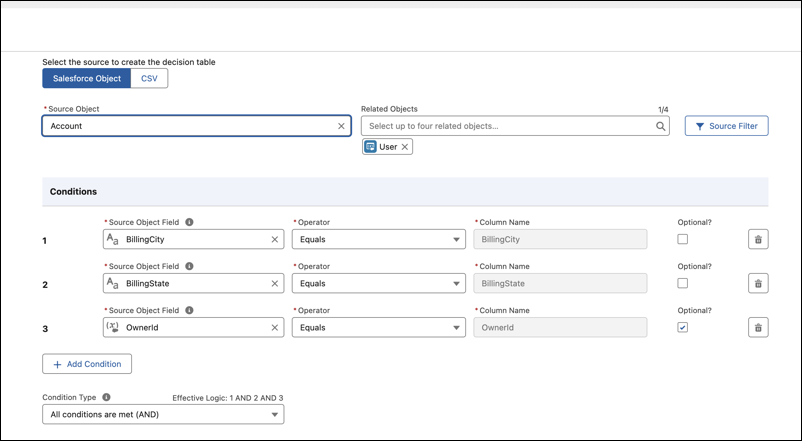
To create a decision table by using source objects, provide these details from the
Salesforce Object tab:
- From Source Object, select the object that has the data that you want to use in the decision table.
-
From Related Objects, select the objects that are related to the source
object.
You can select up to four objects that are related to the source object.Important The related objects must be within three levels of nesting from the source object.
-
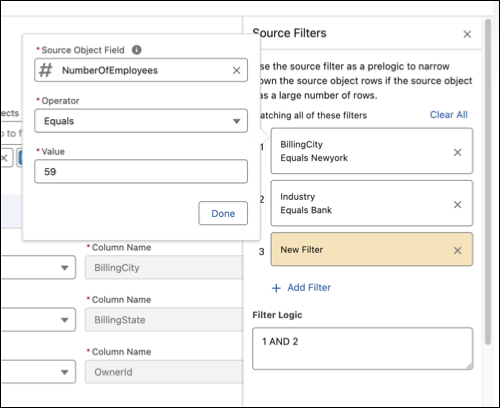
If the source object has a large number of rows, select Source
Filter, if necessary.
You can use the source filter as a prelogic to narrow down the source object rows. Add filters to your source field by selecting the required field, operator, and value. To add additional filters, select Add Filter. If you have multiple filter conditions, you can specify the logic for all filters by using AND or OR in the Filter Logic field.
-
To create a condition, in the Conditions pane, select the required field from the
Object Field list, and a comparison operator from the Operator list.
Operators specify how values in the column are evaluated. For example, when you use the Equals operator for an input column, you define the particular values that the column’s cells must have to meet the table’s lookup condition. You can also set a condition as optional.Note You can edit the column name only for the fields from related objects.
 Warning When an optional column in a decision table does not have a value, it is evaluated as TRUE in a condition.
 -
To group the decision table's rows by input fields, select Group
Condition Settings.
Grouping splits each unique combination of values in the grouping field rows into their individual group.Important The Group Condition setting is available only if you select the Standard decision table type.

-
To create multiple conditions, click Add Condition.
You can select Source Object Fields that aren't compound fields
 Tip The Number column indicates the sequence number of the fields. For example, let’s consider that you have three input fields. To use custom logic that provides an output when fields 1 and 2 match or when field 3 matches, specify the condition as: (1 AND 2) OR 3.
 -
To specify the condition logic for the input fields, select a predefined condition
type from the Condition Type list.
The decision table evaluates input values or records from the object against the logic that you specify.
-
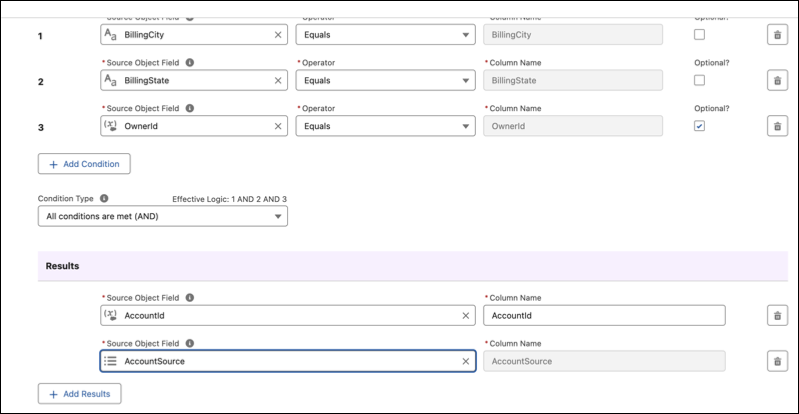
From the Results pane, select the fields that you want to use as the output
columns.
Output columns define the specific data that's returned when a query matches the input criteria. When you input a query into the table, the decision table evaluates the input rows against the defined conditions. If there are matching rows, the values from the output columns for those rows are generated as the result.
To create multiple output columns, click Add Result.
-
Click Save & Next.
The Behaviors page appears.
-
To create a decision table by using a CSV file, use the CSV tab.
Use a CSV file to create decision tables, to save the time and effort for manually creating column headers and adding row data. You must first configure the input columns and output columns when you create the decision table. You can upload the CSV file after you create the decision table. Later, you can bulk edit CSV-based decision tables by downloading them as CSV files, and overwriting the data in the decision table.Note You can use a CSV file as the source only for advanced decision tables. You can't add, delete, or edit columns of a decision table that uses a CSV file as the source. You can't sort data in decision tables that use CSV files as a source. Expression sets read multiple results only from CSV-based decision tables that return multiple outputs.
- From the Conditions pane, configure the input columns by specifying the column name, data type, and operator.
- To add more input columns, click Add Condition.
-
To specify the condition logic for the input fields, select a predefined condition
type from the Condition Type list.
A decision table evaluates input values or records from the object against the logic that you specify.
- From the Results pane, configure the output columns by specifying the column name and data type.
- To add more output columns, click Add Result.
-
Click Save & Next.
The Behaviors page appears.
-
From the Results pane, specify how you want the table’s results to be filtered by using
the Filter Result By list.
The filter that you choose determines whether you get a single matching result or multiple results. For multiple results, the filters also determine the order that the results appear in.Note An expression set can read only one result even if an object-based decision table provides multiple results. So, if you plan to use the decision table in an expression set, select First Match or Any Value, which are both specific to single values.
- If needed, sort the decision table rows by a table field and select a sort order.
-
Click Save & Next .
The Preview & Save page appears. You can preview various aspects of your decision table such as source of data, and optional fields.
- To create your decision table, click Finish.
Activate the decision table to start using it in expression sets or flows. If you update the object or the custom metadata type that contains the rules, refresh the decision table to make sure that the outcomes are based on the latest rules.
- If you use multiple Salesforce objects as the source to create a decision table, the Table tab isn't available on the decision table details page.
- If you make modifications, such as the deletion of a field, change of data type, and change of name, to the source object of the decision table, you can't use the decision table again.
- Add CSV Data to Decision Tables
When you use CSV as the source data for your decision table, you can configure only the input and output columns for the mapping. You can upload the CSV data for your decision table only after you finish creating a decision table. - Edit Decision Tables with CSV Files
Download an existing decision table as a CSV file, make bulk edits directly in the file, and upload it back. You can either append new rows of data to an existing table or overwrite the existing values. - Create Versions of CSV-Based Decision Tables
When you use CSV as the source data for your decision table, you can maintain multiple versions of the decision table. You can activate multiple versions, and assign ranks for managing conflicts.