You are here:
Map Image Tokens in the Omnistudio Data Mapper for Server-Side Omnistudio Document Generation
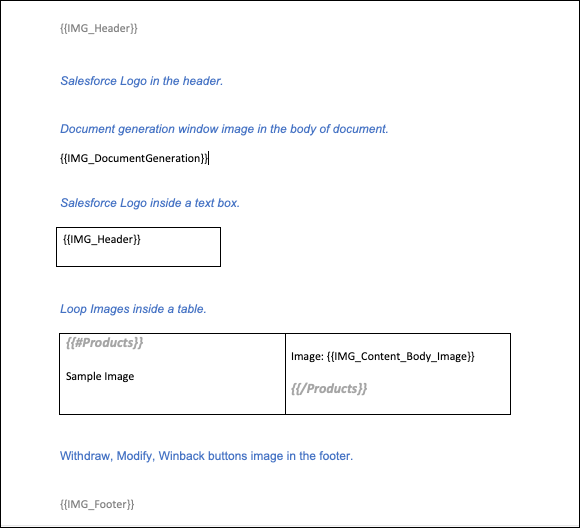
Use image tokens in a Microsoft Word or Microsoft PowerPoint document template to insert dynamic images in generated DOCX and PDF files. The image token must start with IMG_, such as {{IMG_header}}. Salesforce supports single-image, multiple-image, and loop-image tokens. Use Data Mappers to extract images from the org and define their height and width.
Required Editions
| Available in: Lightning Experience |
| Available in: Professional, Enterprise, Unlimited, and Developer Editions |
| User Permissions Needed | |
|---|---|
| To map tokens in the Data Mapper: | DocGen Designer |
- Create a Microsoft Word document and add image tokens.
-
Create a Microsoft Word template.
- Select Data Mapper as the token mapping method.
-
Enter a mapping Data Mapper bundle name.
The Data Mapper Transform maps the field with the ID to the token in the document template. The Data Mapper Transform then transforms the tokens with actual data in the document.
-
Enter a Data Extract Data Mapper bundle name.
The Data Mapper Extract retrieves the field with the ID that identifies the image to be used in the tokens.
-
To open the Data Mapper Extract on a new browser tab, click the
 icon next to the Data Extract Data Mapper Bundle Name field.
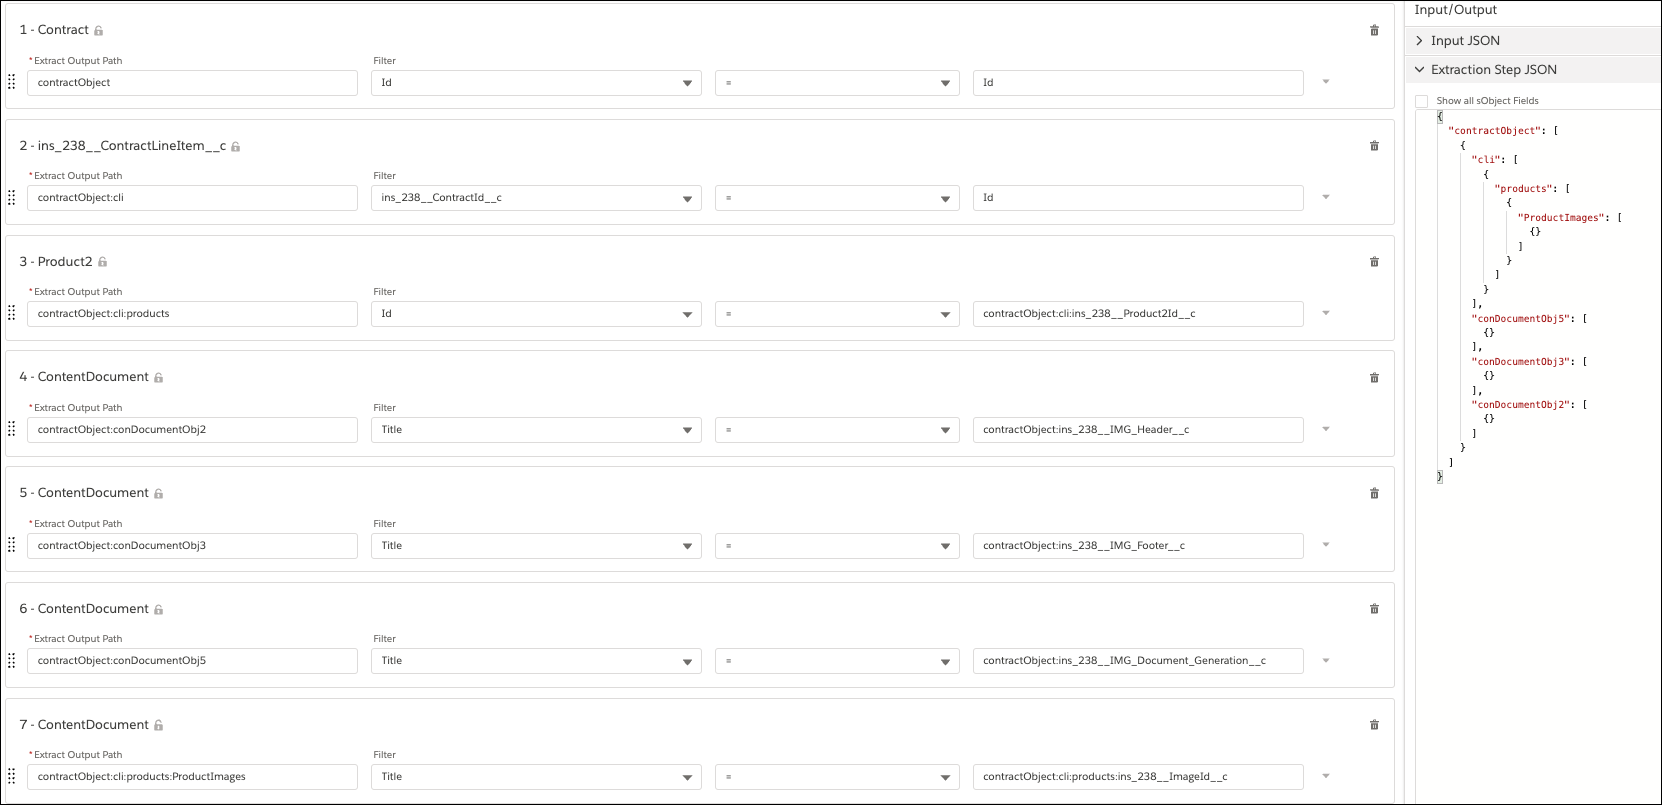
- Create a Data Mapper Extract.
- Define the Initial Extractions.
-
From the list of Salesforce object tables, select the option based on where you uploaded
your image.
- Files: ContentDocument
- Notes & Attachments: Attachment
- Documents: Contract Document
In this example, we use the content document table to retrieve the content ID of the image from the object by using the title as a filter.
Set the Extract Output Path to contractObject:<contentdocumentname> and the Title filter to contractObject:<custom image field API name to map the content document with the custom image field ID. For example, contractObject:ins_238__Header__c.
 Note
NoteHere, ins_238__Header__c is the image API field name where the image is stored. With this image name, the system queries the content document table to fetch the content ID. Alternatively, use the Object ID to pass to the Data Mapper Extract.
 Important
For images uploaded in documents, you must use name as the filter instead of the title filter.
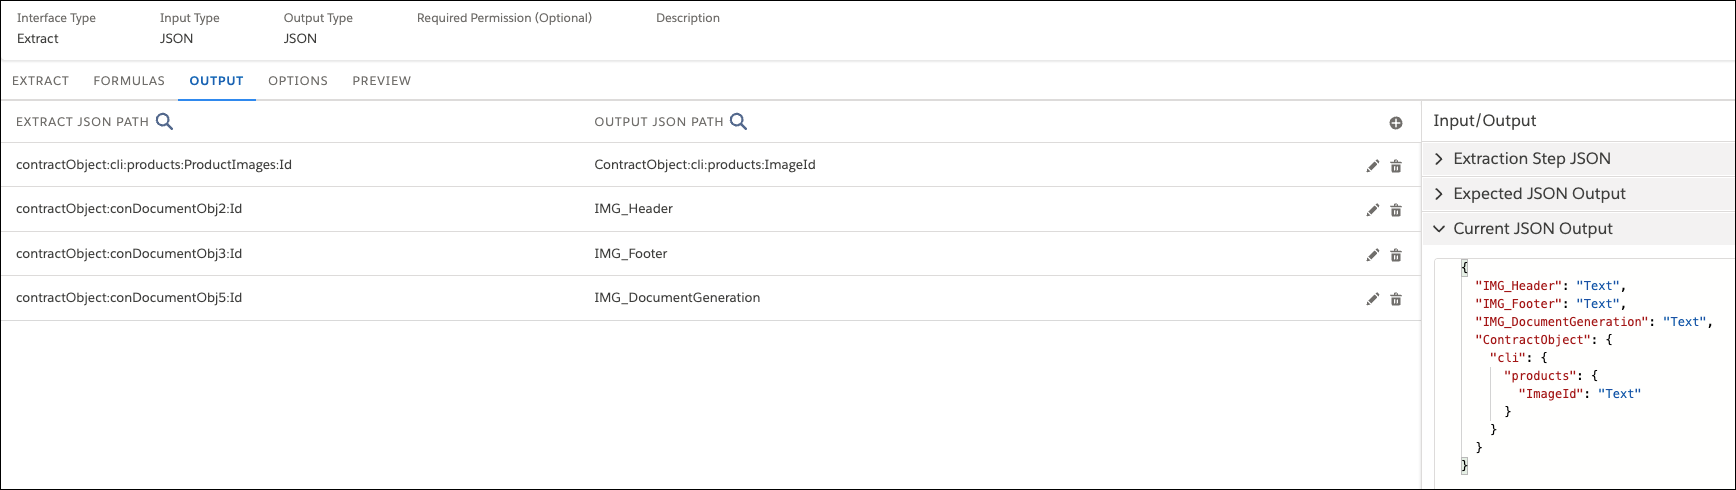
- Define the Data Mapper Extract Output.
- In Extract JSON Path, select the source field for extraction.
- In Output JSON Path, specify the output path.
- Repeat the steps to add all the tokens in the document template with a source field.
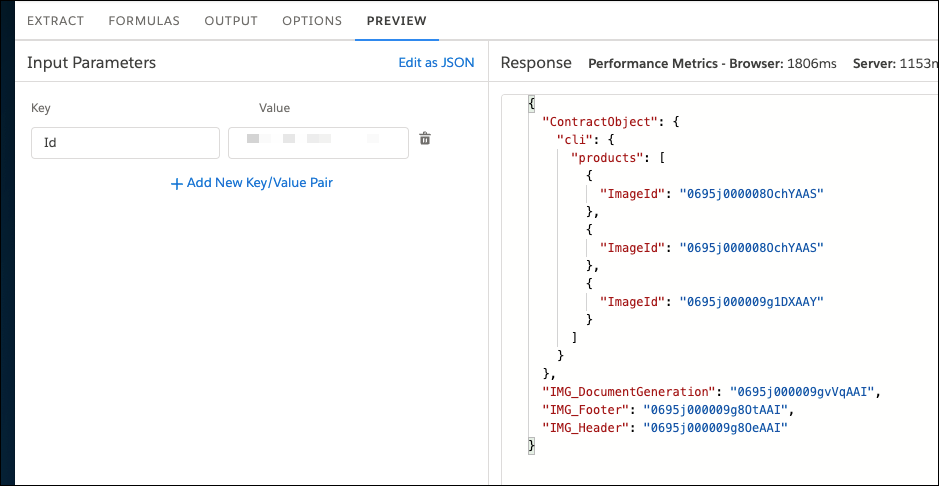
- To confirm that the response pane shows a JSON structure containing the desired output, on the PREVIEW tab, enter the Salesforce object ID and click Execute.
-
On the Output tab, copy the Current JSON Output value, and save it for using it later in
your Data Mapper Transform.
The Current JSON Output pane shows the structure that your output mappings specify.
-
To open the Data Mapper Transform on a new tab, click the icon next to the Mapping Data Mapper Bundle Name field.
- Create a Data Mapper Transform.
-
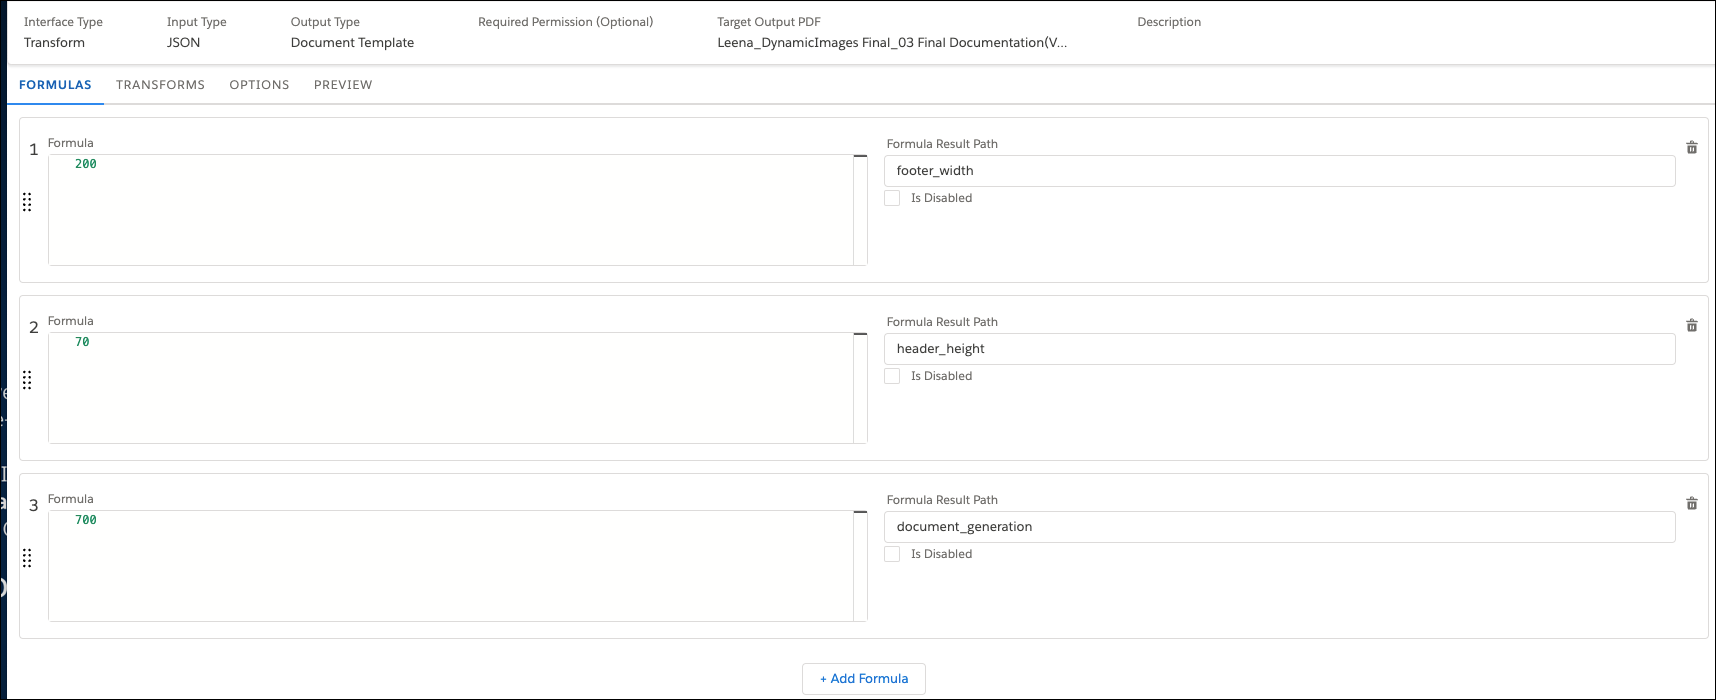
Additionally, define formulas in a Data Mapper to specify the height and width of the
images.
When you define a formula, map its output to the output JSON (for extracts and transforms). See Use Formulas in Omnistudio Data Mappers.
NoteTo maintain the original aspect ratio of an image, define either the height or the width, but not both.
- If neither height nor width is defined, the image is displayed at its original size, up to a maximum of 350 px (width) × 400 px (height) on an A4 portrait page.
- If you define only one dimension (height or width), the image is proportionally scaled based on its original aspect ratio. For example, an image that is originally 100 × 100 px and has height set to 20 will be scaled to 20 × 20 px.
- If you define both height and width, the image is rendered using those exact values, up to a maximum of 600 px × 800 px on an A4 portrait page. If the original image is larger, it will be scaled down to fit the defined dimensions.
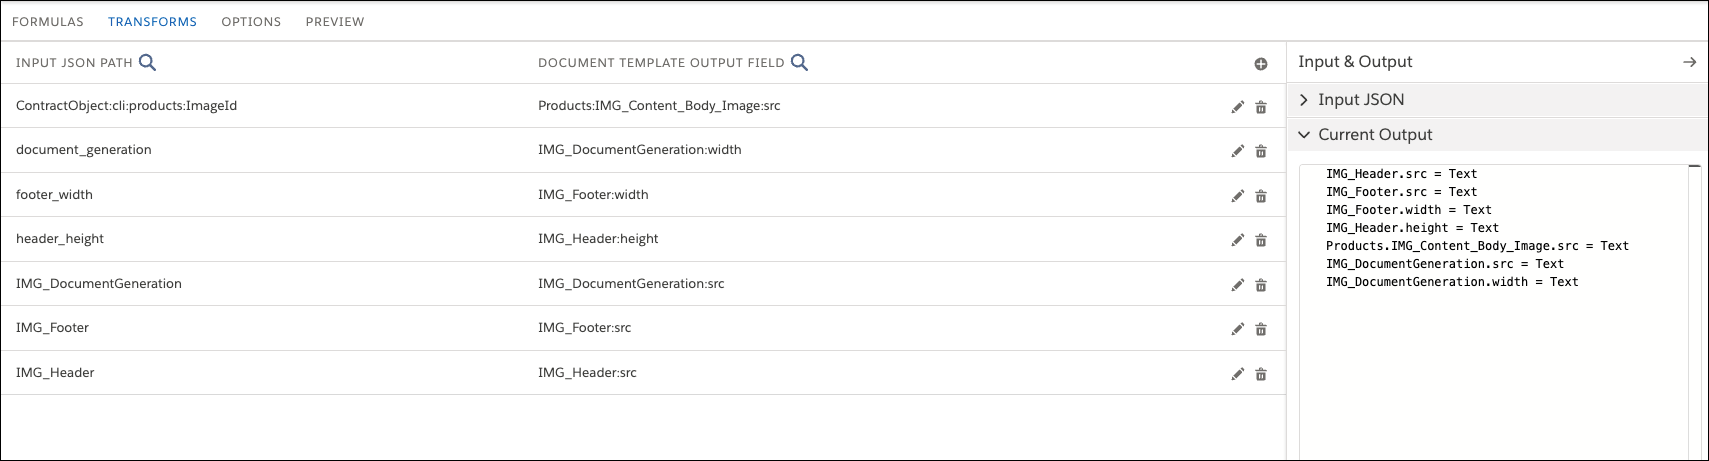
- On the TRANSFORM tab, in the Input JSON panel, paste the Current JSON Output code that you copied from the Data Mapper Extract.
-
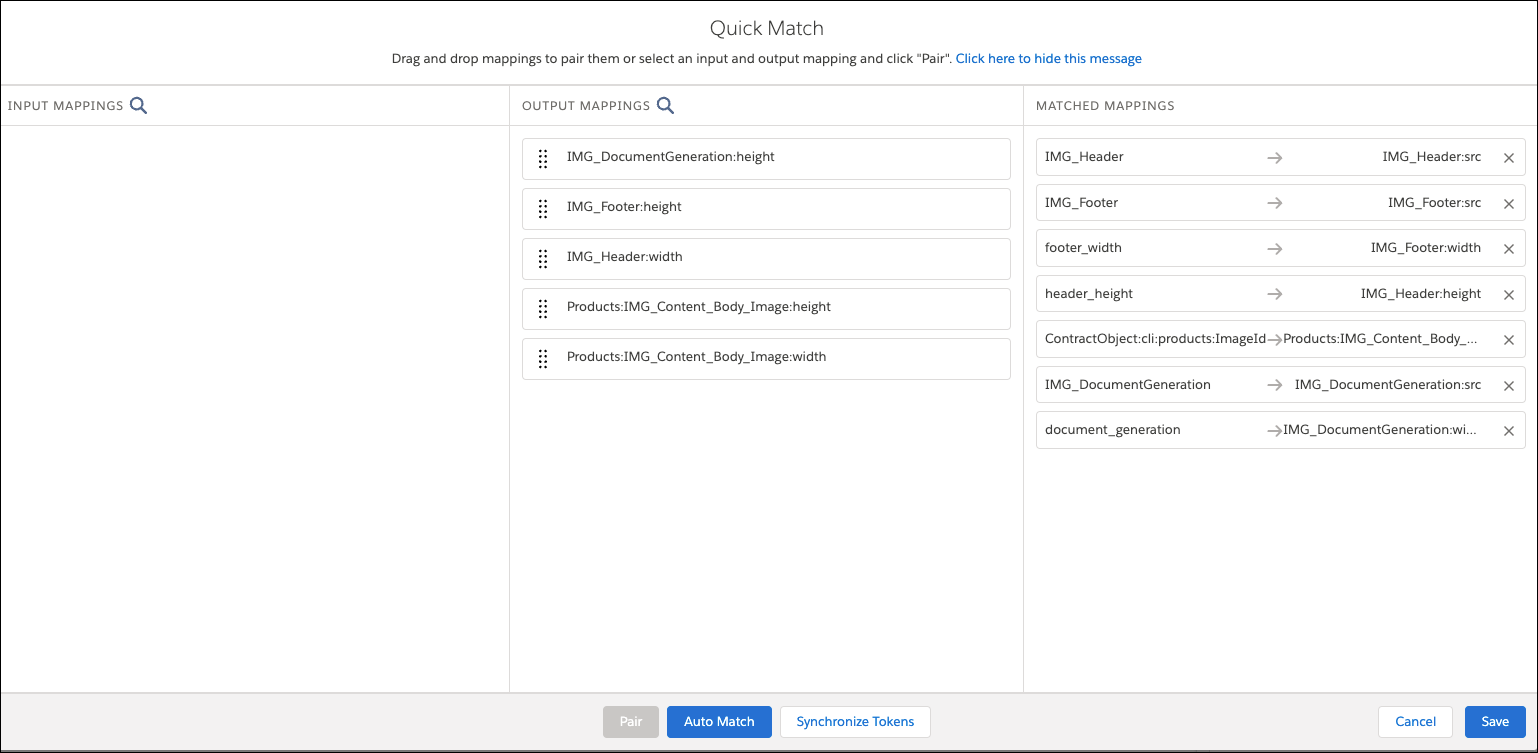
Click Quick Match.
The fields in the Input Mappings column come from the JSON code that you pasted into the Input JSON panel and the formulas that you defined on the Formulas tab. The fields in the Output Mappings column come from the document template.Note
For each image token in the document template, there are three output mappings: height, source (src), and width. The src is mandatory because it uses the image ID. The height and width are optional. If you don't define the height and width, the image renders in its original size in the document.
- Drag fields from the Input column to the Output column to match the fields.
- Save your changes.
- Click Edit and change the Output Type toJSON, and then save your changes.
-
Go to the PREVIEW tab, and verify the Object source (src) for the image tokens.
For some image tokens only the source is listed and for some image tokens both source, width, or height is available.