
You are here:
Perform Post Deployment Steps Large Account Sales Management
After downloading and deploying the Large Account Sales Management static resources, complete these post-deployment steps.
-
Import and activate CPQ templates and layouts.
- From the App Launcher, click Vlocity Cards.
- The the Layouts and Cards page, click the Additional Actions dropdown at the top right corner.
- Click Install CpqBaseTemplates.
- After CPQ Base Templates are installed, click Install CPQOmniScript.
- If you use multi-service or multi-site features, click, Install MultiServiceCPQ.
- To import the new templates, click Import.
-
To activate the new templates, click Activate.
If previous template versions are still active, a caution is displayed on the Activation window and the new versions are not selected. To solve this issue, select the checkbox for each template version displaying the warning, then click Next. The previous versions are deactivated and the new versions are activated.
- Run the CMT Maintenance jobs. See CMT Maintenance Jobs Fresh Install vs. Upgrade.
-
Grant permission to the custom setting
CustomObjectMap. See Grant Permissions on Custom Settings.
Reactivate Large Account Sales Management OmniScripts
Deactivate and then reactivate OmniScripts to ensure that they work with the Lightning Web Components.
- In the App Launcher, go to All Items and click OmniScripts.
-
In the Find in Page box, search vplEnergy/CreatePaymentPlan OmniScript and then click the active version.
The CreatePaymentPlan OmniScript is used in the Create Payment Plan button in the Overview tab of an account in Large Account Sales Management.
- Click Deactivate Version.
- When the OmniScript is deactivated, click Activate Version.
- An Activation confirmation message appears. Click Done.
-
In the Find in Page box, search CPQMultisiteConfigurator and then click the active version.
- Click Deactivate Version.
- Select the NavigateQuote step.
-
In Navigate Action Properties, enter the following in Web URL: /lightning/r/%ContextId%/view

- Select the NavigateOrder step
- In Navigate Action Properties, enter the following text in Web URL: /lightning/r/%ContextId%/view
- To activate the Omniscript, click Activate Version.
- An Activation confirmation message appears. Click Done.
Set Up FlexCard Designer
Use the FlexCard Designer to view and modify FlexCards.
The Flexcard Designer is needed only when you want to configure or customize something in the Flexcard.
- In the App Launcher, go to All Items and click OmniStudio FlexCards.
-
Open the latest version of the
sfiEnergyB2bsalesConsoleOpportunityListFlexCard, and click Edit Page from Setup. - In the Lightning App Builder, under the Pages drop-down, click Open Pages and select Vlocity Card Designer.
- Click Open.
- In the Flexi Page, click Activation. In the pop-up window select your preferences.
Update Parameters for OmniStudio FlexCards
Update the parameters of OmniStudio FlexCards so that they are connected to the right users, accounts, or opportunities in Large Account Sales Management.
Update the parameters of FlexCards in your org to point to the right User, Account or Opportunity records. Ensure that each of the FlexCards listed in this table is associated to the correct records.
| FlexCard | Record | Additional Conditions |
|---|---|---|
| sfiEnergyB2bsalesAgentTargets | User | User record must contain opportunities and leads. |
| sfiEnergyB2bsalesLeadsList | User | User record must contain opportunities and leads. |
| sfiEnergyB2bsalesOpportunitySummaryList | User | User record must contain opportunities and leads. |
| sfiEnergyB2bsalesConsoleOpportunityList | Account | Account record must contain opportunities and quotes. |
| sfiEnergyB2bsalesConsoleQuoteList | Account | Account record must contain opportunities and quotes. |
| sfiEnergyB2bsalesQuotesBringingRevenue | Opportunity | Opportunity record must contain quotes. |
- From the App Launcher, find and select OmniStudio FlexCards.
-
In the Search this list box, enter b2bsales.
A list of FlexCards used in Large Account Sales Management appears.
-
Click the active version of a FlexCard from the list.
For example, click sfiEnergyB2bsalesAgentTargets.
- Click Deactivate.
-
From the App Launcher, find and select the record type that you want to associate with the FlexCard.
For example, for sfiEnergyB2bsalesAgentTargets, you must associate it with a User record.Use the table above to associate the FlexCards to the correct records.
-
From the list of records, select a record that fulfills the additional condition in the table.
For example, for sfiEnergyB2bsalesAgentTargets, select a User record that contains opportunities and leads.
- In the open record, from the browser's search bar, copy the alphanumeric string before the /view text.
-
Open the FlexCard that you had deactivated in step 4.
For example, open sfiEnergyB2bsalesAgentTargets.
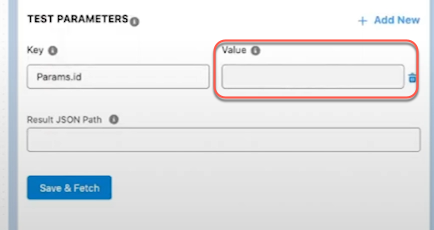
- In Card Properties, scroll down to Test Parameters.
-
Paste the
alphanumeric value in the Value field.
You can replace any prexisting value in the field.
- Click Save & Fetch.
- To test if the FlexCard is fetching data from the correct record, click Preview.
- Click Activate.

Grant Access to the Large Account Sales Management App
Grant permissions for team lead and sales agent users to access the tabs in the Large Account Sales Management app.
- Click Setup.
- Search App Manager in the Quick Find box.
- In the Lightning Experience App Manager page, select Edit from the drop-down next to Energy B2B Sales.
- Click User Profiles.
-
Add the following profiles to the Selected Profiles:
-
System Administrator
-
Team Lead
-
Sales Agent
-
- Click Back to go back to the Setup page.
Update the Opportunity Object Page Layout
Update the opportunity object page layout to include the Manage Opportunity Groups and Multi-Site Order actions.
- Click Setup.
- Select Object Manager.
- In the Quick Find box, search opportunity, and click Opportunity.
- Select Page Layouts.
-
To add actions to the Energy-Console layout, in the Page Layouts section, click Energy-Console layout.
- Select Mobile & Lightning Actions from the left column of Energy-Console layout table.
- Drag and drop the Manage Opportunity Groups action under the Salesforce Mobile and Lightning Experience Actions sub-section.
- Click Save.

Update the Contact Object Page Layout
Update the contact object page layout to assign contact layout to the Sales Agent and Sales Team Lead profiles.
- Click Setup.
- Select Object Manager.
- In the Quick Find box, search contact, and click Contact.
- Select Page Layouts.
- To update page assignments, click Page Layout Assignments.
- Click Edit Assignment.
- For Sales Agent and Sales Team Lead profiles, set Page Layout To Use to Contact Layout.
Set Up Google Map API Key for Large Account Sales Management
Salesforce Industries supports Google MAP APIs to auto-populate address fields. By default, this functionality is disabled in Large Account Sales Management. You can enable the Google MAP API functionality by configuring the API Key in your Salesforce org.
For more information on Google Maps API keys, see Use API Keys.
- Click Setup.
- In Quick find, search Custom Metadata Types.
- In the Custom Metadata Types page, click Manage Records next to VPLExpress.
-
Click Edit link next to Google API
Public Key and ensure that the following details are
set:
-
Label : Google API Public Key
-
VPLExpress Name : Google_API_Public_Key
-
Value: Your Google MAP API key
-
- Click Save.
Set Up Forecast Dashboard
Your sales team leads can view their team's performance using the forecast dashboard.
Sales team leads can view the performance of their sales agents by their revenue using the Forecast feature in Large Account Sales Management.
See Also
- Click Setup.
-
Set up role hierarchy.
- In Quick Find, search for Roles.
-
Click Set Up Roles.
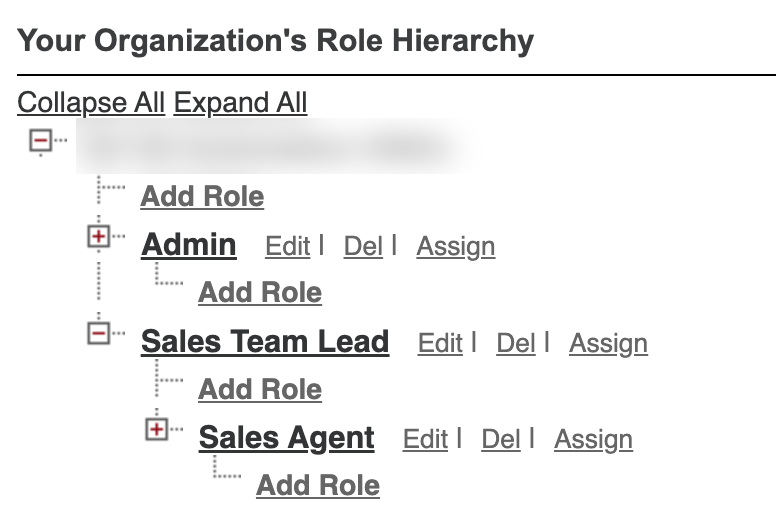
You can set up roles to replicate your organization's role hierarchy.
-
Create a Sales Team Lead role, and then a Sales Agent role under the existing Sales Team Lead.
- Save your changes.
-
Set up the user profiles for sales agents.
Repeat these steps for all sales agents user profiles.
- In Quick Find, search for Users.
- In the Users list, select a user who has been assigned as a Sales Agent role.
- Click Edit.
- Under General Information, select Allow Forecasting.
-
Under Approver Settings, select the Manager for this sales agent.
You must select a user with the Sales Team Lead role as the manager.
- Save your changes.
-
Set up the user profile for the sales team lead.
- In Quick Find, search for Users.
- In the Users list, select a user who has been assigned as a Sales Team Lead role.
- Click Edit.
- Under General Information, select Allow Forecasting.
- Save your changes.
-
Create a forecasts type.
- In Quick Find, search for Forecasts Settings.
- Select Enable Forecast.
- Click Create a Forecast Type, then click Start.
-
Select an object that you want to base your forecast on, then click Next.
For example, select Opportunity.
-
Select a measurement for the forecast, then click Next.
For example, select Amount.
-
Select a date type that you want to be used in forecast calculations, then click Next.
For example, select Close Date (Opportunity).
- For hierarchy, select User Role, then click Next.
-
Add optional filters for your forecast, then click Next.
You can filter your forecasts according to fiscal quarters, fiscal years, lead source, and much more.
- In Developer Name, enter OpportunityForecast, then click Next and save your changes.
- Under Available Forecast Types, activate your forecast type.
-
Set up forecasts hierarchy.
- In Quick Find, search for Forecasts Hierarchy.
- For the Sales Team Lead, click Enable Users.
- Add the user with the sales team lead role from the Available Users column to the Enabled Users column, then save your changes.
- For the Sales Team Lead, click Assign Manager.
- Select the Sales Team Lead role as the forecast manager, then save your changes.
-
Set up forecasts quota as the sales team lead.
- In Quick Find, search for Forecasts Quota.
-
For the selected forecast period and type, click Show Quota.
The sales revenue quotas for the users assigned to Sales Agent and Sales Team Lead roles appears.
- Under the Quota column, enter the quota for each user, then save your changes.
-
Set up the forecast to be viewable to the sales team lead.
- From the App Launcher, find and select Dashboards.
- For the Sales Lead Home Page dashboard, click Edit.
- Click Edit Dashboard Properties.
- In the Properties window, under View Dashboard As, click Another person.
- Enter the name of the Sales Team Lead.
-
Edit the Forecasting Type: API Name filter to match the created forecast.
- From the App Launcher, search Reports.
-
In the Reports list, edit the ForecastingQuotaB2BSales report.
The selected report opens in Report Builder
- Click Filters.
- Click Forecasting Type: API Name.
- For Operator, select equals, and type OpportunityForecast.
- Click Apply, then save your changes.
Assign Business Rules Engine Permission Set
Assign the Business Rules Engine permission set for Large Account Sales Management in your org.
- Click Setup.
- In Quick Find, search for Users.
- In the Users list, select a user who has been assigned as a Sales Agent or a Sales Team Lead role.
- Under Permission Set Assignments, click Edit Assignments.
- Add the Rule Engine Runtime from the Available Permission Sets column to Enabled Permission Sets, and save your changes.
Set Up Custom UI Settings for Large Account Sales Management
Update the custom UI settings for the Energy & Utilities Large Account Sales Management on the target org.
To set the custom UI settings in your target org, follow these steps:
- Click Setup.
- Search Static Resources in the Quick Find box.
- In the Static Resources page, click newport.
- Right-click the View file link and select Copy Link Address and capture the URL in a text editor.
- Go back to Setup.
- Search for and select Omni Interaction Configuration in the Quick Find box.
-
Next to newportZipUrl, click Edit.
If you don't see an entry for
newportZipUrl, click on New Omni Interaction Configuration and create it. The Input Label and Name should be newportZipUrl. - In the Value box, enter the truncated URL of your newport static resource which you obtained in a previous step. Make sure to remove your org's base URL and the ? or # character from the end of the path leaving, for example, /resource/1587030785000/vlocity_cmt__newport.
- Clear your browser cache.
Set up Custom Object Tab
Set up the Vlocity Objects and Object Types tab in your org to use the Large Account Sales Management app.
Create the Vlocity Objects and Object Types tab for the custom object ObjectClass if it doesn't already exist in your org.
- From Setup, in the Quick Find box, enter Tabs and select it.
- Under Custom Object Tabs, click New.
- In Object, select ObjectClass.
- Select a Tab Style, then click Next.
- Save the tab.