
You are here:
Deploy Metadata for Program Management Console
Download the Program Management Console SFDX datapacks and deploy them to your Salesforce org.
In order to deploy the metadata, you must configure Lightning Web Components, and download Visual Code Studio (VS Code), a free, open-source code editor.
-
Add the necessary URLs for Lightning Web Components (LWCs).
- From the App Launcher, find and select OmniStudio FlexCards.
-
Click the Warnings icon, and then copy the two URLs from the Warnings window.
If no warnings appear, skip updating the remote site settings and move to the next step.
- From Setup, in the Quick Find box, enter Remote Site Settings, and then select Remote Site Settings.
-
Click New Remote Site and individually create these LWC remote sites with the URLs that you copied:
Remote Site Name Remote Site URL LWC 1 https://my-domain-name--vlocity-cmt.visualforce.comExample: https://core-web-82002--vlocity-cmt.visualforce.com
LWC 2 https://my-domain-name.lightning.force.comExample: https://core-web-82002.lightning.force.com
- Save your changes.
- Download and install Visual Studio Code. See Visual Studio Code.
-
Install Salesforce Extension Pack in Visual Studio Code:
- Launch Visual Studio Code.
- Click the Extensions icon.
- Search for Salesforce Extension Pack and click Install.
-
Create a project in Visual Studio Code:
- Press Ctrl+Shift+P (Windows) or Cmd+Shift+P (macOS) to make the command palette appear.
- Type and select SFDX: Create Project with Manifest.
- Select Standard.
- Enter any project name, press enter.
- Select a location on your computer for the project files to go.
- Click Create Project.
-
Authenticate your target org:
-
Press Ctrl+Shift+P (Windows) or Cmd+Shift+P (macOS).
The command palette opens.
- Enter SFDX: Authorize an Org, and then select SFDX: Authorize an Org.
- To accept the default login URL, press Enter.
-
Enter an alias.
For example, enter Astro.A new Salesforce login window opens in a browser.
- Log in to your target org.
-
When you are asked to grant access to the connected app, click Allow, and then close the browser window.
The command-line terminal window shows a message when the authentication is successful.
-
Press Ctrl+Shift+P (Windows) or Cmd+Shift+P (macOS).
-
Download and extract the metadata file.
- Download this datapack to your local desktop: EUC_ProgramBnftAsgntAggregation_Sfdx_Datapacks.
- Create a ProgramBnftAsgntAggregation_Sfdx folder in your local desktop.
- Extract EUC_ProgramBnftAsgntAggregation_Sfdx_Datapacks to the ProgramBnftAsgntAggregation_Sfdx folder
-
In the folder, create the file sfdx-project.json which contains the following code:
{ "packageDirectories": [ { "path": "salesforce_sfdx", "default": true } ], "namespace": "", "sfdcLoginUrl": "https://login.salesforce.com", "sourceApiVersion": "59.0" } -
Move the package.xml file from salesforce_sfdx/main/default to the ProgramBnftAsgntAggregation_Sfdx folder.
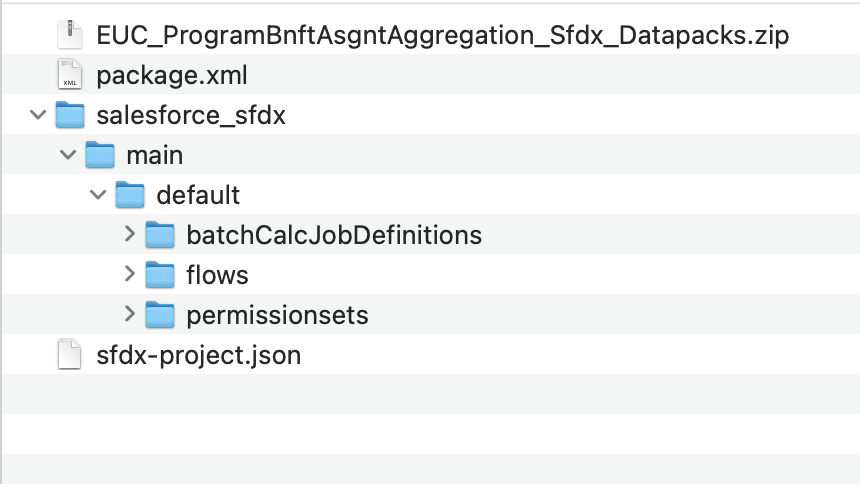
- Open ProgramBnftAsgntAggregation_Sfdx in Visual Studio Code.
-
Deploy components from to your target org.
-
In VSCode, in the left panel, right-click the salesforce-sfdx folder.
For Mac devices, CMD + click the salesforce-sfdx folder.
-
Click SFDX: Deploy Source to Org.
If deployment fails for any component, select the components that failed and deploy them individually.
-
In VSCode, in the left panel, right-click the salesforce-sfdx folder.
Troubleshoot Metadata Deployment for Program Management Console
Troubleshoot issues that can occur when you deploy Program Management Console metadata.
Error deploying batchCalcJobDefinitions and flows metadata
Visual Studio Code shows an error that reads:
salesforce_sfdx/main/default/batchCalcJobDefinitions/Clean_Energy_Program_Benefit_Assignment_Aggregator.batchCalcJobDefinition-meta.xml   								You don't have the required Data Pipelines permission to open Data Processing Engine Builder. Ask your Salesforce admin for help.
salesforce_sfdx/main/default/flows/Clean_Energy_Program_Benefit_Assignment_Aggregation_Scheduler.flow-meta.xml                           			Clean_Energy_Program_Benefit_Assignment_Aggregator (Action) - We can't find an action with the name and action type that you specified.
The error may be caused if Data Pipeline is not enabled in your org.
To solve this problem, from Setup, in the Quick Find box, enter Data Pipelines, and then select Get Started. To find Data Pipelines in Setup, the Data Pipelines Base User permission set must be assigned to you. Enable Data Pipelines.
Error Deploying batchCalcJobDefinitions and Flows metadata
Visual Studio Code shows an error when flexipages deploy that reads
salesforce_sfdx/main/default/batchCalcJobDefinitions/Clean_Energy_Program_Benefit_Assignment_Aggregator.batchCalcJobDefinition-meta.xml  The name field in the IndicatorDefinition.Status BatchCalcJobDatasourceField type node has an issue: We couldn't save this definition because the related object IndicatorDefinition either doesn't exist in the source object or the 'Integration User' user doesn't have access to it. Specify another object and try again.
salesforce_sfdx/main/default/flows/Clean_Energy_Program_Benefit_Assignment_Aggregation_Scheduler.flow-meta.xml                           Clean_Energy_Program_Benefit_Assignment_Aggregator (Action) - We can't find an action with the name and action type that you specified.
The error may be caused because because the Analytics Integration user doesn't have the required access to the objects used in the Data Processing Engine (DPE) definition.
To solve this problem,
-
Deploy Clean Energy Program Analytics Integration User permission set present in the zip.
- Assign these permission set licenses to the Analytics Integration user:
- Energy & Utilities Cloud Program
- Outcome Management
- Program and Benefit Management
-
Assign the Clean Energy Program Analytics Integration User permission set deployed in the first step to the Analytics Integration user.
