
Create an Actionable List from a Data Cloud Segment
Use the List Builder for Data Cloud Segment feature to create an actionable list from a Data Cloud segment.
Required Editions
| Available in: Lightning Experience |
| Available in: Enterprise, Professional, Starter, and Unlimited Editions with the required add-ons |
| User Permissions Needed | |
|---|---|
| To create lists from a Data Cloud segment: | Actionable Segmentation permission set, Data Cloud for Marketing Manager permission set OR Data Cloud for Marketing Specialist permission set, and Data Cloud Data Aware Specialist OR Data Cloud Marketing Admin |
Ensure that you created and published the segment that you want to use to create the actionable list. See Create and Activate Segments.

Warning To avoid
data loss in a segment, don’t publish a Data Cloud segment manually more than five times in an
hour.
- When creating a new Batch Data Transform with DLOs, specifically during the creation of
the Output Node, make sure that the
SfdcOrganizationIdcolumn is selected in the Output Transform DLO. 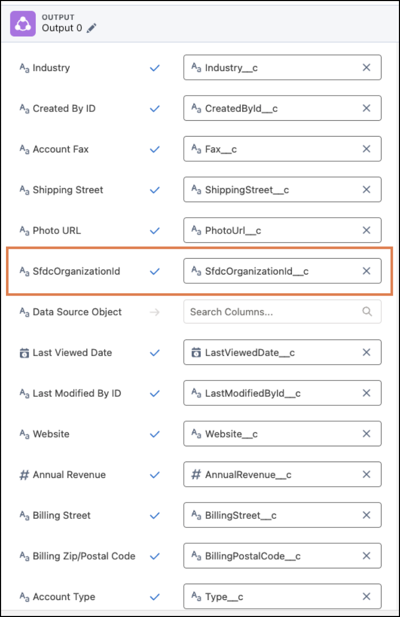
- When creating an Output Transform DLO from an existing Standard DLO and then mapping it to a Standard DMO, make sure that SfdcOrganizationId in the Output Transform DLO is mapped to ExternalSourceId in the Standard DMO. See See Batch Data Transform.
-
From the App Launcher, find and select List Builder for Data Cloud
Segment.
 Tip Alternatively, click New from the Actionable List list view.The New Actionable List window opens.
 - To create your actionable list, select a source, and then click Proceed.
- Select Data Cloud Segment.
- Enter a name and a description for your actionable list, and then click Next.
-
To view data segments and fetch data for the actionable list, select a data space.
You can select only the data spaces that you have access permission for.
-
Select a segment on the Account, Asset, Contact, Lead, Object, Opportunity, or Vehicle
object, and then click Next.
You can search for a segment by using the segment name or the object name. You can also sort the segment list by using the Segment Name, Created Date, and Last Publish Completed columns.
-
To keep the actionable list updated, set up the list to synchronize with the related
segment periodically.
During synchronization, the records removed from the Data Cloud segment are suppressed in the associated actionable list. The status of the suppressed records changes to inactive in the actionable list. When the records are reincorporated to the segment, the records revert to the active status. After every synchronization, a bell notification shows the status of the synchronization. You can synchronize the actionable list only if the associated segment has a publishing schedule. You can check the status of the synchronization in Monitor Workflow Services. See View the Status and Details of Definition Runs.
-
Find and select up to 10 fields that you want to show in the actionable list.
By default, the preview shows 20 records containing the default columns of the object associated with the selected Data Cloud segment. To remove a field, click
 on the field. You can't remove the ID field. To see the records, you must have access to the
records.
on the field. You can't remove the ID field. To see the records, you must have access to the
records. -
After you select the fields, to see 20 records from the actionable list, click
Update Preview, and then click Next.
You can view the full list in the Actionable List Members component after the list is created.
-
To configure the engagement statuses, add new statuses, select the status icons, and then
select the default status.
List creators and agents use these statuses in the Actionable List Members and Outreach List components, respectively, to track their engagement with the prospects.
-
To complete the creation of the actionable list, click
Proceed.
You can check the actionable list creation status in Monitor Workflow Services. See View the Status and Details of Definition Runs. You receive a bell notification and email notification regarding the status of the actionable list creation. After you create the list, you can access the list from the list view for Actionable Lists.The Actionable List Members component appears.
Considerations for Naming Actionable Lists
Here are some things to keep in mind when you name an actionable list.
|
Did this article solve your issue?
Let us know so we can improve!
