
You are here:
Target Ad Sales Customers with Categories and Segments
Target customer groups in Advertising Sales Management using categories and segments. You can customize these categories and segments or create your own for more specific targeting.
![]() This is an Advertising Sales Management on Managed Package feature. For Advertising Sales
Management on Salesforce Platform, see Advertising
Sales Management on Salesforce Platform.
This is an Advertising Sales Management on Managed Package feature. For Advertising Sales
Management on Salesforce Platform, see Advertising
Sales Management on Salesforce Platform.
With targeting, you can organize your customer base into sub-groups (segments), based on shared characteristics (categories). By grouping customers, you can target sections of your audience most likely to buy the product or service you're advertising.
Advertising Sales Management provides you with preset targeting categories and segments. However, you can expand the targeting categories and segments to suit your unique marketing requirements. Use the Targeting Data Import app to upload or import category and segment data using a CSV file.
- Considerations for Importing Targeting Categories and Segments Data
Learn about important considerations when using the Targeting Data Import app to import or upload Targeting categories and segments data. - Import Targeting Categories Data from a CSV File
Import customer targeting category data to your Advertising Sales Management org. - Import Targeting Segments Data with a CSV File
Import customer targeting segment data to your Advertising Sales Management org. - Create Additional Identifiers for Targeting Segments
In your Advertising Sales Management org, you can create additional identifiers for your Targeting Segments data. - Pricing For Advertising Sales Management Targeting
To set up pricing for targeting categories in your Advertising Sales Management org, you must first create matrices for each targeting category. - Use Expression Sets for Targeting
Build expressions for precise targeting. Media Planners can use AND, OR, and AND-OR conditions for targeting attributes for each line item in the media plan.
Considerations for Importing Targeting Categories and Segments Data
Learn about important considerations when using the Targeting Data Import app to import or upload Targeting categories and segments data.
![]() This is an Advertising Sales Management on Managed Package feature. For Advertising Sales
Management on Salesforce Platform, see Advertising
Sales Management on Salesforce Platform.
This is an Advertising Sales Management on Managed Package feature. For Advertising Sales
Management on Salesforce Platform, see Advertising
Sales Management on Salesforce Platform.
When planning to import Targeting categories or segments, consider the following:
-
When you create Targeting categories in your org, either through uploading a CSV file or through the UI, Salesforce recommends that you use the following category names:
-
Audience Targeting
-
Geo Targeting
-
Day and Time Targeting
-
OS Targeting
-
-
If the category names you're using are different from the ones listed here, then you must map the category name to its selector Apex class name using the custom setting 'TargetCategoryNameToClassName'. Following is the recommended mapping between category names and their selector Apex classes.
Name SelectorClassName <audience_targeting_category_name> SfiAdsCustomTargetSelector <geo_targeting_category_name> SfiAdsGeoTargetSelector <os_targeting_category_name> SfiAdsOSTargetSelector <custom_targeting_category_name> SfiAdsCustomTargetSelector -
When you create targeting segments in your org as part of the Audience Targeting category, or when you upload an audience segment using the CSV file, the value as part of all the label-value pairs must be the audience segment ID from Google Ad Manager (GAM). The name of the record for the Audience Segment must be either of the following:
-
Audience Segments
-
Audience Segment
-
- When you create any segment record to be implemented as key value, the SegmentCode should be the key ID of the segment created in GAM, and the value for all label-value pairs should be the value ID from GAM. This rule must be followed even while uploading or importing data using the CSV file.
-
When you create an Operating System segment, either through uploading a CSV file or through the UI, the value for the label-value pairs should be the ID of the operating system from GAM.
-
When creating geo targeting segments (such as country, state, and city), or when uploading geo targeting segments using a CSV file, the value as part of all the label-value pairs must me the ID of the location from GAM, and the display sequence for country, state, and city, should be as follows:
country 1 state 2 city 3 -
When creating segments for Day and Time Targeting either directly from the UI or through the CSV file, you must create two segments: SlotType and DayAndTime.
-
For label-value pairs in the SlotType segment, permitted labels are Hourly, Half Hourly, and Quarter Hourly, and their corresponding values are 1, 0.5, and 0.25.
-
For label-value pairs in DayAndTime, both the label and value are the same. The permitted values are Monday, Tuesday, Wednesday, Thursday, Friday, Saturday, and Sunday.
-
The DisplaySequence for the SlotType and DayAndTime segments are 1 and 2, respectively.
-
Import Targeting Categories Data from a CSV File
Import customer targeting category data to your Advertising Sales Management org.
![]() This is an Advertising Sales Management on Managed Package feature. For Advertising Sales
Management on Salesforce Platform, see Advertising
Sales Management on Salesforce Platform.
This is an Advertising Sales Management on Managed Package feature. For Advertising Sales
Management on Salesforce Platform, see Advertising
Sales Management on Salesforce Platform.
Use the Targeting Data Import application to import Targeting category and segment data. When you upload data, first upload category data before uploading the segment data.
Salesforce recommends that you edit the provided sample CSV files to upload or import new category and segment data.
Each row in the file represents a parent or child category record; if a category has an associated parent category, then the child category is listed in a row below the parent category. If a category doesn't have an associated parent category, then leave the value of ParentAdTargetCategoryCode blank. The sample file contains mandatory and optional column headers. For optional headers, if no value is required, then leave the fields blank. The mandatory column headers include the following:
-
Name
-
Code
-
ParentAdTargetCategoryCode
 Note
Note- Ensure that the CSV file is no larger than 2.5 MB.
- Ensure that you have at least one Targeting category and segment set up in your org to prevent errors in the Targeting Setting modal while creating a Media Plan.
- Download the sample CSV file for uploading Targeting category data.
-
Edit the required fields.
Note Don't use commas or quotation marks in the cells of the CSV file. If there is no value for any of the fields in the CSV file, leave the field blank.
- Save the file to your local system.
- In the app launcher, search for Targeting, and click Targeting Data Import App.
- In Upload Categories Data, either upload or drag the file from your local system.
After you upload the Targeting category data, upload the Targeting segment data.
Import Targeting Segments Data with a CSV File
Import customer targeting segment data to your Advertising Sales Management org.
![]() This is an Advertising Sales Management on Managed Package feature. For Advertising Sales
Management on Salesforce Platform, see Advertising
Sales Management on Salesforce Platform.
This is an Advertising Sales Management on Managed Package feature. For Advertising Sales
Management on Salesforce Platform, see Advertising
Sales Management on Salesforce Platform.
Before You Begin
Be sure to upload category data before uploading the segment data.
Use the Targeting Data Import application to upload Targeting category and segment data. Salesforce recommends that you edit the provided sample CSV files to upload or import new category and segment data.
A single segment record might require multiple rows in the CSV file, depending on the label-value pairs count. The mandatory column headers include:
-
Name
-
Code
-
DataType
-
DependentCategorySegmentCode
-
Label
-
Value
-
DependentValue
-
CategoryCode
DependentCategorySegmentCode is used for geo targeting segments, where the country is the dependent category for a state, and a state is the dependent category for a city. DependentValue is also used in geo targeting, to capture the dependent label for a label. For example, for a state the value of DependentValue is the country in which the state is located. All states for a particular country must be listed together in the CSV file, immediately after the row for the parent segment. For example, if listing the 50 states of the United States of America, all 50 states must be listed in consecutive rows in the CSV file.
The DependentCategorySegmentCode and DependentValue cells must be left blank where not applicable.
- Ensure that the CSV file is no larger than 2.5 MB.
- Ensure that you have at least one Targeting category and segment set up in your org to prevent errors while creating a Media Plan.
- Download the sample CSV file for uploading Targeting segment data.
- Edit the required fields. If there is no value for any of the fields in the CSV file, leave the field blank. Don't use commas or quotation marks in the cells in the CSV file.
- Save the file to your local system.
- In the app launcher, search for Targeting, and click Targeting Data Import App.
- In Upload Segment Data, either upload or drag and drop your file from your local system.
Create Additional Identifiers for Targeting Segments
In your Advertising Sales Management org, you can create additional identifiers for your Targeting Segments data.
![]() This is an Advertising Sales Management on Managed Package feature. For Advertising Sales
Management on Salesforce Platform, see Advertising
Sales Management on Salesforce Platform.
This is an Advertising Sales Management on Managed Package feature. For Advertising Sales
Management on Salesforce Platform, see Advertising
Sales Management on Salesforce Platform.
When you upload targeting segments, the Label and Value columns are mandatory identifiers. The Label is displayed in the UI, and the Value stores the IDs generated by Google Ad Manager (GAM). However, you can also create additional identifiers to store key information about your customers. To create an additional identifier, you must first edit the sfiAdsTargetingConfiguration custom setting, and then add the additional identifiers to the CSV file.
- In your Advertising Sales Management org, click Settings and then Setup.
- In Quick Find, search for and click Custom Settings.
- Search for and click the sfiAdsTargetingConfiguration custom setting.
- Click Manage.
- Click New.
-
Enter TargetingSegmentAdditionalIdentifiers in the Name field, and in the ConfigValue field, enter the additional identifiers, separated by a comma. Label and Value are not considered additional identifiers and must not be added in the ConfigValue field along with the other additional identifiers.
Note The comma separated identifiers in the ConfigValue field must not exceed 255 characters.
- Click Save.
-
In the CSV file, add the additional identifiers after the Value column header.
Note Ensure that the additional identifiers in the custom setting and the CSV file are exactly the same. These values are case-sensitive.
Pricing For Advertising Sales Management Targeting
To set up pricing for targeting categories in your Advertising Sales Management org, you must first create matrices for each targeting category.
![]() This is an Advertising Sales Management on Managed Package feature. For Advertising Sales
Management on Salesforce Platform, see Advertising
Sales Management on Salesforce Platform.
This is an Advertising Sales Management on Managed Package feature. For Advertising Sales
Management on Salesforce Platform, see Advertising
Sales Management on Salesforce Platform.
Before You Begin
Pricing matrices are a complex concept in Salesforce Industries Enterprise Product Catalog. Before setting up pricing for targeting, be sure you are familiar with the concepts of matrix pricing. See Pricing Designer.
Audience Targeting
The Audience Targeting matrix represents the attributes selected under the Audience Targeting category from the Targeting modal in the UI. Each row represents a possible combination of audience based on the following attributes:
-
AudienceSegment
-
Gender
-
AgeGroup
-
Demographics
-
Interests
-
OwnershipValues
Following is an example of the Audience Targeting Matrix.
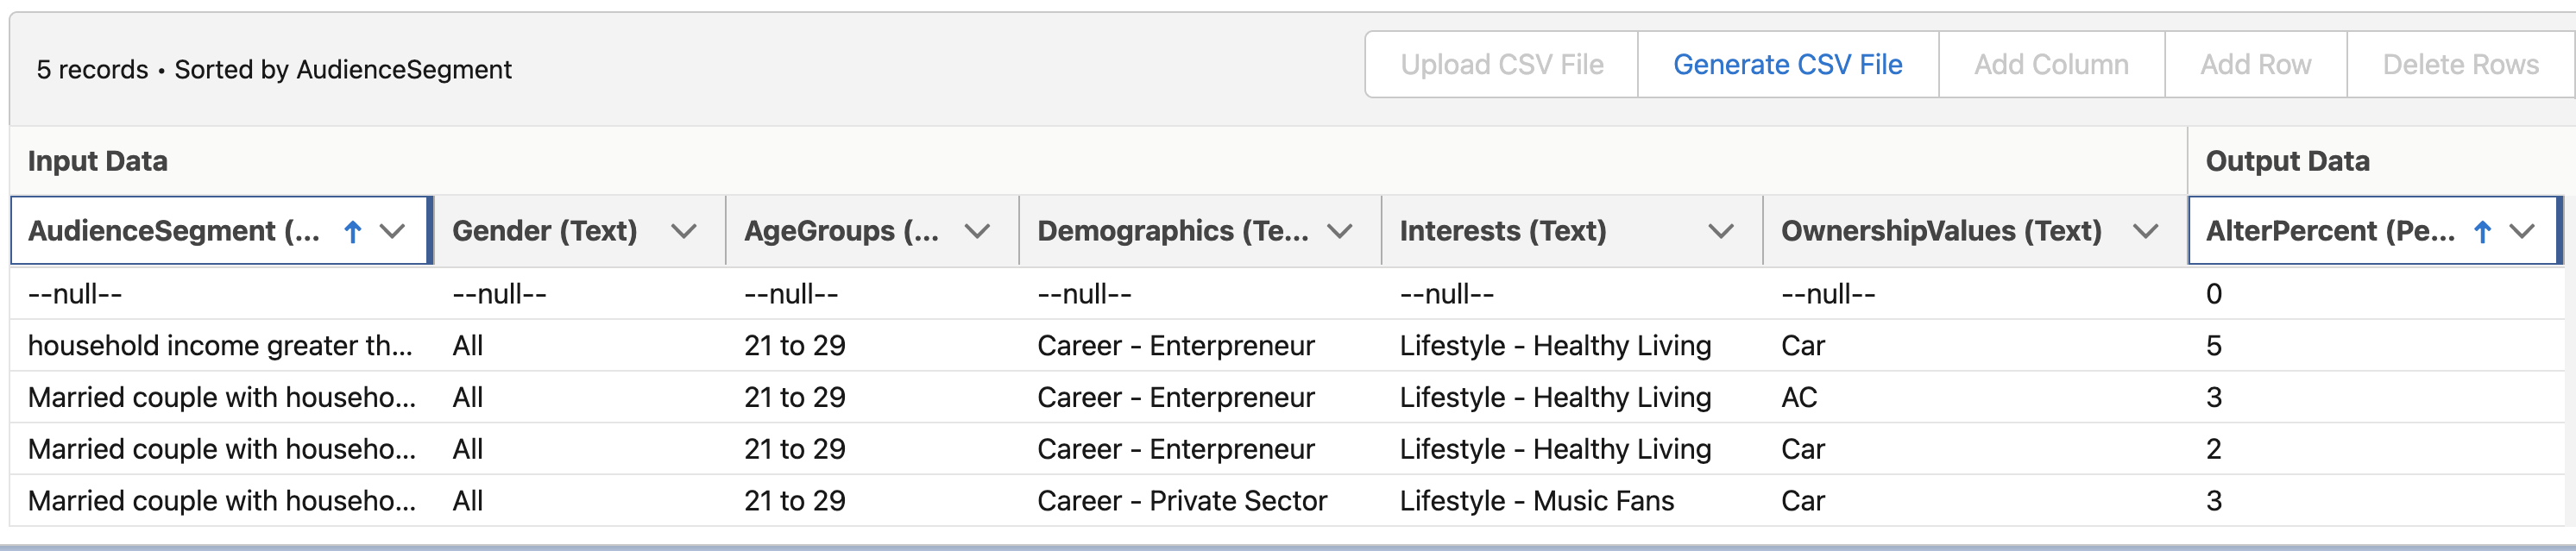
When creating the matrix for audience targeting, note the following:
-
AudienceSegment, Gender, Demographics, Interests, and OwnershipValues are text input parameters. AgeGroup is a range type parameter. AlterPercent is a percent type parameter, and is the output of this matrix.
-
The variable NULLCONSTANT in the variable section must be defined with a value
-null-and the datatype as text. -
When you add data to the Demographics and Interests sections, enter data in the format
<Sub-category name><space><hyphen><space><Selected Value>. For example, if you want to enter Demographic data under the Sub-category Career with a value Public Servant, then enter the data as Career - Public Servant. -
Salesforce provides a subset of possible combinations. You can add more as required.
-
If all attributes within a category are not selected, then the category does not contribute to the pricing process.
-
Ensure that you add all possible pricing scenarios in the matrix. If not, then the default base price is used in calculations.
Geo Targeting
The geo targeting matrix represents the attributes selected under GeoTargeting category from the Targeting modal in the UI. Each row represents a possible combination of the following geo targeting attributes:
-
Country
-
State
-
City
Following is an example of the geo targeting matrix.
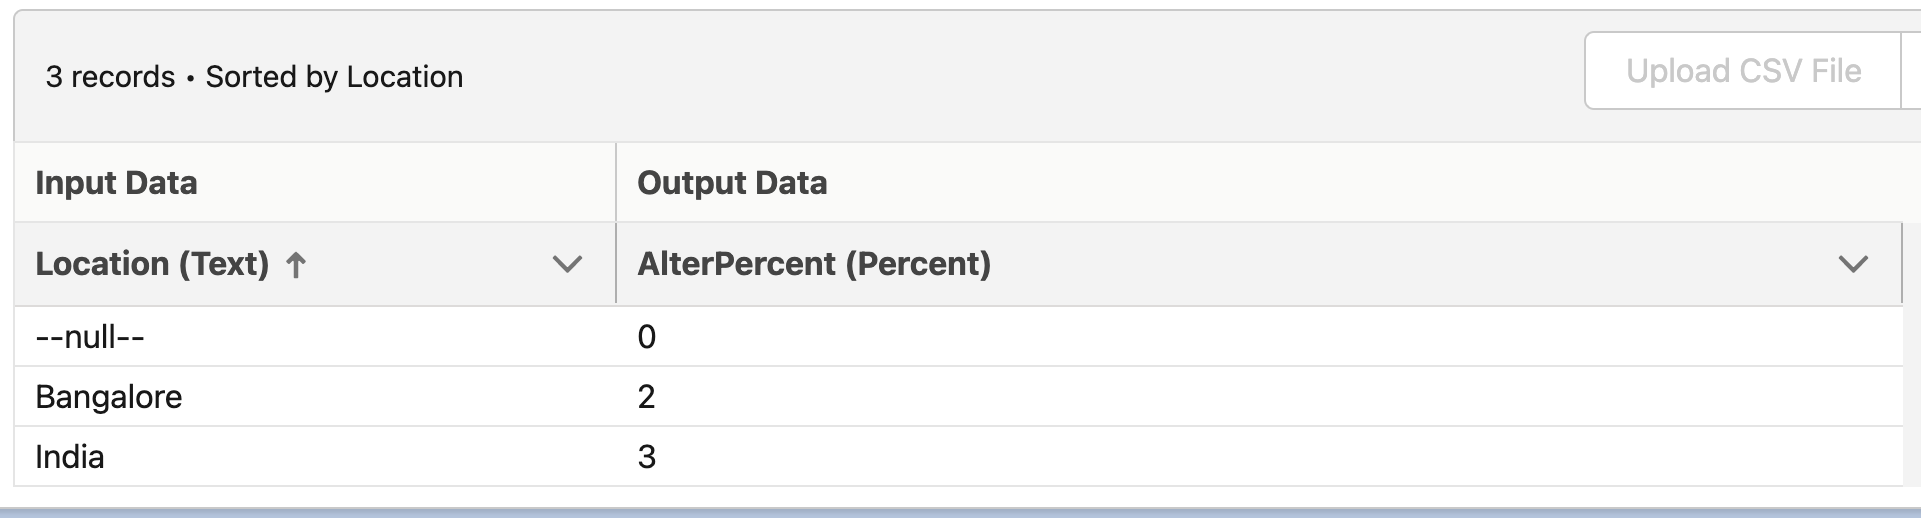
When creating the matrix for geo targeting, note the following:
-
Location is a text input parameter. AlterPercent is a percent type parameter, and is the output of this matrix.
-
The variable NULLCONSTANT in the variable section must be defined with a value
-null-and datatype as text. -
If all attributes within a category are not selected, then the category does not contribute to the pricing process.
-
Ensure that you add all possible pricing scenarios in the matrix. If not, then the default base price is used in calculations.
Day and Time Targeting
The Day and Time Targeting matrix represents all the attributes selected under the Day and Time category from the Targeting modal in the UI. Each row represents a possible combination of Day and Time based on the following attributes:
-
TypeOfDay
-
TimeOfDay
Following is an example of the Day and Time Targeting matrix.
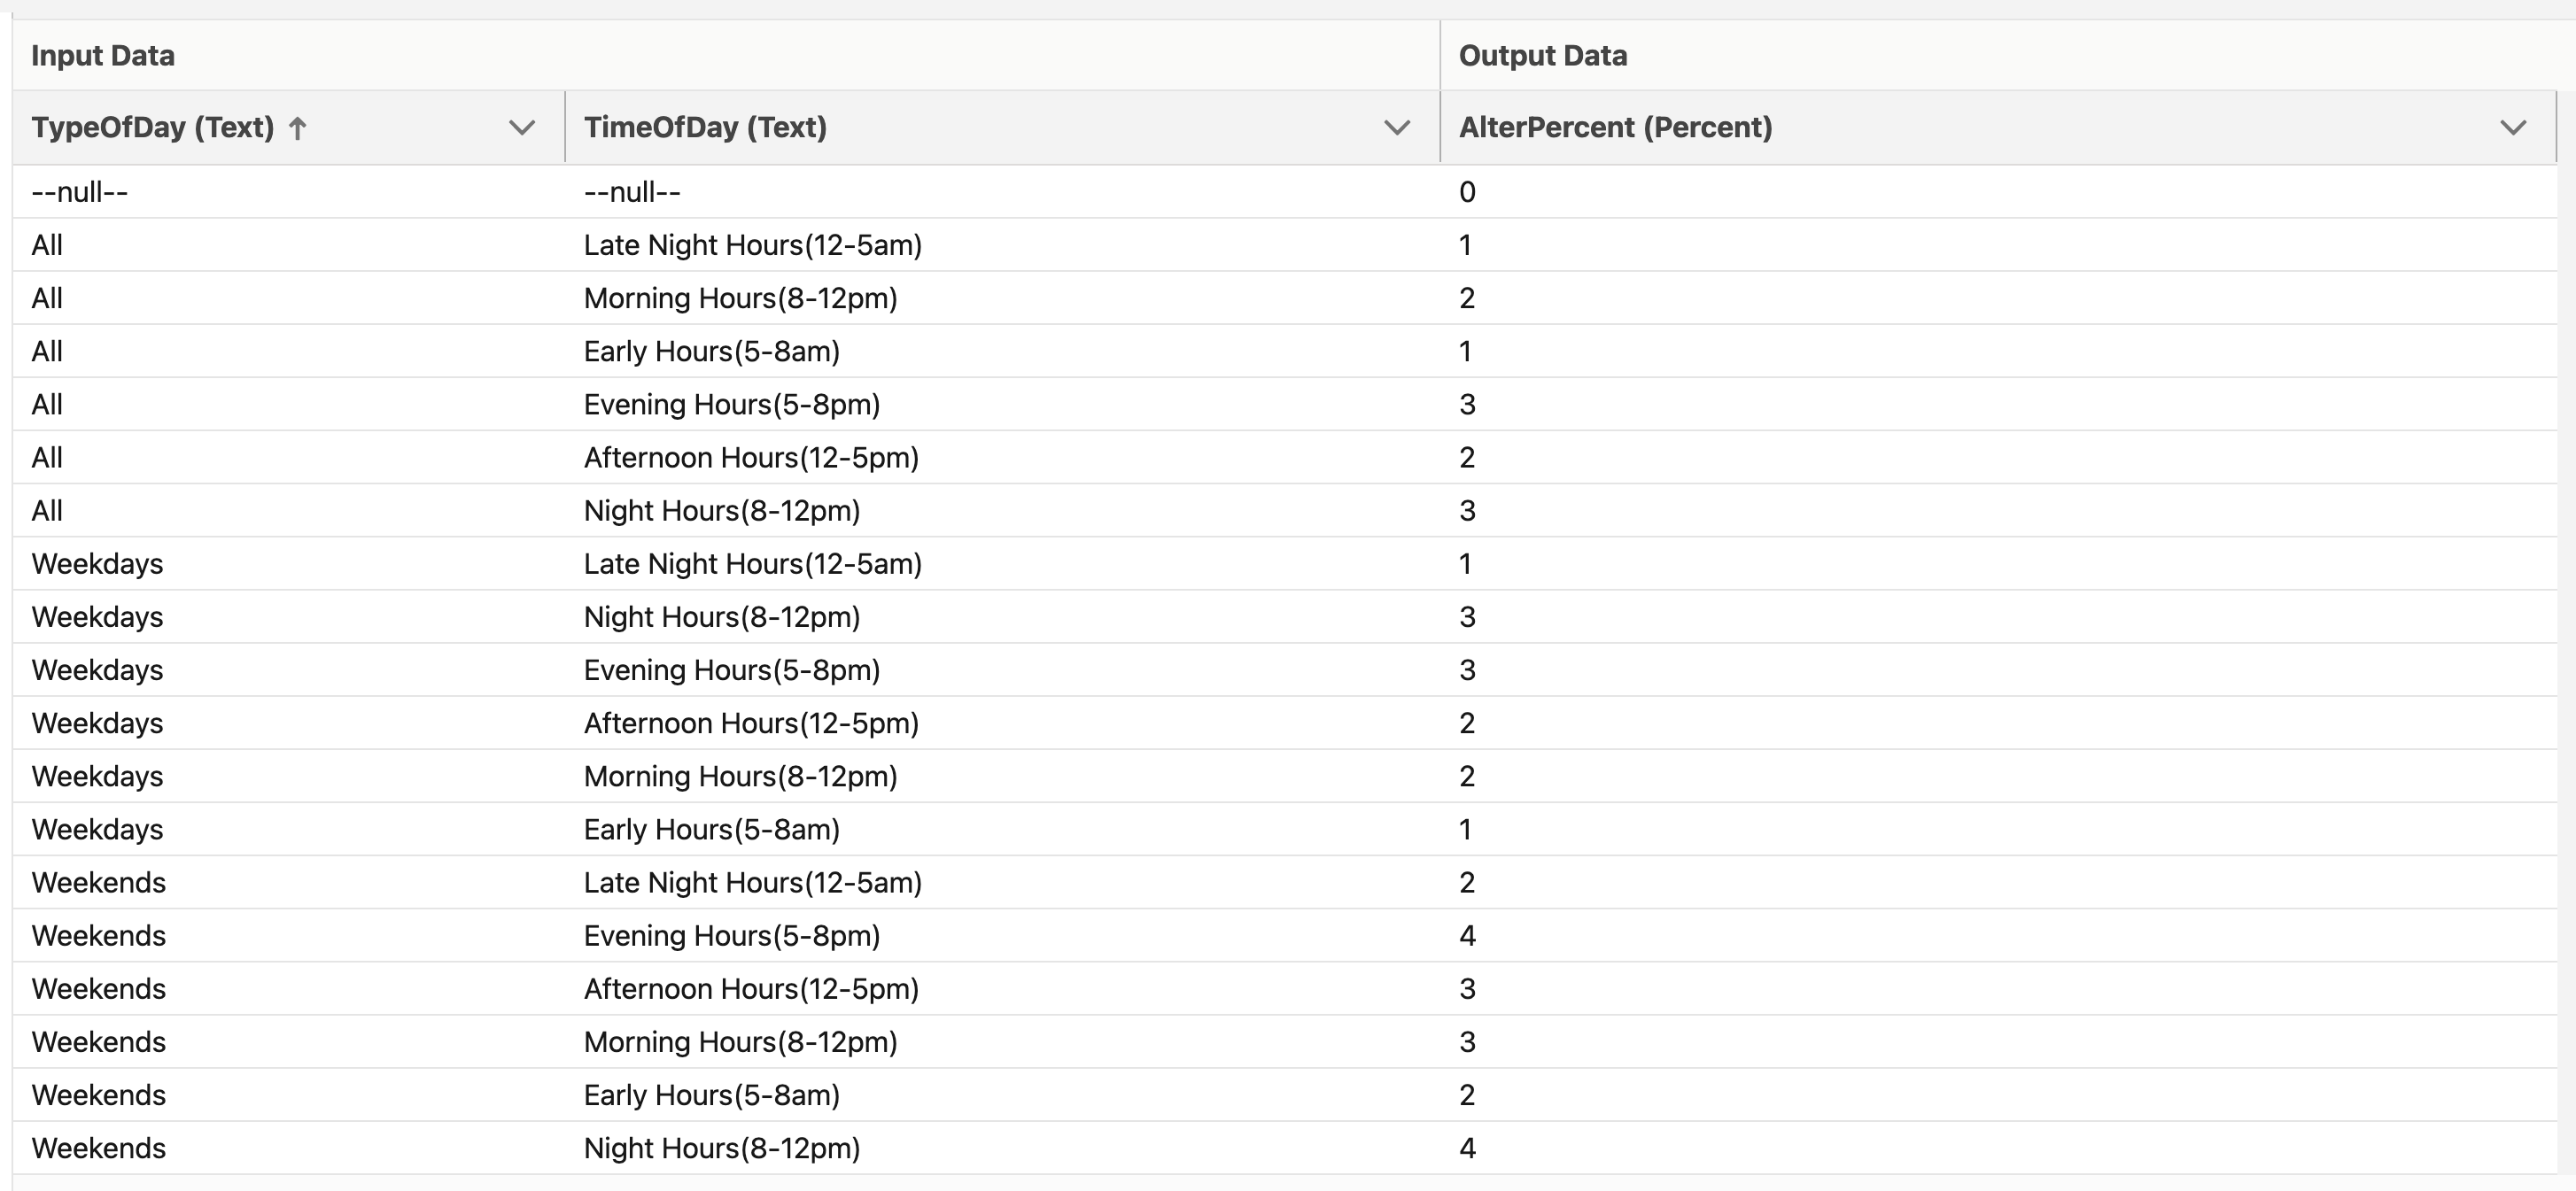
When creating the matrix for Day and Time Targeting, note the following:
-
TypeOfDay and TimeOfDay are text input parameters. AlterPercent is a percent type parameter, and is the output of this matrix.
-
The variable NULLCONSTANT in the variable section must be defined with a value
-null-and datatype as text. -
Salesforce provides a subset of possible combinations. You can add more as required.
-
If all attributes within a category are not selected, then the category does not contribute to the pricing process.
-
For the TimeOfDay attribute, each day has been divided into three time ranges. These time ranges are defined in the AdSalesPricingPlanTargetingHelper Apex class. The out-of-the-box time ranges are customizable from the getTimeOfDay method in the AdSalesPricingPlanTargetingHelper apex class.
-
Ensure that you add all possible pricing scenarios in the matrix. If not, then the default base price is used in calculations.
OS Targeting
The OS Targeting matrix represents the attributes selected under the OS Targeting category in the Targeting modal in the UI. Each row represents a possible value of the OS Targeting attribute OSType.
Following is an example of the OS Targeting matrix.
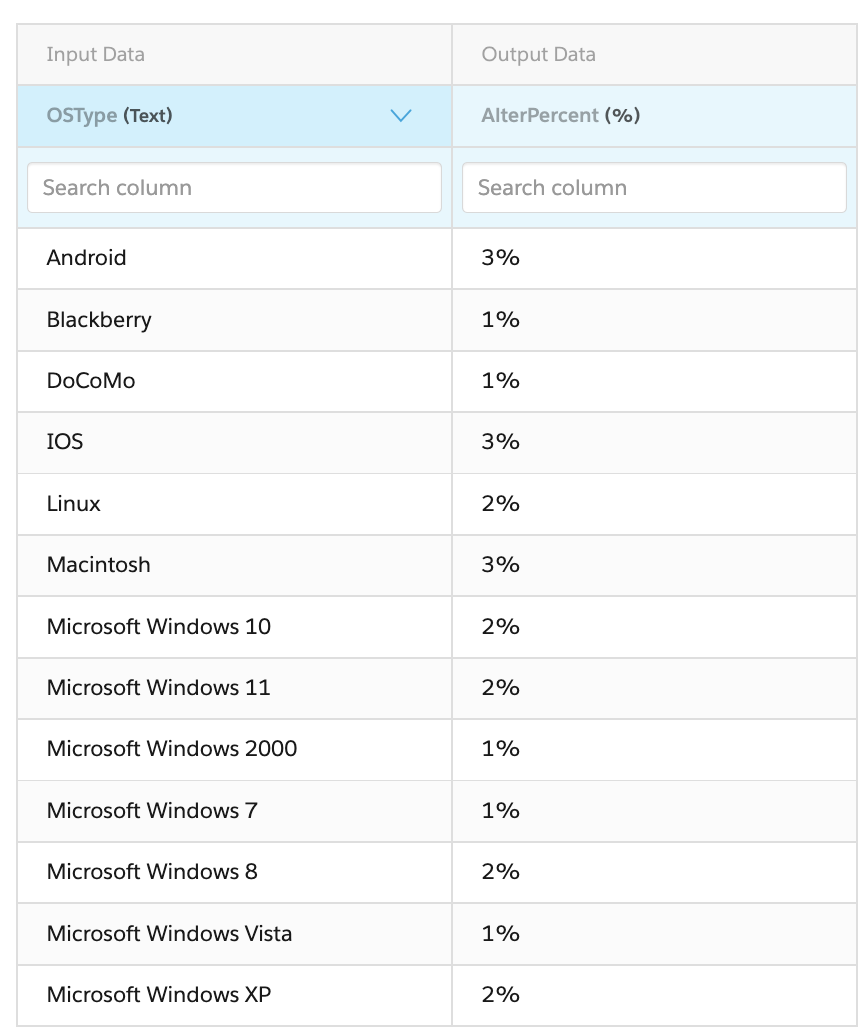
When creating the matrix for OS Targeting, note the following:
-
OSType is a text input parameter. AlterPercent is a percent type parameter, and is the output of this matrix.
-
The variable NULLCONSTANT in the variable section must be defined with a value
-null-and datatype as text. -
If all attributes within a category are not selected, then the category does not contribute to the pricing process.
Use Expression Sets for Targeting
Build expressions for precise targeting. Media Planners can use AND, OR, and AND-OR conditions for targeting attributes for each line item in the media plan.
![]() This is an Advertising Sales Management on Managed Package feature. For Advertising Sales
Management on Salesforce Platform, see Advertising
Sales Management on Salesforce Platform.
This is an Advertising Sales Management on Managed Package feature. For Advertising Sales
Management on Salesforce Platform, see Advertising
Sales Management on Salesforce Platform.
Before You Begin
Expression Sets are a complex topic that requires experience with Business Rules Engine. Before you create expression sets for targeting, see Expression Sets.
In Targeting Settings, as you select targeting segments, they are grouped in numbered groups in the right pane. Use the Condition Requirements and Condition Logic (visible only for Custom Conditions) fields to build your expression sets.
From the Condition Requirements dropdown list, select one of the following options, based on the type of expression you want to create:
-
All Conditions Are Met (AND). Use this option to specify that all selected targeting segments are fulfilled for the particular placement.
-
Any Condition is Met (OR). Use this option to specify that either or any of the selected targeting segments is fulfilled for the particular placement.
-
Custom Condition is Met. Use this option to specify a custom condition which defines how the selected targeting segments are fulfilled for the particular placement. When you select this option, the Custom Logic field is displayed. Enter your custom expression in this field. For example, (1 AND 2) OR (2 AND 3), where 1, 2, and 3 are your numbered groups of selected targeting segments.