
You are here:
Set Up Git for Easy Integration of Releases
To update customized contracts from a newly-released version and to create a customized contract based on a specific version, we recommend that you set up your Git repository and branches as shown in this workflow.
Required Editions
| Available in: Enterprise, Performance, and Unlimited Editions that have Consumer Goods Cloud enabled |
| User Permissions Needed | |
|---|---|
| To set up Git repo: | Customizer, Admin |
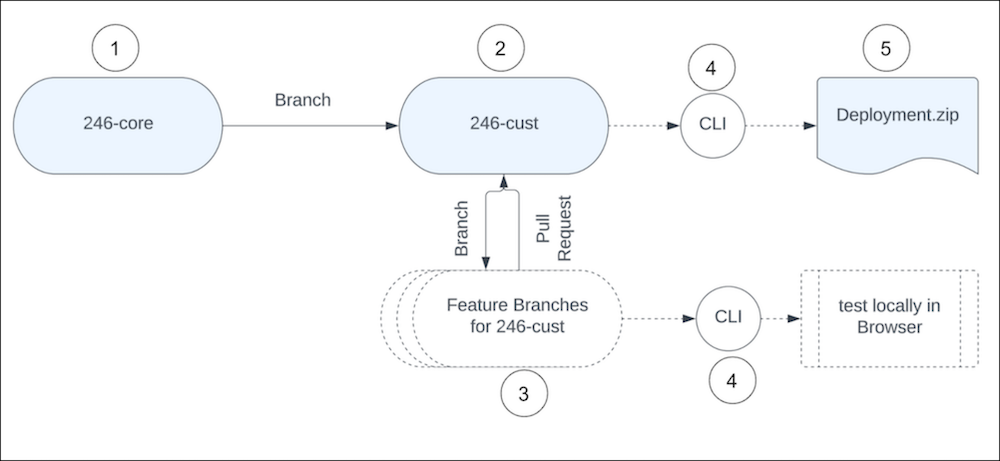
- Create a core branch specific to a release to host the core contracts extracted from the Design Contract zip. For example, a 246-core branch. For every major release, download the ModelerDesignContract zip from the Custom - Managed section of the Lightning App Builder in your Salesforce org into its own branch. You can integrate patch releases into the major release branch. We strongly advise that you use this branch to import only the core fixes and avoid modifying the design contracts in this branch.
- Create a customizer branch and use it to develop custom features for your project, for example 246-cust.
- Create feature-specific branches and use them for development work and pull the changes into the customizer branch.
- You can operate the CLI on the customizer and feature branches to build the contracts and test the new development locally or to build a deployment.zip.
-
You can then deploy the deployment.zip to a Salesforce org and test the changes.
You can also integrate the CLI on a build environment. First, install Salesforce CLI and the Modeler CLI plugin on the build environment. Then, after running a git clone, use the CLI to validate the model, build the model, and create the deployment.zip in an automated way.
- Set Up and Deploy Patch Release Version
When we release a patch version of the contracts, download and extract the patch contents into a branch off the appropriate release core branch. You can test the patch version from that branch, and then merge into the core branch. You can then pull the changes from the core branch into your working branches as needed. Example of patch release - update from 246.0 to 246.1, or from 246.1 to 246.2. - Set Up and Deploy a Major Release Version
Create branches for the target upgrade release, for example, 248-core and 248-cust. Retain the source release branches (246-core and 246-cust) for existing users running the application on version 246. - Create a Modeler Workspace
After you set up the repository and branches in Git, create a Modeler workspace on the feature branch that you intend to work on.
Did this article solve your issue?
Let us know so we can improve!