
You are here:
Example: Automate Order Submission for Fulfillment
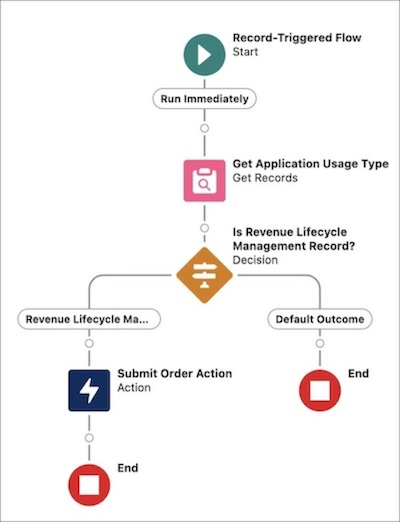
Create a record-triggered flow to submit Agentforce Revenue Management orders to Dynamic Revenue Orchestrator automatically when users activate the orders. Automation makes sure that all eligible records enter the fulfillment pipeline immediately upon meeting specified status criteria.
Required Editions
| Available in: Lightning Experience |
| Available in: Enterprise, Unlimited, and Developer Editions of Revenue Cloud where Transaction Management is enabled |
| User Permissions Needed | |
|---|---|
| To open, edit, or create a flow in Flow Builder: | Manage Flow |
| To submit orders to Dynamic Revenue Orchestrator and call the invocable actions: | Submit Transaction User |
Create a Record-Triggered Flow
Configure the initial trigger and entry conditions for the order object.
- From Setup, in the Quick Find box, enter Flows, and then select Flows.
- Click New Flow.
- Select Start from Scratch and click Next.
- Select Record-Triggered Flow and click Create.
- Select Order as the object.
- Select A record is updated for the trigger configuration.
-
In the Set Entry Conditions section, specify these details.
- Condition Requirements: All Conditions Are Met (AND)
- Field: Status
- Operator: Equals
- Value: Activated
- Select Only when a record is updated to meet the condition requirements for the run frequency.
Add a Component to Get Application Usage Type Assignment Records
Find the specific application usage assignment to verify the record type.
-
Click
 .
.
- Find and select Get Records.
- Enter Get Application Usage Type for the label and Get_Application_Usage_Type for the API name.
- Select Application Usage Assignment as the object.
-
Add these filter conditions.
- Field: RecordId
- Operator: Equals
- Value: {!$Record__Prior.Id}
-
Click Add Condition and specify these filter conditions.
- Field: AppUsageType
- Operator: Equals
- Value: RevenueLifecycleManagement
- Select Choose fields and assign variables (advanced).
- In the Record field, select New Resource.
-
Specify these details for the new resource.
- Resource Type: Variable
- API Name: ApplicationUsageAssignmentRecord
- Data Type: Record
- Object: Application Usage Assignment
- Click Done.
Add a Decision to Check for Agentforce Revenue Management Records
Verify that the record belongs to the Revenue Lifecycle Management usage type before proceeding.
-
Click .
- Find and select Decision.
- Enter Revenue Lifecycle Management Record? for the label and Is_Revenue_Lifecycle_Management_Record for the API name.
-
Specify these outcome details.
- Label: Revenue Lifecycle Management Record
- API Name: Revenue_Lifecycle_Management_Record
- Condition Requirements: All Conditions Are Met (AND)
- Resource: !ApplicationUsageAssignmentRecord.Id
- Operator: Does Not Equal
- Value: !$GlobalConstant.EmptyString
Add an Action to Submit Orders to Dynamic Revenue Orchestrator
Invoke the fulfillment submission for the qualified record.
-
Click in the Revenue Lifecycle Management Record branch.
- Find and select Action.
-
Specify these action details.
- Action: Submit Order
- Label: Submit Order Action
- API Name: Submit_Order_Action
- Order ID: {$Record_Prior.Id}
- Click Done.
- Save your changes.
- Enter a label and API name for the flow and save again.
- Activate the flow.
To add the Fulfillment Plan and Orchestration Submission Status fields, edit order page layouts. See Customize Page Layouts with the Enhanced Page Layout Editor.
