
You are here:
Configure an Auth Provider for Microsoft App Manually
Add an Auth Provider credential to establish a secure connection between Salesforce and Microsoft.
Note This step is part of manually integrating Microsoft 365 Azure with Salesforce. To refer to guided
setup, see Set Up Microsoft 365 and Azure Integration Using Guided
Setup.
| REQUIRED EDITIONS |
|---|
| Available in: Lightning Experience |
| Available in: Enterprise, Unlimited, Professional, and Developer Editions |
| USER PERMISSIONS NEEDED | |
|---|---|
| To configure Auth. Provider: | System Administrator |
Ensure that Application (client) ID and Client Secret Value correspond to your Azure account. If the ID and value don't match with your Azure account, the add-in fails to function correctly or doesn't load as expected and could result in graph API issues.
- From Setup, in the Quick Find box, enter Auth. Providers, and then select Auth. Providers.
- Click New, and select Open ID Connect as the provider type.
-
Enter MicrosoftApp as the Auth Provider name.
The URL automatically gets suffixed with MicrosoftApp.
- In Consumer Key, enter your Azure App's Application (client) ID.
- In Consumer Secret, enter your Azure App's Client Secret Value.
- In Authorize Endpoint URL, enter https://login.microsoftonline.com/organizations/oauth2/v2.0/authorize
- In Token Endpoint URL, enter https://login.microsoftonline.com/organizations/oauth2/v2.0/token
- In User Info Endpoint URL, enter https://graph.microsoft.com/oidc/userinfo
-
In Default Scopes, enter https://graph.microsoft.com/Files.ReadWrite.All offline_access openid User.ReadWrite.All
 Note Ensure that Default Scopes matches the API permissions that you added to your Microsoft Azure account. See Configure a Microsoft Azure App Manually.
 - Ensure Send client credentials in header is unselected.
- Select Send access token in header and Include Consumer Secret in SOAP API Responses.
- For Registration Handler, click Automatically create a registration handler template.
- In Execute Registration As, select your system admin account.
-
Save your changes.
It saves your auth provider and generates Salesforce Configuration URLs.
-
Verify that these URLs are generated under Salesforce Configurations.
-
Test-Only Initialization URL
-
Single Sign-On Initialization URL
-
Existing User Linking URL
-
OAuth-Only Initialization URL
-
Callback URL
-
Single Logout URL
-
-
If an experience cloud site is available in your Salesforce instance, expand Experience Cloud Sites and verify that these URLs are generated.
-
Test-Only Initialization URL
-
Single Sign-On Initialization URL
-
Existing User Linking URL
-
OAuth-Only Initialization URL
-
Callback URL
-
-
Save your changes.
After you save the Auth. Provider details, a Registration Handler Apex Class gets created. For example, AutocreatedRegHandler1234567890123.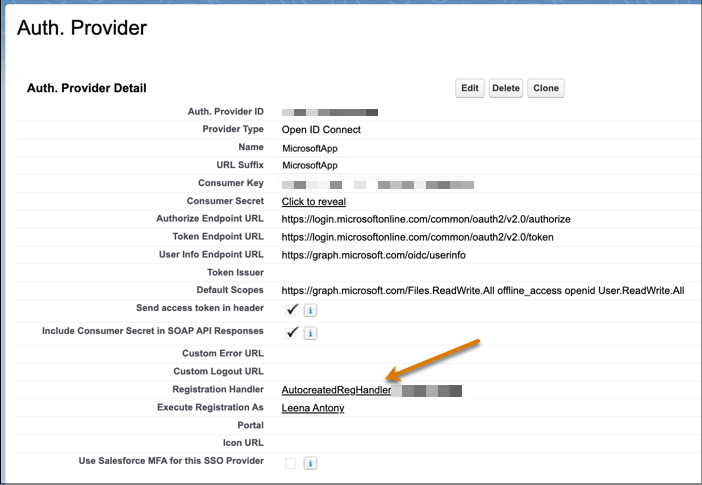
-
Disable automatic synchronization of username and email address.
By default, when you link Salesforce to Microsoft Azure, the system automatically updates your Salesforce username and email address with your Microsoft Azure account details. To turn off this automatic update, perform these steps.
- Click the Registration Handler Apex Class link.
- Click Edit.
-
Search for the updateUser method and remove or comment out:
//u.email = data.email; //u.lastName = data.lastName; //u.firstName = data.firstName; - Save your changes.
-
Add the Callback URL.
- Go back to your auth provider.
- In the Salesforce Configuration section, copy the callback URL.
- Open your Microsoft Azure account, and click Overview.
- Click Add a Redirect URL next to Redirect URLs.
- Select .
- Paste the callback URL in Redirect URIs.
- Select Access tokens (used for implicit flows) and ID tokens (used for implicit and hybrid flows).
- Click Configure.
- If you have a partner community set up, go to the Auth. Provider in your org.
- From the Experience Cloud Sites section, copy the callback URL.
- Open your Microsoft Azure account, and click Authentication.
- Go to , and click Add URL.
-
Paste the Experience Cloud Site callback URL, and save your changes.

-
Test if your Auth. Provider authentication was successful.
- From the Salesforce Configuration section, copy the Test-Only Initialization URL.
-
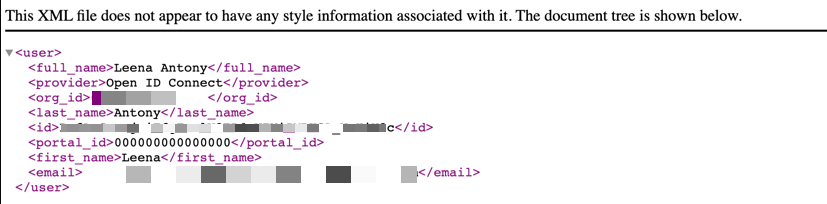
Paste the URL in the address bar, and press Enter.
This is a sample text that appears:
Heeft dit artikel uw probleem opgelost?
Laat ons weten wat we kunnen doen om te verbeteren!