
You are here:
Set Up Approval Process Detail Page For Contracts
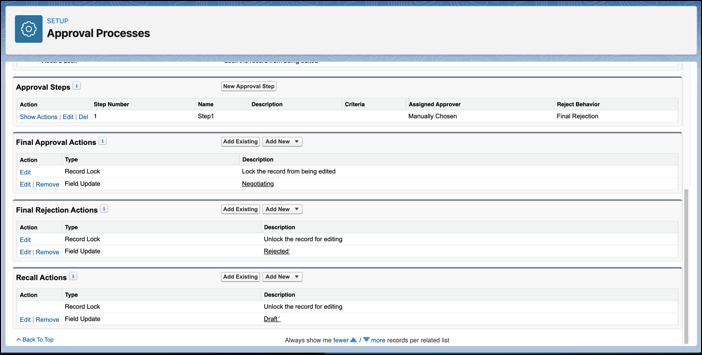
You cannot activate the approval process until you define at least one approval step. You must define who receives the approval request and the field update settings for final approval actions, final rejection actions, and recall actions. The contract approval process setup ensures that the contract status reflects the defined action when the contract is approved, rejected, or recalled.
You have created an approval process in the previous section Define a Contract Approval Process Name. However, you cannot activate the approval process until you define at least one approval step.
- From Setup, in the Quick Find box, enter Approval Process.
- Click Approval Processes.
- Select Contract in the Manage Approval Processes For field.
- Click the approval process that you created.
- From the Approval Steps section, click Add Approval Step.
- Enter these details in Step 1. Enter Name and Description:
- Name: name. For example, Step1.
- Unique Name: name. For example, Step1.
- Description: Description of the step.
- Step Number: number. For example, 1.
- Click Next.
- Select All records should enter this step in Step 2. Specify Entry Criteria. Click Next.
-
Select an approver option in Step 3. Select Assigned Approver:
Use the Submit for Approval option in the dropdown menu next to the New Note button. Don't use the Submit for Approval button located on the Documents tab of the Contract record.
- Select a reject behavior option in Step 3. Select Assigned Approver:
Perform all rejection actions for this step AND all final rejection actions. (Final Rejection)
Perform ONLY the rejection actions for this step and send the approval request back to the most recent approver. (Go Back 1 Step)
- Save your changes.
- Select No, I'll do this later. Take me to the approval process detail page to review what I've just created. Click Go.
- From the Final Approval Actions section, click Add New and select Field Update.
- Enter these details in the New Field Update window:
- Name: Negotiating
- Unique Name: Negotiating
- Description: Add a description.The default object is a contract.
- Field to Update: Status
- Select Negotiating for A specific value.
- Save your changes.
- From the Final Rejection Actions section, click Add New and select Field Update.
- Enter these details in the New Field Update window:
- Name: Rejected
- Unique Name: Rejected
- Description: Add a description.The default object is a contract.
- Field to Update: Status
- Select Rejected for A specific value.
- Save your changes.
- From the Recall Actions section, click Add New and select Field Update.
- Enter these details in the New Field Update window:
- Name: Draft
- Unique Name: Draft
- Description: Add a description.The default object is a contract.
- Field to Update: Status
- Select Draft for A specific value
- Save your changes.
- Activate the approval process:
- From Setup, in the Quick Find box, enter Approval Process.
- Click Approval Processes.
- Click Activate next to the contract approval process you created.