You are here:
Set Up Salesforce Contracts Partner Community User
Perform these tasks to set up the partner user in Salesforce Contracts.
- Enable Salesforce Digital Experience for Salesforce Contracts Partner Community UserYou must configure a domain name, and then enable standard external profiles.
- From Setup, in the Quick Find box, enter Digital Experiences.
- Click Settings.
- Select the Enable Digital Experiences checkbox.
- Enter the domain name. Click Check Availability.
- Click Save, and then click OK.
- From Settings, scroll to Role and User Setting, and select Allow using standard external profiles for self-registration, user creation, and login.
- Click OK, and then click Save.
- Create a Partner Account for Salesforce Contracts Partner Community UserYou must create an account to associate it with a contact.
- In the App Launcher, search for and open Accounts.
- Click New, add the required details, and then save the account.
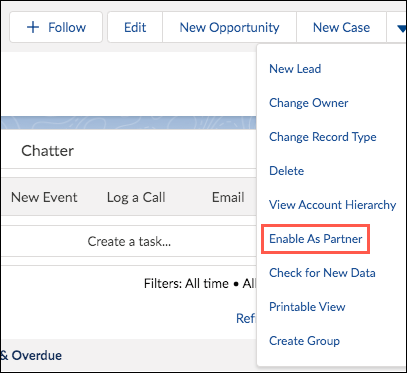
- Open the new account, and from the dropdown menu, select Enable As Partner.
- Clone and Configure a Partner Profile for Salesforce Contracts Partner Community UserOn the Profile Setup page, you must clone an existing profile to create a custom profile.
- From Setup, in the Quick Find box, enter Profiles, and then select Profiles.
- Click the name of a profile that’s similar to the one that you want to create, and then in the profile page, click Clone.
- Enter a profile name.
- Click Save.
- Click Edit, next to the cloned profile name.
- From the Standard Object Permissions section, select access level as read and edit for these objects:
Contract
Contact
Account
- From the General User Permissions section, select the option: Allow users to generate contract documents and manage contract lifecycles in Digital Experience Partner sites.
- From the Administrative Permissions section, select API Enabled.
- Click Save.
- From the Record Type Settings, select Contract and select Contract Lifecycle Management as the default record type.
- Click Save.
- From the Tab Settings, select Contract and change the visibility to Default On.
- Click Save.
- Create a Salesforce Contracts Partner Community UserYou must create a contact and enable it as partner.
- In the App Launcher, search for and open Contacts.
- Click New.
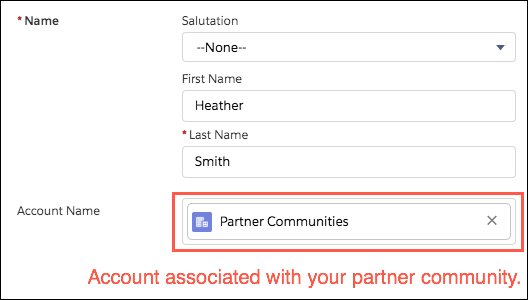
- Add the required details in the Name field.
- In the Partner Account field, select the account that you created for your partner community.
- Save the contact.
- Open the new contact that you created, and then select Enable Partner User.
- In the New User page, select these items:
User License: Partner Community
Profile: <Name of the cloned profile>
 Note If you’ve cloned a profile, then in the profile field, select the cloned profile name.
 - Define other required fields, such as email and nickname.
- Select Salesforce CRM Content User.
- Click Save, and then click OK.
- From the Permission Set Assignments, click Edit Assignments and assign DocGen Run-time Community User and CLM Digital Experience Partner User permission set.
 Important
If you receive a "Portal Account Owner has No Role" error, assign a role to the owner of the partner account. Then repeat this procedure.
- Create Salesforce Digital Experience Site for Salesforce Contracts Partner Community UserYou must configure a name and URL for a partner portal site.
- From Setup, in the Quick Find box, enter Digital Experiences.
- Click All Sites.
- Click New.
- Select the Partner Central Non Enhanced template.
- Click Get Started.
- In the Name field, enter the name for the digital experience site.
- In the optional part of the URL field, enter a name.
- Click Create.
- Configure Partner Community Digital Experience Site for Salesforce Contracts Partner Community UserYou must activate the partner community digital experience site and associate the site to the cloned partner community profile.
- From Setup, in the Quick Find box, enter Digital Experiences.
- Click All Sites.
- Find the partner community that you created, and then click Workspaces | Administration.
- In Settings, click Activate. Click OK.
- In Preferences, select Show All Settings in Workspace.
- Click Save.
- In Members, select Partner from the Search dropdown.
- Select the profile that you cloned earlier from Available Profiles, and then click Add to move the profiles to the Selected Profiles list. Click Save.
- Return to the Digital Experiences All Sites page.
- Close the window.
- Add Contracts Object to the Navigation Menu of Partner Community Digital Experience SiteYou must add contract object to the partner portal navigation menu.
- From Setup, in the Quick Find box, enter Digital Experiences.
- Click All Sites.
- Click Builder next to the site created in the previous step.
- Click anywhere on the navigation menu bar, and then click Edit Default Navigation.
- Click Add Menu Item.
- Enter the following information:
Name: Contract
Type: Salesforce Object
Object Type: Contract
Default List View: Default
- Click Save Menu.
- Click Publish.Note You can adjust the style and layout of the site theme.For additional information, see Adjust the Style and Layout of Your Site Theme.Note E-Signature and Contract Documents page should be available under the List of Pages dropdown. Wait for the builder to refresh, if not available.
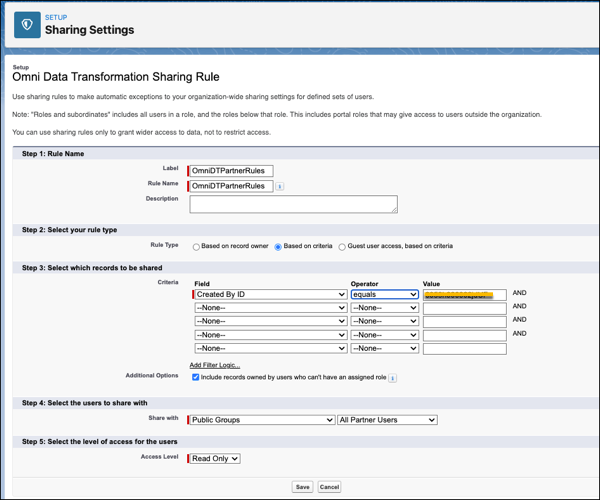
- Define Sharing Rules for Document Generation for Salesforce Contracts Partner Community UserSharing rules grants partner users read access to records. The documents can be accessed according to the rule. You can create sharing rules based on your business needs. The details of the sharing rules are specific to your organization.
For document generation, create the following types of sharing rules for Document Templates, Omni Data Transformation, and Omni Process.
- From Setup, in the Quick Find box, enter sharing.
- Click Sharing Settings.
- To set up the sharing rules for Document Templates, Omni Data Transformation, Omni Process, and Object State Definition scroll to the respective Sharing Rules section, and then click New.
- Define required fields, such as label, rule name, rule type, and share with.
- Set up the sharing rules:See these examples for more details:
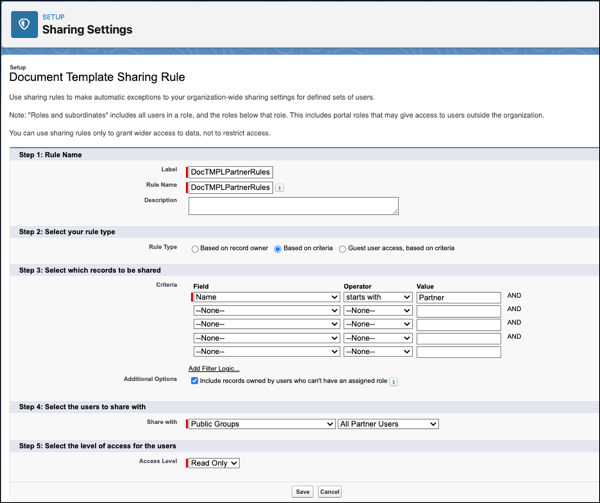
Document templates
Document templates don’t contain sensitive data, and aren't specific to any customer. You can design a sharing rule that shares only the document templates that partner users require.
- Click Save.
- Repeat steps c-f for Omni Data Transformation Sharing Rules and Omni Process Sharing Rules.
Omni Data Transformation
This sharing rule provides the partner users read access to the Omnistudio Data Mappers map items associated with document templates and Omniscripts.
Omni Process
This sharing rule provides the partner users read access to the Data Mappers map items associated with document templates and Omniscripts.

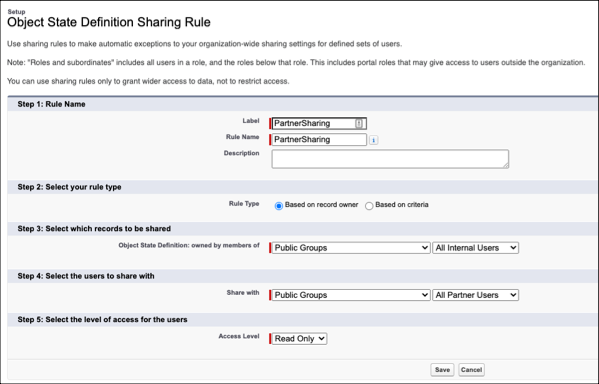
Object State Definition
This sharing rule provides the partner users to access the contract state transition from one state to the other state.