You are here:
Service Process Studio Request Forms
A request form is an intake form that helps service agents to gather information from customers easily. Create a request form and associate it with a service process definition. Service agents can launch this request form from the Action Launcher component and get started with customer service operations quickly and efficiently.
Required Editions
| Available in: Lightning Experience |
| Available in: all editions with the Industry Service Excellence licenses |
- Design a Request Form by Using Omniscripts and Screen Flows
Use Omniscripts and screen flows to design a request form for your service process. This request form gives agents a guided path for completing a business process and serves as a configurable way of creating a seamless customer experience. - Create a Case Through Omniscript By Using Connect API
When the agent confirms the details and submits a request, the service-catalog-request Connect API is triggered to create a case for this service process request. Use one of these Omniscript elements to call this service-catalog-request Connect API. - Create a Case Through a Flow by Using Connect API
When a user submits a request, for instance, to update their profile, the service catalog request Connect API is triggered to create a service request and a case. To call the Connect API, create an invocable method, and include it as a subflow within the screen flow that's used to design the request form.
Design a Request Form by Using Omniscripts and Screen Flows
Use Omniscripts and screen flows to design a request form for your service process. This request form gives agents a guided path for completing a business process and serves as a configurable way of creating a seamless customer experience.
With an Omniscript or screen flow, you can configure interactive business processes that are easy to use, yet have complex functionality occurring behind the scenes. See Omniscripts and Automate Your Business Processes with Salesforce Flow
Let’s consider an address update service process to understand request forms better. A service agent gathers some details from a customer before creating a case for this service process request.
In the following example, you see an OmniScript walking an agent through several steps to provide information for an address update service process request.
First the agent enters the details such as the address line 1, address line 2, city, state, country, and then the agent is prompted to select the type of addresses such as shipping or billing, and the agent also needs to select one or more applicable financial accounts such as savings, checking, or credit card for which the address needs to be updated. The next step enables the agent to upload the address proof documents received from the customer. Agent can view the summary of information captured and the agent is asked to confirm the request. After the agent confirms, a Connect API is triggered to create a case that is used to track this service process request.

See Also
Create a Case Through Omniscript By Using Connect API
When the agent confirms the details and submits a request, the service-catalog-request Connect API is triggered to create a case for this service process request. Use one of these Omniscript elements to call this service-catalog-request Connect API.
The information received from the customer through the Omniscript is sent as Additional Input in these action elements.
- Integration Procedure Action
- HTTP Action
This topic illustrates how the information is sent as additional input in the Integration Procedure Action for an Address Update service process request.

The integration procedure calls the Connect API that creates a case and updates the information received from the customer into the data attributes associated with the service process definition. Ensure that the Connect API parameter names map to the data attributes that you’ve created in the Service Process Studio. For example, if you’ve created these data attributes in the Service Process Studio, then design your Connect API attributes accordingly.
- Address Line 1
- Address Line 2
- City
- State
- Accounts
Example Request Body
The attributes in this example represent data attributes of an address update service process request.
{
"svcCatalogItemDefApiName": "AddressUpdate",
"attributes": {
"data": {
"address_line_1": {
"value": "1095 Avenue of the Americas"
},
"address_line_2": {
"value": 6th Ave
},
"city": {
"value": New York
},
"state": {
"value": NY
},
"accounts": {
"value": [
{
"FinancialAccountNumber": 1111
},
{
"FinancialAccountNumber": 9999
}
]
}
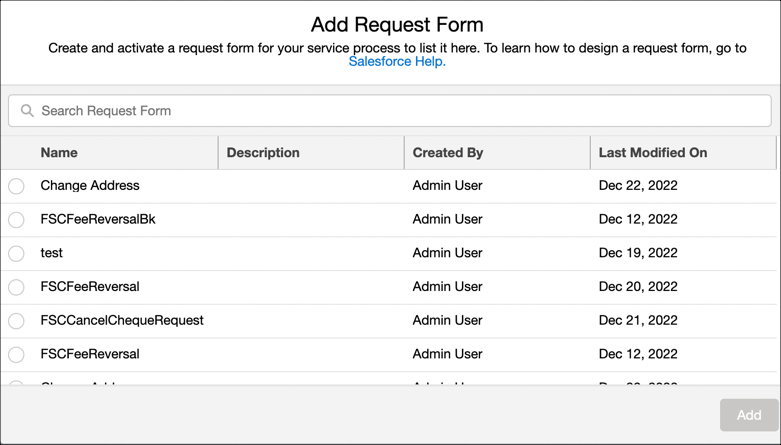
}After you’ve created and activated an Omniscript, add it as a request form to your service process in the Service Process Studio as shown in this example. If your org doesn’t have Omnistudio Runtime, you can't add an Omniscript as a request form.
Create a Case Through a Flow by Using Connect API
When a user submits a request, for instance, to update their profile, the service catalog request Connect API is triggered to create a service request and a case. To call the Connect API, create an invocable method, and include it as a subflow within the screen flow that's used to design the request form.
This example shows how a service request and a case is created when a user submits a leave request through a request form that's designed by using a screen flow.
This screenshot shows a service process definition for submitting a leave request with the API name submitLeave.

This screenshot shows the data attributes in the service process definition.
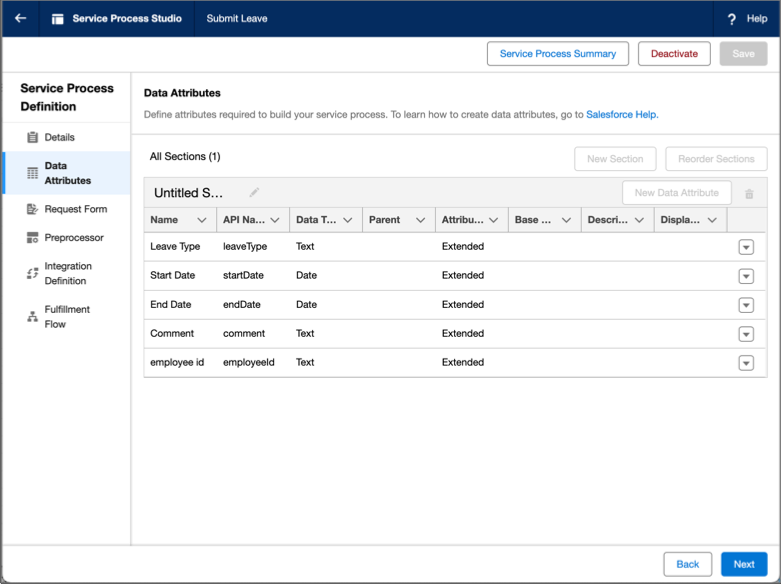
The service process definition contains these data attributes.
- Leave Type
- Start Date
- End Date
- Comment
- employee id
Ensure that the Connect API parameter names map to the data attributes.
The information received from the user through the screen flow is sent to the invocable method as an input. You can create an invocable method by using Developer Console in the Setup menu. See InvocableMethod Annotation.
This code sample shows a class that stores the input variables included in the flow that's used to design the request form.
global class submitLeaveRequest {
    @InvocableVariable
    @AuraEnabled
    global String employeeId;

    @InvocableVariable
    @AuraEnabled
    global String leaveType;

    @InvocableVariable
    @AuraEnabled
    global Date startDate;

    @InvocableVariable
    @AuraEnabled
    global Date endDate;

    @InvocableVariable
    @AuraEnabled
    global String comment;


    @InvocableVariable
    @AuraEnabled
    global String subject;

    @InvocableVariable
    @AuraEnabled
    global String contactId;

    global submitLeaveRequest() {}

    global submitLeaveRequest(String employeeId, String leaveType, Date startDate, Date endDate, String comment, String subject, String contactId) {
     employeeId = employeeId;
     leaveType = leaveType;
     startDate = startDate;
     endDate = endDate;
     comment = comment;
     subject = subject;
     contactId = contactId;
   }
}
This code sample shows the invocable method that calls the service catalog request Connect API for creating a service request and a case. The invocable method stores case object attributes, such as the Subject and ContactId fields, and data attributes. See Service Process Studio Connect APIs.
public class callConnect {
@InvocableMethod(label='Submit Leave' description='Returns the case number for Leave Case submitted' category='CustomCategory')
public static List<String> submitLeave(List<submitLeaveRequest> submitLeaveRequests) {
submitLeaveRequest submitLeaveRequest = submitLeaveRequests[0];
ConnectApi.ServiceProcessRequestInputRepresentation spd = new ConnectApi.ServiceProcessRequestInputRepresentation();
spd.svcCatalogItemDefApiName = 'submitLeave';
// To store Data Attributes
Map<String, ConnectApi.GenericObject> fields = new Map<String, ConnectApi.GenericObject>();
ConnectApi.GenericObject employeeId = new ConnectApi.GenericObject();
employeeId.value = submitLeaveRequest.employeeId;
fields.put('employeeId', employeeId);
ConnectApi.GenericObject leaveType = new ConnectApi.GenericObject();
leaveType.value = submitLeaveRequest.leaveType;
fields.put('leaveType', leaveType);
ConnectApi.GenericObject startDate = new ConnectApi.GenericObject();
startDate.value = submitLeaveRequest.startDate;
fields.put('startDate', startDate);
ConnectApi.GenericObject endDate = new ConnectApi.GenericObject();
endDate.value = submitLeaveRequest.endDate;
fields.put('endDate', endDate);
ConnectApi.GenericObject comment = new ConnectApi.GenericObject();
comment.value = submitLeaveRequest.comment;
fields.put('comment', comment);
spd.attributes = fields;
// To store Case Information
Map<String, ConnectApi.GenericObject> caseInfo = new Map<String, ConnectApi.GenericObject>();
ConnectApi.GenericObject subject = new ConnectApi.GenericObject();
subject.value = submitLeaveRequest.subject;
caseInfo.put('Subject', subject);
ConnectApi.GenericObject contactId = new ConnectApi.GenericObject();
contactId.value = submitLeaveRequest.contactId;
caseInfo.put('ContactId', contactId);
spd.caseInfo = caseInfo;
ConnectApi.ServiceProcessRepresentation output = ConnectApi.IServiceProcessConnectFamily.createCaseServiceProcess(spd);
return new List<String> {output.caseNumber};
}
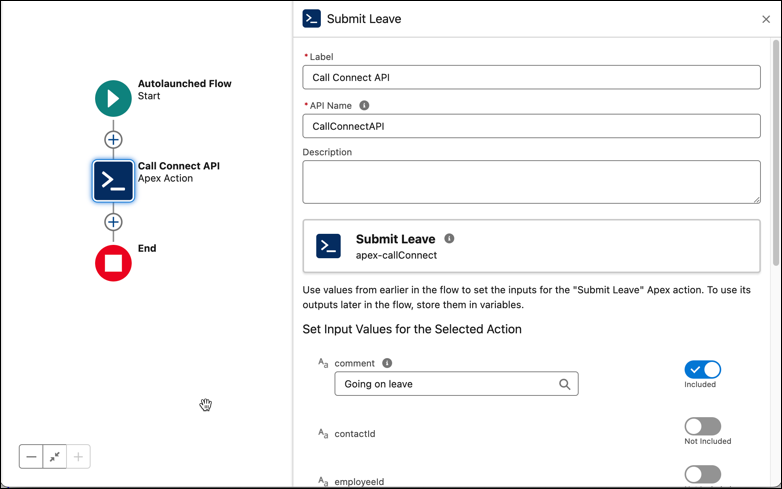
}This screenshot shows a subflow that contains the invocable method callConnect. The subflow is referenced within the screen flow that's used to design the request form.
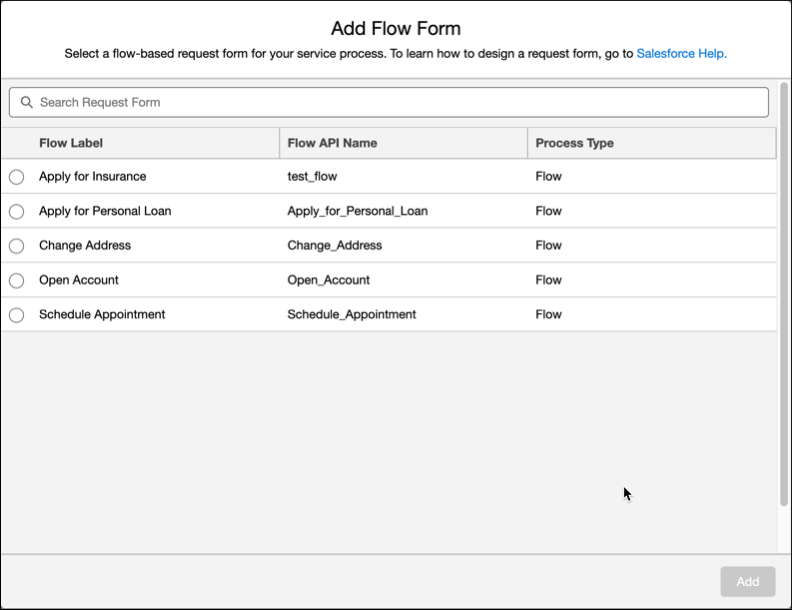
After you create and activate the screen flow, add it as a request form to your service process in Service Process Studio as shown in this screenshot.