
You are here:
Apply Transpose Transformers
Apply a transpose transformer when you want to reconstruct a flat-file format by translating columns of data into rows.
Required Editions
| User Permissions Needed | |
|---|---|
| To apply transformers: | Admin |
If headers in your file look like this, and you want to transpose View Through Conversions and Click Through Conversions into separate rows, this example shows how to apply a transpose transformer:
| Date | Campaign | Activity 1 View Through Conversions | Activity 1 Click Through Conversions | Activity 2 View Through Conversions | Activity 2 Click Through Conversions | Activity 3 View Through Conversions | Activity 3 Click Through Conversions |
| 08-14-15 | ABC_FY15 | 10 | 4 | 100 | 20 | 43 | 31 |
- From the Connect & Mix tab, select Data Streams, and then Data Streams List.
- Create a data stream, or edit an existing one.
- In the Preview Source screen, click Edit Transformers.
- Transpose transformers aren’t added by default, so you must add them. In the Add Transformers area, next to the Transpose Transformer, click the blue plus icon.
-
Define the details:
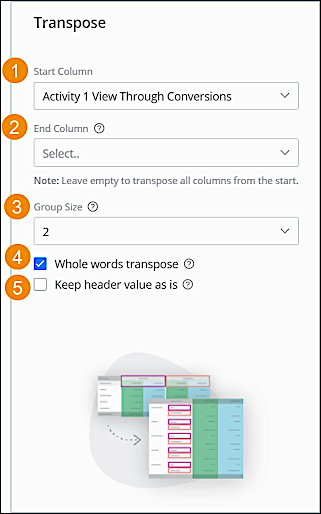
Start Column (1) Sets the column that you want to start the transpose from, meaning the first column with the dimension and measurements together in the header. In this case, set to Activity 1 View Through Conversions. End Column (2) Sets the column where you want to stop the transpose. The column specified isn’t transposed. When using this option, don’t map the non-transposed measurements because doing so causes the data to be duplicated. (This option isn’t the default. In most files, it isn’t necessary to stop the transpose process. ) Group Size (3) Sets the number of columns relevant to the same dimension value. Set the group size throughout the file, otherwise you risk linking measurements to the wrong dimension values. If some columns are missing, you receive the "Transpose groups are incomplete" error and can’t continue to the mapping screen. In this case, set the group size to 2 because you’re creating two groups. Whole words transpose (4) If you want to transpose whole words, select this option. If there are repeating words, they must have a space before and after them. This option doesn’t split words when creating the transpose object dimension. Keep header value as is (5) After locating the repeating words in the group, the transpose creates the transpose object dimension so that it includes the entire column header without separating the measurement section. When there are groups of more than one column, the value that appears as the dimension is the first value in the group. This option isn’t a default, and it’s used to transpose columns of dates. This way, the year, which is a repeating word, isn’t separated from the rest of the date. For example, if you want to transpose dates 01-01-2020 and 01-02-2020, select this checkbox. - Click Done.
Here’s what the table looks like after transpose:

Did this article solve your issue?
Let us know so we can improve!