You are here:
Create a Triggered Email Message Interaction
Create a triggered email interaction in Email Studio to respond to a subscriber action with an email message. Create your email content before creating the interaction. After completing this procedure, start the interaction.
When an event triggers an email in Marketing Cloud Engagement, it creates a copy of the email. The copy includes content blocks called from AMPscript functions such as ContentBlockByID, ContentBlockByKey, and ContentBlockByName. To change the email, pause the trigger interaction, edit the email, and restart the interaction. Triggers that occur during the paused state queue until you restart the interaction.
- In Email Studio, on the Interactions tab, select Triggered Emails.
- Click Create.
-
Complete the fields in the Properties section.
Properties Property Description Name Name or title of this email message interaction. Use this name to identify the message in the application. Subscribers can’t see the name. External Key Unique identifier for the message. Use this value to identify the message when using the API. Description A brief explanation of the email’s content and purpose. Send Classification Sets a send classification to use for this interaction. Override Sender Profile Determines whether the interaction uses a different sender profile than indicated in the send classification. If selected, select an override sender profile to use. Override Delivery Profile Determines whether the interaction uses a different delivery profile than indicated in the send classification. If selected, select an override delivery profile to use. -
Complete Content.
Content Property Description Email The message content sent by this interaction. Select a Content Builder email to use. Subject Line Subject or title of the email message. The subject line is automatically generated based on the email you choose. -
Complete Subscriber Management.
Subscriber Management Property Description List List that holds Subscriber data, including status, for Subscribers who trigger this email interaction. If you don’t select a list, the Triggered Send Managed List, a hidden system-defined list that doesn’t support all triggered send functionality, is used. Triggered Send Data Extension The data extension to update with data from requests to trigger this email interaction. Select a value in this field if you use a data extension created using the TriggeredSendDataExtension template. You can’t remove the data extension after a send occurs. Add subscribers to this list Determines whether the list accepts new subscriber information of subscribers who trigger this email interaction. This setting only applies to the selected list and isn’t related to the selected data extension. Update Subscribers If you pass in new data for a preexisting subscriber attribute via the API call, it updates that subscriber’s attributes. This setting applies to the selected list and isn’t related to the selected data extension. - To include a suppression list that prevents certain addresses from receiving triggered email messages, select that list.
-
To use a data extension or exclusion script to prevent email from going to selected
domains, select the data extension or enter the AMPscript.
For multiple AMPscript lines, separate the lines with an OR. For example:
ROWCOUNT(LOOKUPROWS("Case_16733436", "SubscriberKey", _subscriberKey)) > 0 OR ROWCOUNT(LOOKUPROWS("Case_15537702", "SubscriberKey", _subscriberKey)) > 0 -
Complete optional Send Options.
Send Options Property Description CC Email Address More email addresses you want to receive a copy of this email. These addresses are visible to email recipients. You can also use the Lookup()function in AMPscript to retrieve email address information.BCC Email Address More email addresses you want to receive a copy of this email. These addresses aren’t visible to email recipients. Track all links found within this email Determines whether the system collects tracking information on the links in this email. Send as Multipart MIME Determines whether you send the message as multipart MIME to provide a text version of the email to subscribers whose email client doesn’t support HTML email. Use multipart MIME format for international sending because it allows character sets other than US-ASCII. Suppress the send from Reports When selected, reports exclude sends from this interaction. Use this option to prevent test sends from appearing in reports. Priority Determines how quickly a triggered email is sent.
- High: Queued immediately.
- Medium: Queued up to 3 minutes by default. It then takes up to 1 minute to send the email.
- Low: Queued every 5 minutes. It then takes up to 5 minutes to send the email.
Keyword Categorizes the interaction. If you enter a value in this field, that value is available to API calls. Send Logging Log the send in the SendLog data extension. Disable API calls to the triggered send when an email build error threshold is reached Set a threshold of errors before API calls are disabled and the send process is stopped.
By default, the send process stops when an error occurs while building an email for a subscriber. These errors can occur for several reasons, including an API call passing in bad data or an AMPscript runtime error. However, the system continues to accept API calls even after an error occurs. If you want to use a back-up system when the threshold is reached, this option allows visibility at the API layer to the error.
Use Disable API calls to this triggered send when an email build error threshold is reached if your account uses the asynchronous API.
 Note The default error threshold is 10. The first error stops sends, but the system continues to accept API calls. To change the error threshold, contact your Engagement account representative. When that number changes, the system disables API calls after reaching the threshold.
 - Save your changes.
See Also
Edit a Triggered Email
Understand the process of editing a triggered email in Email Studio after you start the interaction.
- Pause the interaction. While the interaction is paused, messages that subscribers trigger are queued until you restart the interaction.
- Edit the email's content under Content.
- Under Interactions, publish the triggered send with your content changes.
- Restart the interaction.
Triggered Sends Queue Options
Use the triggered sends queue in Email Studio to view, export, clear, and delete specific subscribers that were added to a paused triggered send. The queue is useful for testing new triggered sends, troubleshooting triggered sends, or for using journey builder email activity triggered sends that paused after exceeding the error threshold.
Allowed Actions
The triggered sends queue allows these actions. View queue is enabled when a paused triggered send is selected. It remains disabled if multiple triggered sends are selected unless they're all paused.
| Action | Meaning | Notes |
|---|---|---|
| Clear Queue | Clears the entire queue of subscribers that were added to a paused triggered send created in Email Studio. | When the triggered send is started, cleared subscribers don’t receive an email. |
| Export Data | Exports the contents of the queue. | |
| Delete Individual | Removes only the selected subscribers. | |
| Refresh | Updates the queue grid to show latest content. |
Administrator Options
Administrators can use the Clear Queue permission to control which account users can view queue. Users without this permission can’t clear the queue or delete subscribers from it. The Clear Queue permission is available for these Marketing Cloud Engagement roles: Administrator, Viewer, Editor, Publisher, Channel Manager, Security Administrator.
Queue Export Columns
Export the triggered send queue to a .csv file via FTP, which includes these columns.
- Job ID
- Triggered Send Subscriber ID
- Triggered Send Subscriber Request ID
- Created Date
- Member ID
- List ID
- Full Name
- Email Address
- Subscriber Key
- Request Data
Triggered Emails Example
Review this example to learn how to send a thank you email to any subscriber who makes a purchase on your website. Create a triggered email interaction from start to finish in Email Studio.
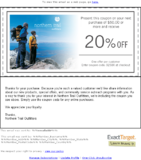
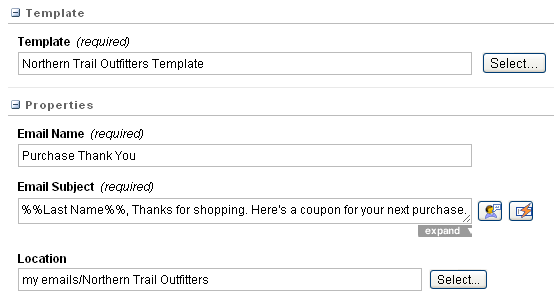
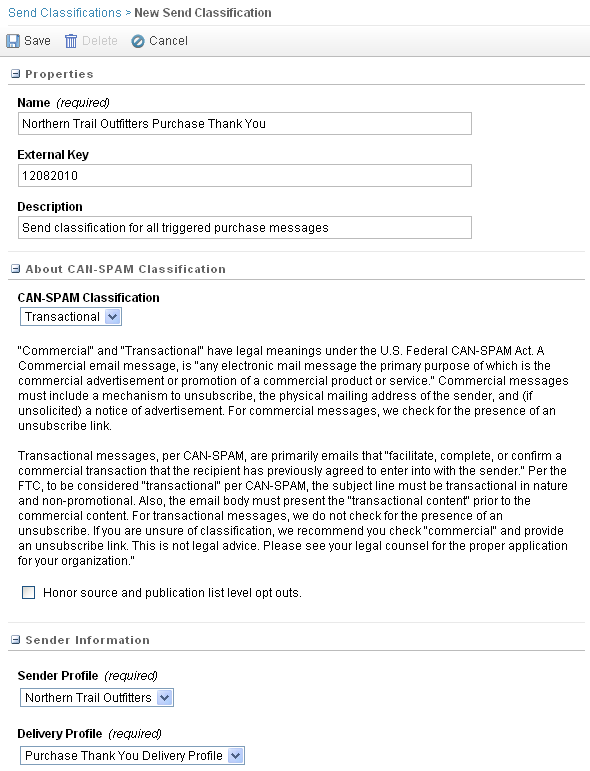
A marketer at Northern Trail Outfitters sends a thank you email to any subscriber who makes a purchase on their website. The marketer creates a triggered email message interaction to automate the email send.
-
Create the email message content. As with any email message, you can use advanced features,
such as dynamic content, personalization, and international character encoding.
-
Create the send classification, which contains the CAN-SPAM classification, sender profile,
and delivery profile used for this triggered email interaction.
-
Bring email message content and send classification together into the triggered email
interaction.
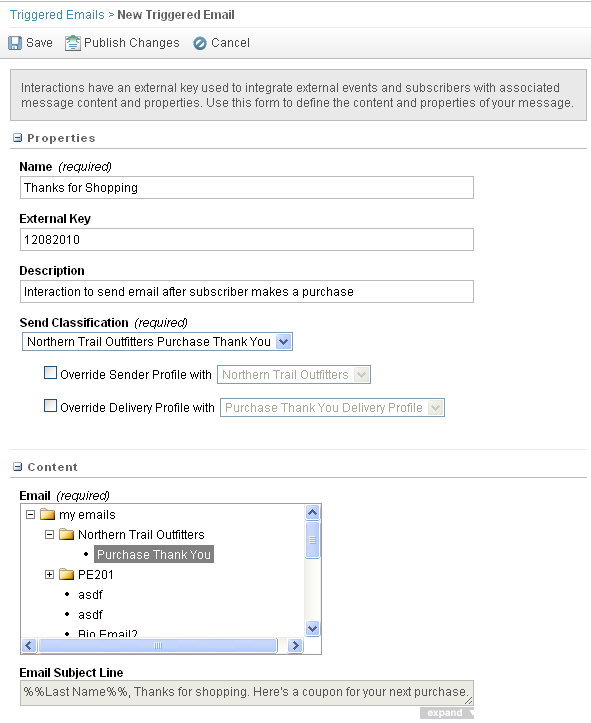
- Associate a send classification with the interaction. You can override the sender profile or delivery profile.
- Choose the email to send when this interaction is triggered.
- Optionally, update a list or a data extension for the subscriber who triggers this interaction.
-
Start the email interaction, making it available for trigger by customer activity.
 Note The events that trigger this interaction are determined using the API to create code outside of the application interface. To create API components so the triggered email interaction works as intended, coordinate with your IT department.
The interaction is available to send the email message when triggered. Any customer who makes a purchase on the Northern Trail Outfitters website receives the thank you message.