
You are here:
Create and Use the Journey Decisioning Agent
Harness the power of Agentforce in your journeys with the Journey Decisioning agent. The agent dynamically assigns the best customer journey and creates custom content for each individual based on real-time behavior profile details and context.
Required Editions
| Available in: Marketing Cloud Engagement Pro+, Corporate+, and Enterprise+ Editions |
| User Permissions Needed | |
|---|---|
| To build an agent in Marketing Cloud Next: | Manage AI Agents AND Manage Agentforce Employee Agents |
| To set up and configure data in Data 360 | Data Cloud Architect |
| To use Agentforce in Journey Builder: | Marketing Cloud Engagement+, access to Data Extensions, Journey Builder, and optionally, Automation Studio |
Learn what the Journey Decisioning Agent can do for your business.
Work with your Salesforce admin to address the prerequisites. Then set up your agent, create your use cases, and use the Agentforce data in your journeys.
- To access Marketing Cloud Next, make sure Marketing Cloud Engagement+ is set up and ready to use.
- Give your marketers agent access.
- Optionally, set up your business units to use in Marketing Cloud Next.
- Set up Data Cloud for your org.
- Set up a data graph in Data 360 that contains the information to evaluate.
- Create journeys in Journey Builder. You can use up to five journeys when you create your use cases in Marketing Cloud Next.
- Journey Decisioning Subscriber Key Resolution
This content describes the behavior of specific Agentforce actions related to the Marketing Cloud Engagement inputs, particularly focusing on the crucial step of resolving customer identifiers. - Journey Decisioning Flows and Data Extensions
For each use case you set up in Marketing Cloud Next, several items are automatically created for you. For each journey use case, two flows and two data extensions are created. For a flow-only use case, two flows are created, but since data extensions aren’t applicable, they aren’t created.
Set Up Your Journey Decisioning Agent
This setup in Marketing Cloud Next ensures the correct AI features are enabled for you to use the Journey Decisioning agent.
- Set up Einstein Generative AI.
- Enable Agentforce.
-
Enable the Agentforce Employee Agent (AEA) agent. This step allows you to use the
marketing-specific agent templates.
- From Setup, in the Quick Find box, enter Agentforce Agents and select it.
- Open the Agentforce Employee Agent in Agentforce Builder and turn it on.
- Enable the Journey Decisioning agent, and open it in Agentforce Builder.
- Your agent already contains a subagent and actions. Click on the subagent to open its details, and update the instructions. See the table below for details about updating the instructions based on your organization's preferences.
- Open the subagent tab to show the subagent actions. Open each action respectively and update the information as needed.
- Customize the Journey Decisioning agent by adding actions as needed.
To make the best decisions, the agent needs information about your subscribers. You can provide that information to the agent in several ways. See the table to determine how you should set up your instructions.
| Scenario | Instructions | How |
|---|---|---|
| Your organization uses the Get Context action. This action provides a summary based on the data graph. | Replace DataGraph API Name and the Agent Version ID that are in brackets in the instructions. |
|
| Your organization doesn't use the Get Context action, but has a custom action with another context source. | Delete the instruction using the garbage can icon and replace it with another option to provide customer details. |
|
Set Up Your Use Cases
This part of the setup provides the information that the agent uses to determine which journeys to choose from by defining overviews and outcome expectations for each journey.
- In Setup, search for and select Agentforce & Gen AI.
-
Scroll to the Manage Marketing Agent Templates section.
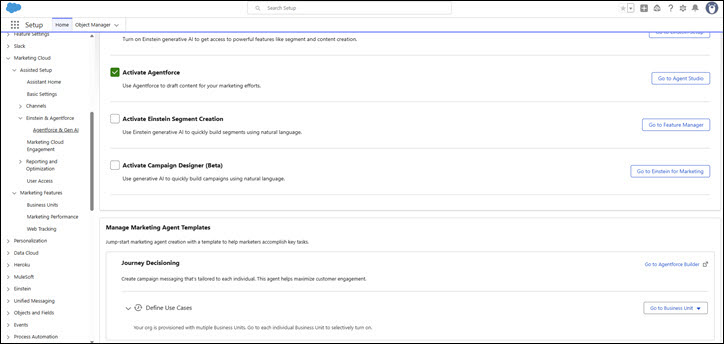
With business units Choose the business unit to use from the drop-down list of options and follow the instructions. Without business units Continue to the next step. -
Add 3 to 5 journeys for the agent to choose from.
- Click Add Use Case.
- Add the name and description for your use case and select Next.
- Select which marketing experience to use.
- If applicable, select the business unit to use.
- Add an overview and expected outcome, and save your changes.
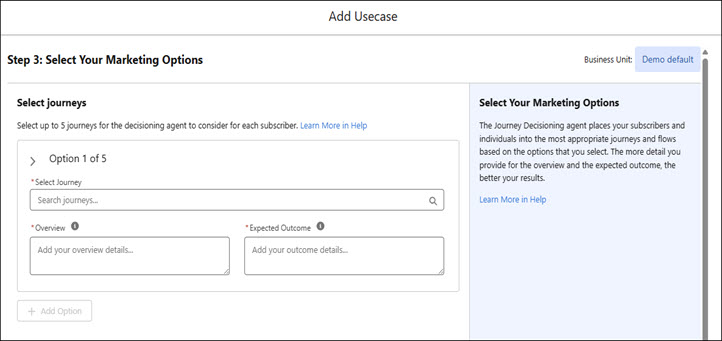

Once this setup is complete, these items are created for you.
- A flow for decisioning
- a flow for content
- A data extension for the journey selection data
- a data extension for the content data
Considerations
To avoid errors, ensure these items are set up correctly.
- Verify proper access to the appropriate business units.
- Verify use cases have a unique name.
- To avoid resolution errors, verify which Unified Individual DMO API name to use if not the default.
- Verify you have a Subscriber Key, Unified Individual ID, or both.
Set Up Your Agent Flow
Agentforce uses the flow to sort your population into the right journeys, creates the right content for each individual, and stores the data in your data extensions.
- Create a new flow in Flow Builder.
-
Select your New Automation data source.
This is akin to choosing a journey entry event. For example, choose a segment-triggered flow for a journey. For flows, use the automation event-triggered flow.
- Click the Add Element icon in the flow.
- Find the action you need in the list of options. The agent action is the API name for the action you created.
-
Fill out the fields associated with your action.
Refer to the Sample Input Value Text table for examples of the information to use for the input values.
- Save the action.
| Action | Sample utterance | considerations |
|---|---|---|
| Journey Selection | Working with usecase {usecaseId}, select the best journey for the subscriber with unifiedIndividualId {unifiedIndividualId}. Use individualId {individualId} only for retrieving personalized context. | Copy and paste this text to use for your input value for journey selection. |
| Journey Content Creation | Working with usecase {usecaseId}, create journey email content on selectedJourneyId {selectedJourneyId} for the subscriber with unifiedIndividualId {unifiedIndividualId}. The email content should consider user preferences, given that they like [enter specifics here]. Use individualId {individualId} only for retrieving personalized context. | Copy and paste this text to use for your input value for content creation. Replace information in the [enter specifics here] placeholder. This should be information that specifically reflects the subscriber, such as liking running or hiking, or they live in the Northwest US. |
Use Your Data in Journey Builder
Now that Agentforce has your personalized journey decisions and content created for your subscribers, you can use that information in Journey Builder.
Log into Marketing Cloud Engagement. Use the data extensions that contain your Agentforce results in the journey entry event.
Your Marketing Cloud Next setup determines how you can use the data from the data extensions. For example, if you use Automation Studio, create your automation to link the subscribers to the data you need for the journey and add them to the trigger. You can see which subscribers the agent sorted into which journeys.
If you created content using Agentforce, you can, for example, add the AMPscript to your messages to use the subject line, preheader, and body copy from the data extension.
