
You are here:
Synchronize Data Extensions with Marketing Cloud Next
Synchronize your data extensions with Marketing Cloud Next on a schedule that you define. When you synchronize a data extension, your team can continue to use any integrations that rely on data extensions in your Marketing Cloud Engagement account. At the same time, you can start using that data to create campaigns, segments, and flows in Marketing Cloud Next.
Required Editions
| Available in: Marketing Cloud Next Pro+, Corporate+, and Enterprise+ Editions |
| User Permissions Needed | |
|---|---|
| To sync data extensions, create Data 360 Objects, and map fields: | Data Cloud Architect |
This video shows the process of synchronizing your data extensions with Marketing Cloud Next.
Create a Data Stream for Data Extension Data
In Data 360, a data stream is a connection to a data source. Each data stream has its own refresh schedule in which it pulls the latest data from the connected data source. In Marketing Cloud Next for Engagement, you use data streams to synchronize Data 360 with data from your data extensions.
When you create a data stream, Data 360 stores the data from your data extension in a raw storage layer called a data lake object (DLO). However, the data isn’t available widely throughout Data 360 until you map the fields to a data model object (DMO). A DMO is the business layer that marketers interact with. To learn more about data objects, see Salesforce Help: Data Objects in Data 360.
Prioritize creating data streams for your most important data extensions, such as those used within the Contact Model.
- Log in to Salesforce.
-
On the app launcher (
 ), search for data streams, and then select Data
Streams.
), search for data streams, and then select Data
Streams.
- On the Data Streams tab, click New.
- Under Connected Sources, select Marketing Cloud.
- Click Next.
-
Review the mappings of business units to data spaces.
These mappings don’t automatically apply when you sync a data extension. In a later step, you specify which data space can access the data from the data extension.
- Click Next.
-
On the Data Extensions tab, select the business unit that contains the data extension, as
shown in this image.
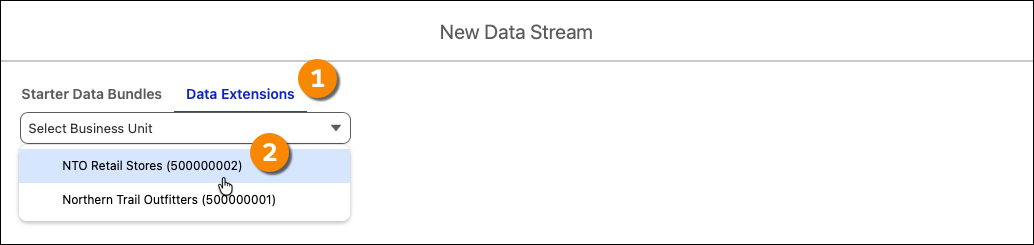
-
From the list of data extensions, select the data extension you want to synchronize with
Data 360.
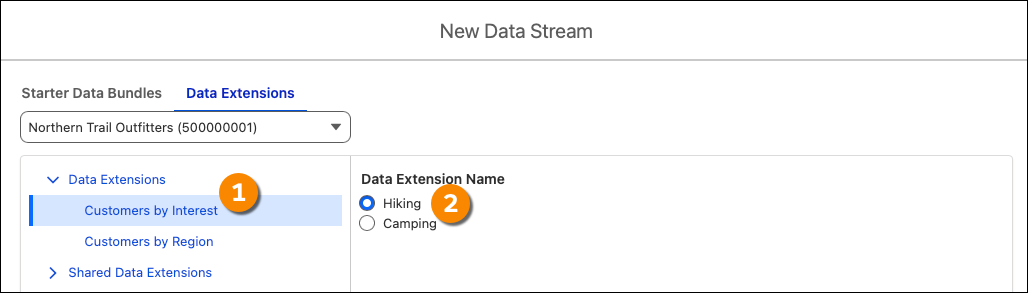
The pane on the left lists the data extension folders from your Marketing Cloud Engagement account. After you select a folder, the pane on the right lists the data extensions it contains, as shown in this image.
-
To apply a custom label to the data extension, change the name in the Object
Label field. When you update the Object Label, the Object API Name field updates
automatically.
 Tip It’s helpful to add a prefix such as MCE_ to make the data extension object easier to identify.
 - Click Next.
-
Under Object Details, for Category, select a category that aligns with the data in the
selected data extension.
- Profile—Data related to an individual, account, or other type of profile. This type of data can include demographic data (such as name, age, or location), psychographic data (such as hobbies, interests, or preferences), or aggregate information (such as lifetime value or loyalty tier).
- Engagement—Time-series oriented data related to events, such as previous purchases or interactions with a web page.
- Other: Any other type of data, such as reference data.
- For Primary Key, select the primary key field from the data extension.
- Click Next.
-
Select a data space to sync data into.
After you create the initial synchronization process, you can sync the data with other data spaces.
-
To specify the records that are accessible within a data space, define a filter.
A filter defines the criteria for records to include in the data space. Filters don’t restrict which records are imported from the data extension into the DLO. See Knowledge Article: Data 360: Impact of Data Space Filters on Data Stream Counts.
- Next to Data Space, click Set Filter.
- Click Add Filter.
- For Select an Object, select the data extension object.
- For Select Column, select the column in the data extension to filter on.
- For Select Operator, select the type of operator to use in the filter.
- For Value, enter the value to filter on for the selected column.
- Click Add.
- To add more filters, click Add Filter, and then define the next filter.
- Save your changes.
-
For Data Extension Extract Mode, select an option for extracting data from the data.
 Note For best performance, use a delta refresh type.
- Full Refresh—Pull the complete set of data from the data extension.
- Delta Extract by Date—Pull only the data added after the last refresh. When you select this option, also select a timestamp field from the data extension. When the extract runs, Data 360 sets the most recent value in the selected field as a high-water mark. In the next refresh, Data 360 extracts all records in which the date in the selected field is more recent than the previous high-water mark.
- Delta Extract by Number—Pull only the data added after the last refresh. When you select this option, also select a number field from the data extension. When the extract runs, Data 360 finds the maximum value in the selected field and sets it as a high-water mark. In the next refresh, Data 360 extracts all records in which the number in the selected field is greater than the previous high-water mark.
-
For Refresh Mode, select an option for adding data to the data object.
- Upsert—Update existing records, and create records if existing records aren’t found.
- Full Refresh—Delete all existing data from the data object and insert the extracted data each time the refresh occurs.
- Click Deploy.
Map Data Extension Fields in Data 360
After you create a data stream that syncs data from a data extension, create a data model object (DMO) in Data 360 and map the fields from the data extension to fields in the DMO.
These steps show how to create a custom data object with fields that are equivalent to the fields from your existing data extension.
- On the Data Streams page in Data 360, select the data stream that’s connected to the data extension you want to make available throughout Data 360.
-
Under Data Mapping, click Start, as shown in this image.

- Under Data Model Entities, click Select Objects.
-
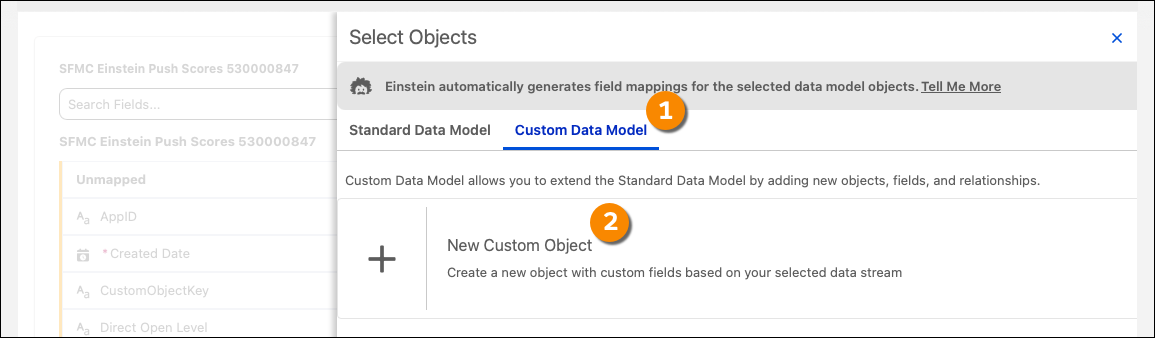
Create the data model object.
-
On the Custom Data model tab, click New Custom Object, as shown
in this image.
-
For each field that marketers use in segments or flows, we recommend that you check the
box in the Enable Value Suggestion column. This option gives users a
preview of values for the selected field when they use the field to create a segment or to
configure decisions in a flow.
Note Up to 500 fields across your entire account can use this feature. We recommend that you only select this option for commonly used string fields that have several possible values. For example, select this option for a field called Loyalty Status that has many different but standardized status options, such as Bronze, Silver, Gold, Platinum, or Diamond.
-
Save your changes.
Data 360 creates a data object that contains the fields from the original data extension, and automatically maps the data stream to them.
-
On the Custom Data model tab, click New Custom Object, as shown
in this image.
- To map data extension fields to fields in another object, map the data extension fields to Data Model Object fields.
Map Data Extension Fields to Data Model Object Fields
After you create an object for the data in your data extension, optionally map the data to other Data 360 objects. For data extensions that contain profile data, it’s a good idea to get started by joining your data extension to the Individual object.
Depending on your use case and the relationships between your data extension and Data 360, you can also map fields to other objects.
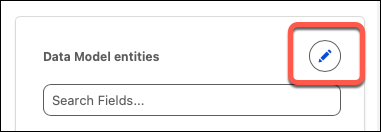
-
On the mapping page for your data source, click the pencil icon next to Data Model
entities, as shown in this image.
-
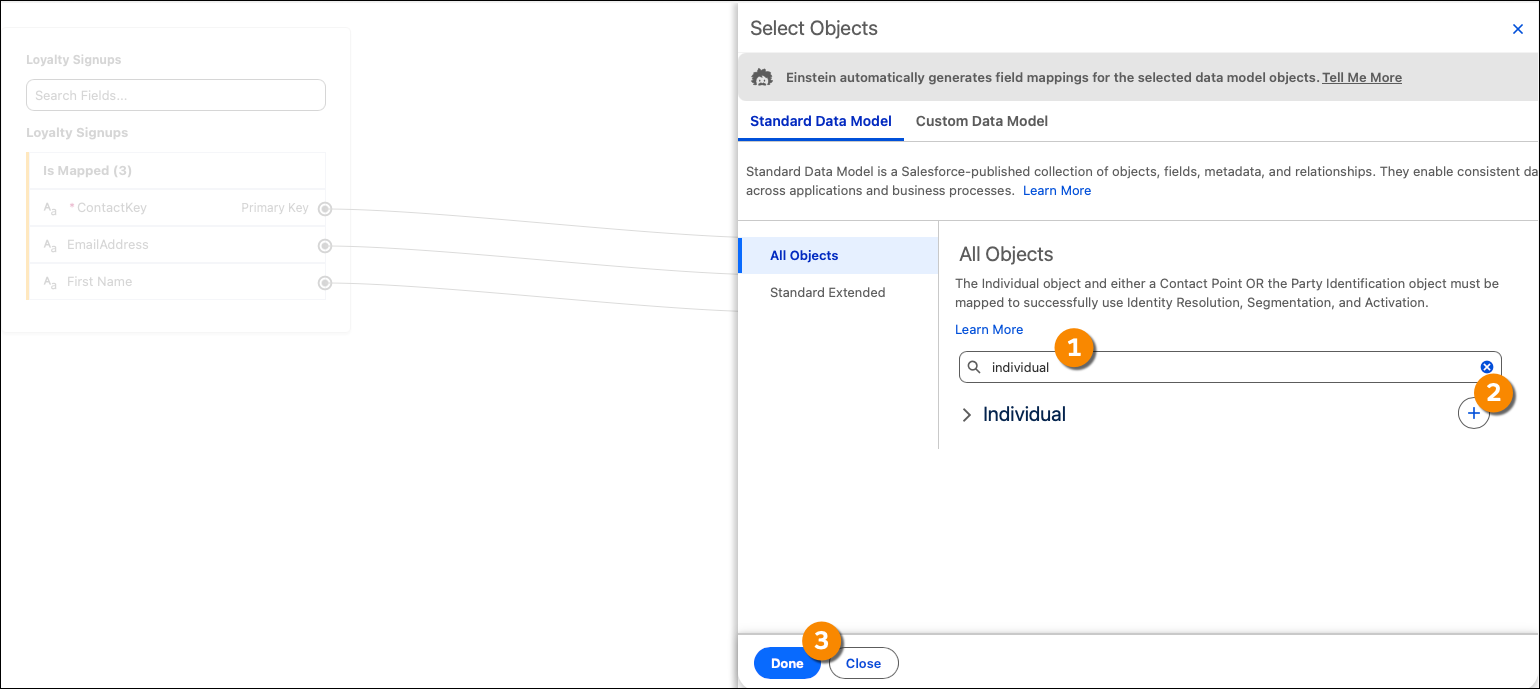
On the Select Objects page, under All Objects, search for the name of the object to
associate fields with. For example, to associate fields from your data extension with fields
from the Individual object, search for individual. Click the plus sign
next to Individual, and then click Done, as shown in this image.
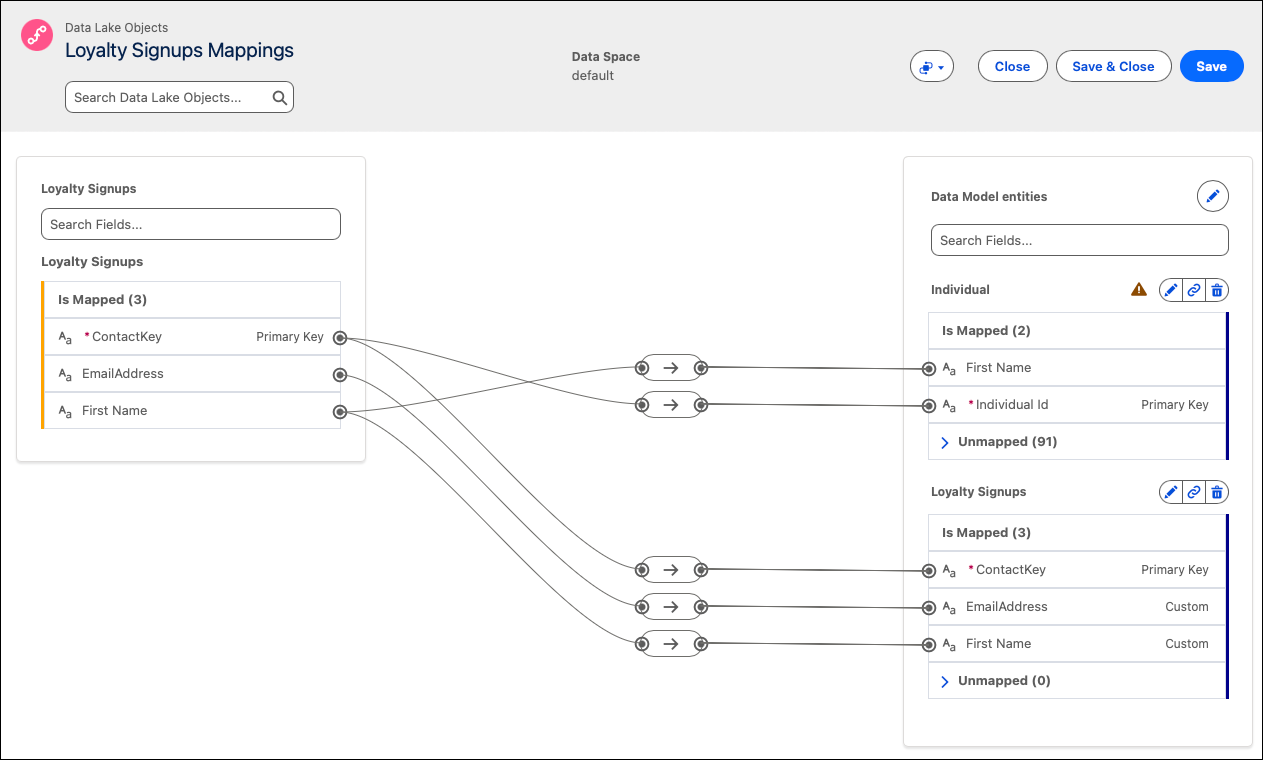
The mapping view appears. The fields listed on the left side of the page are fields from your data extension, and the fields on the right side are fields from the selected data objects.
- In the mapping view, under the selected data object, expand the Unmapped section.
-
Click the name of a field from the data extension and then click a field from the data
object. For example, if your data extension contains a field called Email that contains
customer email addresses, you can map it to the Email Address field in the Contact Point Email
object. A line appears between the two fields, indicating that they’re mapped to each
other.
This image shows a connection between the ContactKey field in a data extension and the Individual Id field from the Individual object, and a connection between the First Name fields in both objects.
 Tip It isn’t always correct to map the primary key from the data extension to the primary key in the Standard DMO. For example, if your data extension contains information about customers’ purchase histories, each record in that data extension might have a Purchase ID (which is the primary key used to distinguish records), and a Customer ID. If you join this data extension to the Individual object, map the Customer ID (a non-primary key) in the data extension to the Individual ID (the primary key) in the Individual object.
 -
Repeat the preceding step until you’ve mapped all the fields that you want to use from the
data extension.
It isn’t necessary to map all the fields from the data extension. However, only mapped fields are available to use in Marketing Cloud Next.
Tip To create a field in a data object, click Add New Field, and then specify a field name and data type for it. After you create a field, you can map data extension data to it. - When you finish mapping fields, save your changes.
There are several foundational DMOs to link to your data extensions. For example, if your data extension contains the email addresses of your customers, we recommend that you connect that field to fields in the Contact Point Email DMO. This table lists these objects and the suggested field mappings between object fields and data extension fields.
| Data Extension Field Contents | Data Model Object | Field in DMO to map to |
|---|---|---|
| A primary key for the data extension, such as SubscriberKey or ContactKey | Individual | Individual Id |
| A primary key for the data extension, such as SubscriberKey or ContactKey | Contact Point Email | Contact Point Email Id |
| A field that contains a subscriber’s email address | Email Address | |
| A primary key for the data extension, such as SubscriberKey or ContactKey | Contact Point SMS | Contact Point Email Id |
| A field that contains a subscriber’s phone number | Telephone Number | |
| A field that contains a subscriber’s E.164-formatted phone number | Formatted E164 Phone Number |
As your account grows and you add more data to it, consider creating more mappings between data extensions and standard data objects. For more information about the standard data objects in Data 360, see Salesforce Help: Customer 360 Data Model and Salesforce Developers: Standard Data Model Objects (DMOs).
Create Data Relationships with DMOs
Establish data relationships between your data extension and standard data model objects. While DMO mapping defines how to structure raw data in data model objects during ingestion, a DMO relationship defines how records connect to each other after ingestion.
Defining data relationships is a foundational step for working with segments and journeys. The process of defining a DMO relationship in Marketing Cloud Next is similar to defining the Contact Model in Marketing Cloud Engagement. In the Contact Model, you define one-to-one, one-to-many, and many-to-many relationships between data extensions, which define paths for filters and decision splits in Journey Builder. For example, you can associate a customer ID with previous orders in a one-to-many relationship–that is, one customer ID is associated with many orders. A journey can then use this relationship to send customers down a certain path if they’ve placed more than one order.
-
On the app launcher (), search for data model, and then select Data
Model.
-
From the list of data model objects DMOs, select the DMO that contains the data from your
data extension.
Note If you don’t see the DMO listed, click the arrow next to Mapped, and then select All.
-
On the Relationships tab, click New, as shown in this image.
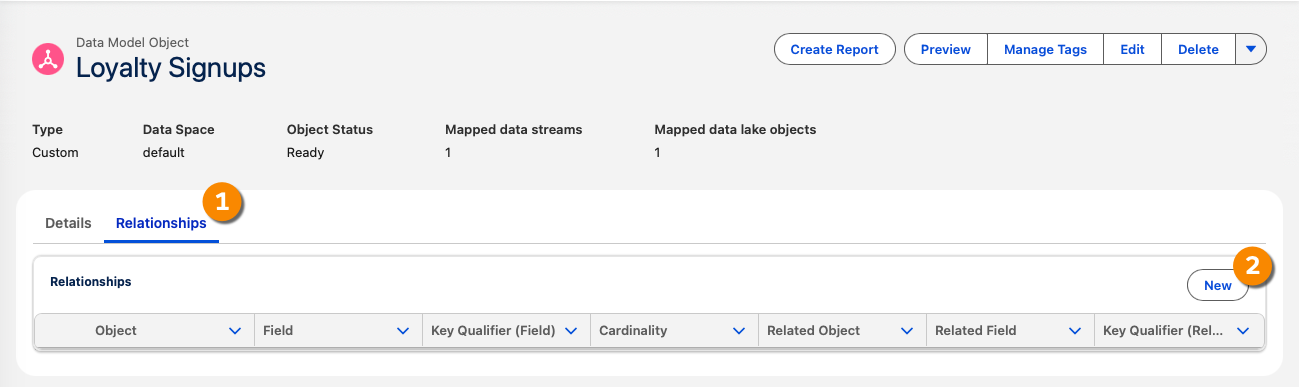
- On the Edit Relationships window, click New Relationship.
-
Configure the relationship.
- For Field, select the primary key field from the data extension. For profile-related data extensions, this value is usually SubscriberKey or ContactKey.
- For Cardinality, select the type of relationship to create. If the data extension contains a field that’s unique for each corresponding record in the related object, select 1:1. If the data extension contains multiple records that correspond to a single record in the related object, select Many:1.
- or Related Object, select the object that contains the fields you want to relate to the data extension object.
- For Related Field, select the field to relate.
- Save your changes.
Synchronize Data to an Additional Data Space
Add the data from a data extension to more than one data space. For example, if you have a primary customer data extension that’s used by multiple business units, you can synchronize it with the data space for each business unit.
- In Data 360, click the Data Spaces tab.
- Select the data space that you want to make the data from the data extension available in.
- Click Add Data Lake Objects.
- Select the data lake object that’s associated with your data extension, and then click Next.
-
To specify which records to make available in the data space, define a filter.
- Click Set Filters.
- Click Add Filter.
- For Select an Object, select the data extension object.
- For Select Column, select the column in the data extension to filter on.
- For Select Operator, select the type of operator to use in the filter.
- For Value, enter the value to filter on for the selected column.
- Click Add.
- To add more filters, click Add Filter, and then define the next filter.
- Save your changes.
- On the Data Streams tab, select the stream for your data extension.
- The Data Mapping section includes the new data space. Next to the name of the new data space, click Start.
- Map the fields from the data space to fields in the data model entities for the data space.
- Configure relationships between the data extension and standard DMOs.