
You are here:
Manually Create a Segment in Marketing Cloud Next
To create a segment, you drag in attributes that describe your target audience. When you build segment rules, make sure that you select objects and fields that align with your data model.
Required Editions
| Available in: Salesforce Enterprise and Unlimited Editions with Marketing Cloud Next Growth or Advanced Edition |
-
Create a segment.
- From a campaign record, click Select Segment | New Segment.
- From the Segments tab, click New.
- Select the default data space.
- Segment on the Unified Individual object.
-
Select a publish schedule.
A more frequent publishing schedule keeps data fresher, but has an impact on the data allocations in your org. To decide later, select Standard Schedule and set the frequency to Don’t Refresh.
-
Add attributes to include in the segment.
- Select the Include canvas.
- Expand and browse the attribute library, find a field that you want to use, and then drag it onto the canvas.
-
Configure the settings for the attribute.
- Set the aggregator measurement for when to evaluate the rule.
- Select the operator.
- Enter a value to match on.
- Click Done.
- Drag other fields onto the Include canvas and configure them as needed.
-
Set the AND/OR operator across all attributes.
- AND returns results that match all of the rules together.
- OR returns results that match any of the rules.
- To configure rules that keep records out of the segment, click Exclude, and then add and configure attributes.
- Save the segment.
Example Klara wants to exclude people who have received at least 5 emails from her already. On
the Exclude canvas, she uses the aggregation fields to group matches using the values Count is at
least 5.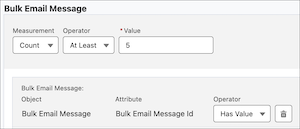
Each time you save a segment, Salesforce estimates the number of matching records in the segment population. When you publish a segment, the system requests the latest available data.
After you save the segment, you can use the segment in other campaigns. To base a future segment on this one, drag it from the Segments tab on the attributes pane onto the canvas.
Did this article solve your issue?
Let us know so we can improve!