
You are here:
Quick Start: Send an Email Campaign
This guide covers the basic steps to send a promotional email to opted-in leads and contacts with Marketing Cloud Next. It outlines the simplest path, so that you can get a feel for using the tools. For more details, features, and customization options, visit Salesforce Help.
Required Editions
| Available in: Salesforce Enterprise and Unlimited Editions with Marketing Cloud Next Growth or Advanced Edition |
| User Permissions Needed | |
|---|---|
| To import leads, contacts, and consent data: | Marketing Cloud Admin OR Marketing Cloud Manager permission set |
| To create and manage a campaign: | Marketing Cloud Admin OR Marketing Cloud Manager permission set |
| To edit and share reports and dashboards: | Marketing Cloud Manager permission set OR |
Before you begin, make sure that your Marketing Cloud Admin has completed the required setup steps to send emails. See Quick Start: Set Up Email Sending.
Included in this guide:
- Import Leads and Contacts
- Import Consent Data
- Create an Email Campaign
- Add a Segment to a Campaign
- Customize the Default Email
- Preview and Test Your Email
- Publish Your Email
- Send or Schedule Your Email
- Review Email Performance
Import Leads and Contacts
To get started, add the leads and contacts you want to market to. If you already have all your leads and contacts in Salesforce, skip this step.
- From the Leads or Contacts tabs, click Import.
-
Follow the steps to upload a CSV file. If you don’t have a CSV file yet, download the
sample file from the import window and add your data.
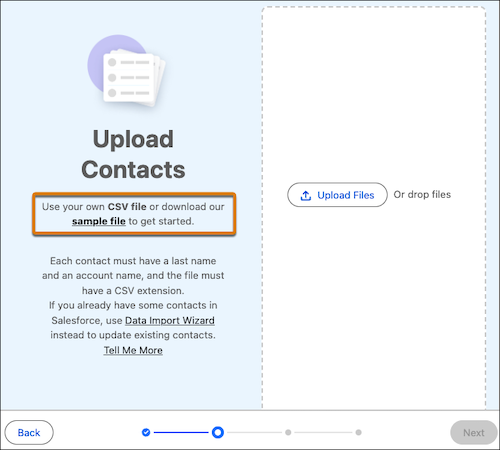
After an import is complete, we send a notification email to the user who imported the file.
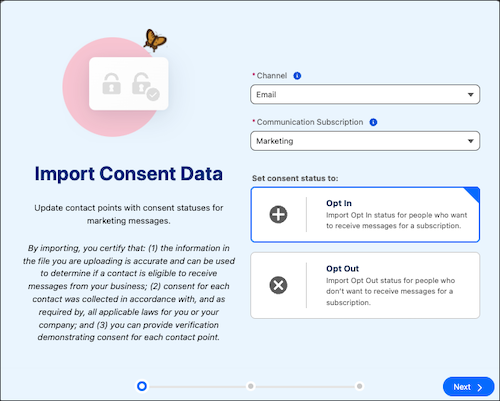
Import Consent Data
Next, import consent data for lead and contact email addresses to update their consent status in Salesforce. You can send promotional messages only to people who opted in to receive emails from you.
A consent import updates consent information for email addresses, also known as contact points, that are related to an existing lead or contact. It can’t create new leads or contacts or update other fields.
- From the Consent page, select Consent Imports, and then click Import.
- For the Channel, select Email. For the Communication Subscription, select Marketing.
-
For the consent status, select Opt In, and then click
Next.
-
Upload your CSV file, and then click Next. If you don’t have a
consent CSV file yet, download the sample CSV file and add your data. Follow these guidelines
for formatting consent import files:
- Include an Email column and a Consent Date column.
- Each email must be a valid and complete email address. For example, lyn@ursalsolar.com. Emails can't include special characters.
- Each consent date must be in a supported DateTime format, such as MM/DD/YYYY or yyyy-MM-dd. For more on formatting consent import files, see Formatting Marketing Consent Import Files.
- On the preview step, review the sample fields from your file and then click Import.
- To import a list of opted out leads and contacts, repeat these steps and select Opt Out in Step 3.
After an import is complete, we send a notification email to the user who imported the file. It can still take some additional time to sync updated consent statuses to Data 360.
Create an Email Campaign
To send an email in Marketing Cloud Next, start with an email campaign. All you need to do is edit the draft email and make a few other selections.
Each campaign starts with an underlying flow, which you can think of as the automation engine for your campaign assets. The campaign flow is responsible for actually sending your email to your audience segment.
- From the Campaigns tab, create a campaign and fill in your campaign details.
-
Select the Single Email campaign option.
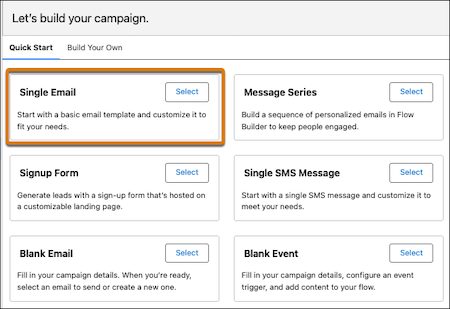
The campaign record summarizes your flow and contains links to create content and configure related details, such as the recipient segment and send time.
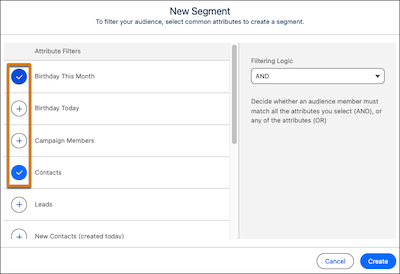
Add a Segment to a Campaign
To create a recipient list, you use Data 360 segments. The easiest way to create a segment is by working from the campaign record and using quick filters.
- From the campaign record, click Select Segment, and then select Use Quick Filters.
-
Select one or more filters.
-
If you’re using multiple filters, select filtering logic for your segment, and then click
Create.
AND returns results that match all of the filters together. OR returns results that match any of the filters.
- From the campaign record, click Publish. A segment must be published for people to receive your messages.
- Allow some time for the segment to publish and then refresh the page.
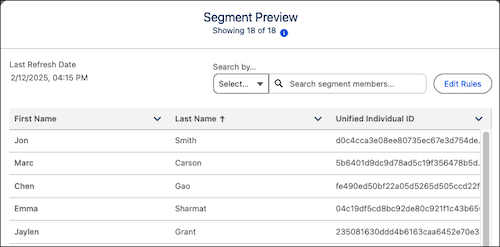
-
After the segment is published, click Preview to review a sample of
the people in your segment.
Customize the Default Email
Fill in your sender details and edit the default email.
-
From the campaign record, configure the message details.
- Scroll to the email section, and then click Configure.
- Select a sender email address.
- For the communication subscription, select Marketing.
- Save your work.
-
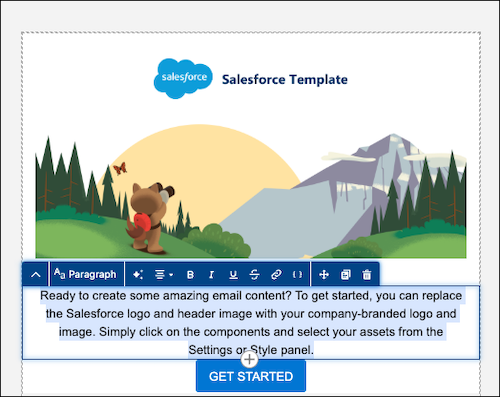
Customize the email content.
- From the email section, click Edit.
-
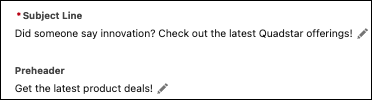
In the editor canvas, enter a subject line and preheader for recipients.
-
Replace the default text and images with your own content, and add or move components to
create the layout that you
want.
- Remove the example text in the footer and verify that it includes these compliance details:
- The physical address merge field: {!$organization.Address}
- A way for recipients to unsubscribe. The unsubscribe link and Preference Manager link are included by default.
Preview and Test Your Email
From the editor canvas, preview and test your email content. You can preview the email as a sample recipient and send test emails to different inboxes that you have access to.
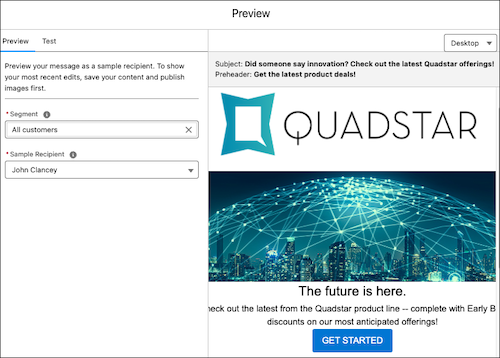
-
From the editor canvas for the email, click Preview, and then
select a segment and sample recipient. Verify that merge fields and content appear as
expected.
- To send a test email, open the Test tab. Enter up to five email addresses that you can access, separated by a comma, and then click Send Test. Check the inboxes that you sent tests to and verify that merge fields and content appear as expected.
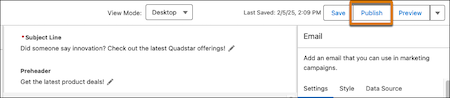
Publish Your Email
Before you can activate your campaign flow to send your email, you must publish your email content first.
Send or Schedule Your Email
When your email content is ready to go, review your campaign and send or schedule your email.
- Review your campaign and make sure you're ready to send. Check that your segment and email are both published.
-
To schedule your email, click Schedule.

-
To send your email immediately, click the
 in the Schedule section and select Send Now.
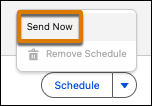 This option activates the campaign flow and queues your email to send.
- To make sure your segment data is up to date, leave the default setting in the activation window.
- When you’re ready, click Activate.

Review Email Performance
Engagement data, such as opens and clicks, is available for sent emails. You can download statistics or share them with other Salesforce users.
- From the Analytics tab, click Browse in the Analytics menu.
- Find the Email Engagement report or Email Engagement dashboard, and open it.
- Save the data from your dashboard.
-
To share the dashboard, click
 , copy the URL, and share with other Salesforce users.
People you share the URL with must have access to view the dashboard.
, copy the URL, and share with other Salesforce users.
People you share the URL with must have access to view the dashboard. - Optionally, create a dashboard based on this data set.
Next Steps
Check out these features and customizations available for marketing.
| Enhancement | Description |
|---|---|
| Create campaign assets with AI | After an admin enables AI features in your org, you can use AI to help you create segments, draft content, and more. See Increase Productivity with AI. |
| Brand your content | Create a default brand that's applied when you create or edit content. You can set default colors, fonts, brand identity, and tone. See Brand Your Content. |
| Personalize your content | Create engaging content tailored to your recipients with personalization merge fields and dynamic content. See Personalize Marketing Content. |
| Add channels | Marketing Cloud also supports sending SMS and WhatsApp messages, publishing landing pages, and embedding forms on landing pages or your external site. See Manage Content. |
| Explore campaigns and flows | Get to know campaigns, options available for starting points, and how campaigns and flows work together. See Enhance Your Marketing with Campaigns. |
| Explore channels | Work with your admin to expand your reach with additional marketing channels and content types. See Types of Marketing Content. |