
You are here:
Manually Personalize Page Elements
The Web Personalization Manager enables you to modify HTML elements manually. Using the visual editor interface, you can select multiple elements on individual web pages, and modify attributes to provide personalized content to site visitors.
- From the Personalization Experiences menu in Web Personalization Manager, select New.
-
Select Embedded Content, and click Next.
 Note To learn more about the Web Curation Agent experience or for assistance with setup, contact your account executive.
 -
Select the button next to the personalization point that you want to base the
personalization experience on.
Web Personalization Manager displays only personalization points in the data space you've configured in the website's sitemap.
-
(Optional) To create a new personalization point, click
Create Personalization Point.
A window opens enabling you to create and configure a personalization point. After you finish creating the personalization point, you can then return to the selection window to choose it.
- Click Next.
- Click Select and Modify Existing Elements and click Next.
-
From the Location tab in the Editor panel, specify the page option where you want to
display the personalized content.
- To display the personalization experience on all website pages of the type you’re
currently on, select Current Page Type.
For example, selecting this option on a Product Detail Page type duplicates the experience on all product detail pages on the website.
- To select pages based on a URL, select Page URL and specify
a URL.
Using wildcards, you can apply the personalization to multiple pages. For example, you can use a wildcard for the page name to apply the personalization to all pages in a specific path, such as https://mysite.com/product/*.html.
- To display the personalization experience on all website pages of the type you’re
currently on, select Current Page Type.
- Under Page Element Selection, click Select Element.
- On the element selection page, hover over the element that you want to use, wait until it’s highlighted, and then click it.
-
(Optional) To select the top-level element that includes the currently selected
element, click Select Parent.
 Tip You can use the Page Element field to add the CSS code for the elements or make changes to existing ones.
 - To add more elements, click Add Element.
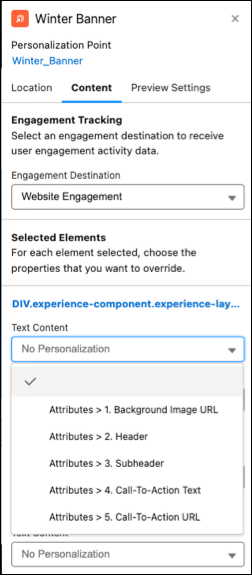
- After you finish adding elements, click the Content tab.
- Select the type of engagement that you want to track from the Engagement Destination menu. For more information, see Track Personalization Engagement.
- For each element you choose, select the personalized content attribute that you want to display.
-
Click the Preview Settings tab.
preview option action Show Overlays Enable this option if you want to display highlighted overlays around personalized content when previewing your personalization experience. Show All Personalization Experiences Enable this option if you want to preview the current experience along with all the other personalization experiences created on the page. - (Optional) Enter a different Individual ID if you want to preview the personalization experience from the perspective of a different user.
- Click Save.
Did this article solve your issue?
Let us know so we can improve!
