
You are here:
Send an Email Using an Existing Email Template Example
This example uses an existing email template to send a follow-up email to a new contact based on a case. It uses the Send Email action and an email template with merge fields that are populated by the recipient.
Required Editions
| View supported editions. |
| User Permissions Needed | |
|---|---|
| To open, edit, create, activate or deactivate a flow using all flow types, elements, and features available in Flow Builder, including Einstein and Agentforce for Flow: | Manage Flow |
| To create or update a case: |
|
This example assumes you've already created the email template named Follow-Up Email After Case Is Closed. To learn about creating email templates, see Create an Email Template in Lightning Experience

Important To send email from Salesforce, the Send
Email action in Salesforce Flow requires domain-level and user-level email verification.
Email delivery fails if either the user's email address or the email-sending domain is
unverified. See Requirements to Send Email from Salesforce.

Note If you're following along in an existing flow, make sure the Send Email action version is set
to 1.0.1. To prevent broken email template ID references when you deploy a flow from one org to
another, use the Email Template Name instead of the Email Template ID. To use an Email Template
Name, change the Action Version in the Send Email action to 3.0.1 or later.
Create the flow that sends an email to your customer when a case's stage is closed.
-
Open the Flows list view.
- From Setup, in the Quick Find box, enter Flows, and then select Flows.
- From the Automation app, select the Flows tab.
- From the Flows tab in any Lightning app, click the actions menu and select Open Flow.
-
Create a record-triggered flow.
- From the Automation app, click New | Triggered | Record-Triggered Flow.
- From Setup, click New Flow | Triggered | Record-Triggered Flow.
-
Configure the Start element.
-
For Object, click Case.
Case is selected because that's the type of record that triggers the flow when it's updated.
- For Trigger the Flow When, select A record is updated.
-
In the Set Entry Conditions section, for Field, click Stage. For
Operator, click Equals. For Value, enter
Closed.
A record is updated is selected, and this entry condition is added, because we want the flow triggered when a case is updated to a Closed status.
- Use the default values for the other fields.
-
For Object, click Case.
-
Add and configure an Action element. The action element is used to send the email.
-
Click
 , and select Action.
A list of available actions opens.
, and select Action.
A list of available actions opens. -
In the search bar, enter Send Email, and then click
Send Email.
For more information about the Send Email action, see Flow Core Action: Send Email.
-
For Label, enter Send Follow-Up Email and use the default API
name, Send_Follow_Up_Email.
Follow-Up Email After Case Is Closed is the name of the email template you previously created.
- For Recipient Addresses, click Triggering Case, click Contact ID, and then click Email.
- To add your exiting email template, click Use Email Template.
- To use an Email Template Name, set the Action Version for the Send Email action to 3.0.1 or later, and select Follow-Up Email After Case Is Closed from the Email Template Name field.
- If you are on action version 2.0.1 or lower, search for and select Follow-Up Email After Case Is Closed in the Email Template ID field.
-
For the Recipient ID value, click Triggering Case, and then click
Contact ID.
This step sets the email recipient to the case record that triggers the flow when it gets updated.
-
Click
- Save and name the flow.
- To make sure that the flow works as expected, debug and test it by using different scenarios.
-
To start sending emails, activate the flow.
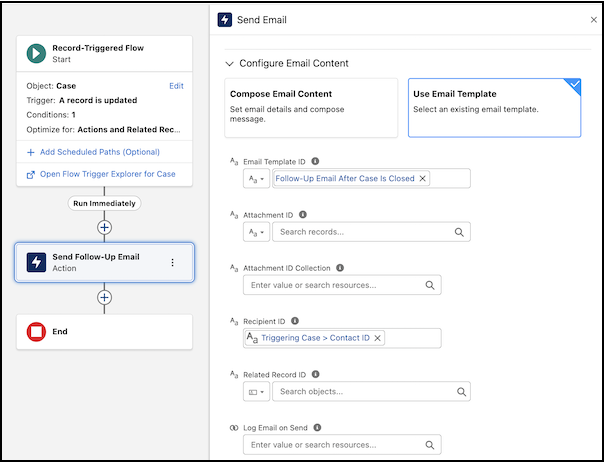
The flow sends an email to the contact of a case record when the stage is closed.
Important After migrating flows, always review and reconfigure
the Send Email action to reference the new record IDs in the target Salesforce org. This
step is crucial to avoid broken references and to make sure that email delivery functions
correctly.
Did this article solve your issue?
Let us know so we can improve!
