
You are here:
Show Screen Flow Stages in a Progress Indicator Example
This example creates a custom progress indicator stage that guides users through a multi-step process. By creating clear stages and assigning them to screen elements, you can enhance user experience and ensure that users understand their progress and next steps.
Required Editions
See Also
Plan the Stages in the Flow
- Determine how many stages to create. You want each screen to show as a different step. You have 4 screens, so create 4 stages.
- Determine what you want to call the stages since their labels are shown in the progress indicator. You decide to label the stages the same as the screens: Contact Info, Order Info, Billing Details, and Order Confirmation.
- Determine the order of the stages. You want the customer to enter their contact information, then the order information, then their billing details, and then show the confirmation at the end. Here's the stage order: Stage 1: Contact Info, Stage 2: Order Info, Stage 3: Billing Details, Stage 4: Order Confirmation.
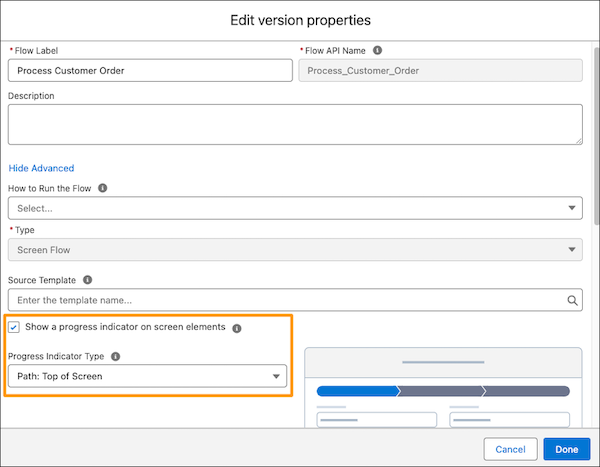
- Determine which stages you want to show in the progress indicator when the flow starts. You want all of the stages to show in the progress indicator the entire time the flow is running. So, all of the stages must be set to active by default.
For more information, see Planning the Stages of Your Flow.
Create the Flow Stages
- In your screen flow in Flow Builder, open Toolbox.
- Click New Resource.
- For Resource Type, select Stage.
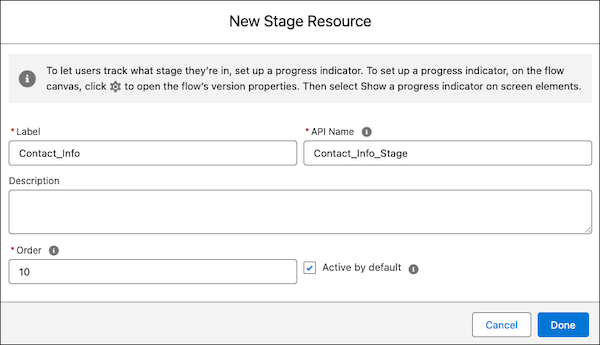
- For Label, enter Contact Info.
- For API Name, enter Contact_Info_Stage.
-
For Order, enter 10.
If it's possible that stages might be added in the future, use order numbers with numbers between them so you don't have to reorder all the stages if you add a new stage. For example, 10, 20, 30, 40 instead of 1, 2, 3, 4.
- Select Active by default.
- Click Done.
- Complete steps 1 through 7 for the next 3 stages so the stage resources are set up like this.
| Label | API Name | Order | Active By Default |
|---|---|---|---|
| Contact Info | Contact_Info_Stage | 10 | Selected |
| Order Info | Order_Info_Stage | 20 | Selected |
| Billing Details | Billing_Details_Stage | 30 | Selected |
| Order Confirmation | Order_Confirmation_Stage | 40 | Selected |
For more information, see Create Flow Stages.

Assign Your Stages to Screen Elements
Assign a stage to each screen element so the correct stage is highlighted in the progress indicator when the running user reaches each screen.
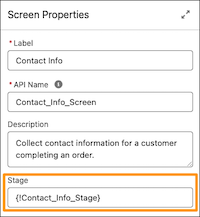
- In your screen flow in Flow Builder, open the Contact Info screen element.
- Click the screen element's header to show the screen properties.
- For Stage, select Contact Info (API name: Contact_Info_Stage).
- Click Done.
- Complete steps 1 through 3 for the next 3 screen elements so the stages are assigned to these screen elements.
| Screen Element Label | Stage Label | Stage API Name |
|---|---|---|
| Contact Info | Contact Info | Contact_Info_stage |
| Order Info | Order Info | Order_Info_Stage |
| Billing Details | Billing Details | Billing_Details_Stage |
| Order Confirmation | Order Confirmation | Order_Confirmation_Stage |
For more information, see Show Stages in a Progress Indicator.
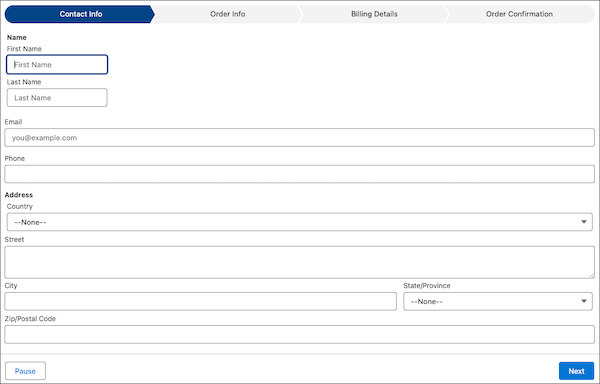
The progress indicator is set up and ready to guide your users through their order process.
Did this article solve your issue?
Let us know so we can improve!