
You are here:
Create an After-Save Record-Triggered Flow for Course Attendee
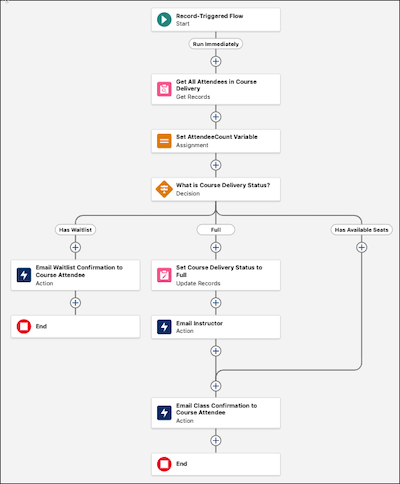
Create a record-triggered flow that runs after a new course attendee record is saved. If the course delivery is now full, set the course delivery status to full and email the instructor. Send an email notification to the new course attendee.
Required Editions
| View supported editions. |
| User Permissions Needed | |
|---|---|
| To open, edit, create, activate or deactivate a flow using all flow types, elements, and features available in Flow Builder, including Einstein and Agentforce for Flow: | Manage Flow |
Important To send email from Salesforce, the Send
Email action in Salesforce Flow requires domain-level and user-level email verification.
Email delivery fails if either the user's email address or the email-sending domain is
unverified. See Requirements to Send Email from Salesforce.
This sample flow works in conjunction with the other sample flows in Automate a Course Management Process Project.
-
Open the Flows list view.
- From Setup, in the Quick Find box, enter Flows, and then select Flows.
- From the Automation app, select the Flows tab.
- From the Flows tab in any Lightning app, click the actions menu and select Open Flow.
-
Create a record-triggered flow.
- From the Automation app, click New. Select Triggered Automations, and then select Record-Triggered Flow.
- From Setup, click New Flow, select Triggered Automations, and then select Record-Triggered Flow.
The Configure Start panel opens. -
Configure the Start element.
- On the Configure Start panel, for Object, select Course Attendee.
- For Trigger the Flow When, select A record is created.
- For Optimize the Flow for, select Actions and Related Records.
-
Get all records with the same course delivery as the new record with a Get Records
element.
-
Click
 , and select Get Records.
The Get Records panel opens.
, and select Get Records.
The Get Records panel opens. -
For Label, enter Get All Attendees in Course Delivery.
The API name auto-fills.
- For Description, enter Gets all course attendee records with the same course delivery record ID as the triggering record. Stores the results in the Course Attendees from Get All Attendees in Course Delivery record collection.
- For Object, select Course Attendee.
- For Field, select Course Delivery.
- For Operator, select Equals.
- For Value, select Triggering Course_Attendee__c > Course Delivery > Record ID.
- For How Many Records to Store, select All records.
-
Click
-
Add a variable to store a count of how many records the Get Records element returned.
-
To open the Toolbox, click
 .
.
- Click New Resource, and then select Variable.
- For API Name, enter AttendeeCount.
- For Description, enter Stores the number of attendees for the course delivery of the triggering record.
- For Data Type, select Number.
- For Decimal Places, enter 0.
- Click Done.
-
To open the Toolbox, click
-
Store the number of course attendee records for the course in the AttendeeCount variable
with an Assignment element.
-
Click , and select Assignment.
The Assignment panel opens.
-
For Label, enter Set AttendeeCount Variable.
The API name auto-fills.
- For Description, enter Sets the value of the AttendeeCount variable to the number of records returned by Get All Attendees in Course Delivery.
- For Variable, select AttendeeCount.
- For Operator, select Equals Count.
- For Value, select Course Attendees from Get All Attendees in Course Delivery.
-
Click
-
Determine whether the class has available seats remaining, is fulled enrolled, or has a
waitlist with a Decision element.
-
Click , and select Decision.
The Decision panel opens.
-
For Label, enter What is Course Delivery Status?.
The API name auto-fills.
- For Description, enter Determines whether the course delivery is full and has a waitlist, is full but has no waitlist, or still has seats available.
- For Select Decision Logic, select Define Manually (Default).
- For Outcome Label, enter Has Waitlist.
- For Outcome API Name, enter HasWaitlist.
- For Resource, select AttendeeCount.
- For Operator, select Greater Than.
- For Value, select Triggering Course_Attendee__c > Course Delivery > Maximum Attendees.
-
In Outcome Order, click
 .
A new outcome is added after the Has Waitlist outcome.
.
A new outcome is added after the Has Waitlist outcome. - For Outcome Label, enter Full.
- For Outcome API Name, enter IsFull.
- For Resource, select AttendeeCount.
- For Operator, select Equals.
- For Value, select Triggering Course_Attendee__c > Course Delivery > Maximum Attendees.
- Under Outcome Order, select Default Outcome.
- For Label enter Has Available Seats.
-
Click
-
Add a text template to store the subject of the email to sent to the course attendee.
-
To open the Toolbox, click .
- Click New Resource, and then select Text Template.
- For API Name, enter EmailSubjectTextTemplate.
- For Description, enter Generates the subject for the course attendee email that includes the status and the course name.
- Under Body, for the dropdown, select View as Plain Text .
-
For Body, enter Your status for
{!$Record.CourseDeliveryId__r.CourseId__r.Name}: {!$Record.Status__c}.
To add a merge field like Status__c to the text template, click Insert a resource, and then select the relevant resource.
- Click Done.
-
To open the Toolbox, click
-
If the class has more attendees than the maximum students, notify the course attendee that
they’ve been added to the waitlist with a Send Email Action element.
-
In the Has Waitlist path, click , and then search for and select Send Email.
The Send Email panel opens.
-
For Label, enter Email Waitlist Confirmation to Course
Attendee.
The API name auto-fills.
- For Description, enter Emails the triggering course attendee that they’ve been added to the waitlist for the course delivery.
- For Recipient Addresses, select Triggering Course_Attendee > Attendee > Email.
- For Subject, select EmailSubjectTextTemplate.
- For the first paragraph of Body, enter Hi {!$Record.AttendeeId__r.FirstName} {!$Record.AttendeeId__r.LastName}, and then press Enter twice.
- For the second paragraph of Body, enter Thank you for your interest in the {!$Record.CourseDeliveryId__r.CourseId__r.Name} class on {!$Record.CourseDeliveryId__r.Start_Date__c}. and then press Enter twice.
- For the third paragraph of Body, enter This class is currently full, so we have added you to the class waitlist. If a seat becomes available and you're next on the waitlist, we'll automatically enroll you in the class. If this happens, we'll immediately email you again with a course confirmation code. and then press Enter twice.
- For the fourth paragraph of Body, enter To find alternative sessions of {!$Record.CourseDeliveryId__r.CourseId__r.Name}, please explore our website. and then press Enter twice.
- For the fifth paragraph of Body, enter Best Regards, and then press Enter twice.
- For the sixth paragraph of Body: enter {!$Record.CourseDeliveryId__r.Owner:User.FirstName} {!$Record.CourseDeliveryId__r.Owner:User.LastName} and then press Enter.
- For the final line of Body, enter Course Scheduler.
- For Rich-Text-Formatted Body, select True.
-
In the Has Waitlist path, click
-
If the class is full but has no waitlist, set the course delivery status to Full with an
Update Records element.
-
In the Full path, click , and select Update Related Records.
The Update Records panel opens.
-
For Label, enter Set Course Delivery Status to Full.
The API name auto-fills.
- For Description, enter Sets the Status field of the course delivery record associated with the triggering record to Full.
- For How to Find Records to Update and Set Their Values, select Update records related to the course attendee record that triggered the flow.
- For Record Related to Course Attendee, select Triggering Course_Attendee > Course Delivery.
- For Field, select Status.
- For Value, select Full.
-
In the Full path, click
-
Email the instructor that the class is full with a Send Email Action element.
-
In the Full path, click , and then search for and select Send Email.
The Send Email panel opens.
-
For Label, enter Email Instructor.
The API name auto-fills.
- For Description, enter Sends an email to the instructor, notifying them that the course is full and asking for availability to teach another session of the same course.
- For Recipient Addresses, select Triggering Course_Attendee > Course Delivery > Instructor > Email.
- For Subject, enter Your course has reached capacity.
- For the first paragraph of Body, enter Hi {!$Record.CourseDeliveryId__r.InstructorId__r.FirstName} {!$Record.CourseDeliveryId__r.InstructorId__r.LastName}, and then press Enter twice.
- For the second paragraph of Body, enter The {!$Record.CourseDeliveryId__r.CourseId__r.Name} that you're teaching on {!$Record.CourseDeliveryId__r.Start_Date__c} is now at capacity. To help us plan future course offerings, please let us know when you can lead another session. and then press Enter twice.
- For the third paragraph of Body, enter Best Regards, and then press Enter twice.
- For the fourth paragraph of Body, enter {!$Record.CourseDeliveryId__r.Owner:User.FirstName} {!$Record.CourseDeliveryId__r.Owner:User.LastName} and then press Enter.
- For the final line of Body, enter Course Scheduler.
- For Rich-Text-Formatted Body, select True.
-
In the Full path, click
-
Email the enrolled course attendee a class confirmation code with a Send Email Action
element.
-
After the Email Instructor element, click , and then search for and select Send Email.
The Send Email panel opens.
-
For Label, enter Email Class Confirmation to Course
Attendee.
The API name auto-fills.
- For Description, enter Emails the triggering course attendee a course confirmation code.
- For Recipient Addresses, select Triggering Course_Attendee > Attendee > Email.
- For Subject, select EmailSubjectTextTemplate.
- For the first paragraph of Body, enter Hi {!$Record.AttendeeId__r.FirstName} {!$Record.AttendeeId__r.LastName}, and then press Enter twice.
- For the second paragraph of Body, enter Thank you for enrolling in the {!$Record.CourseDeliveryId__r.CourseId__r.Name} class on {!$Record.CourseDeliveryId__r.Start_Date__c}. Your course confirmation code is {!$Record.Confirmation_Code__c}. and then press Enter twice.
- For the third paragraph of Body, enter Best Regards, and then press Enter twice.
- For the fourth paragraph of Body, enter {!$Record.CourseDeliveryId__r.Owner:User.FirstName} {!$Record.CourseDeliveryId__r.Owner:User.LastName} and then press Enter.
- For the final line of Body, enter Course Scheduler.
- For Rich-Text-Formatted Body, select True.
-
After the Email Instructor element, click
-
Connect the Has Available Seats path to the Email Class Confirmation to Course Attendee
element.
-
In the Has Available Seats path, click , and then select Connect to element.
-
Select the Email Class Confirmation to Course Attendee
element.
The Has Available Seats path is now connected to the Email Class Confirmation to Course Attendee element.
-
In the Has Available Seats path, click
-
Save the record-triggered flow.
- Click Save.
-
For Flow Label, enter Set Course Delivery Status and Send
Emails.
The Flow API Name auto-fills.
- For Description, enter Manages course delivery status and emails to course attendees after a new course attendee is created.
- Click Save.
Previous Step: Create After-Save Record-Triggered Flows
Next Step: Create an After-Save Record-Triggered Flow for Changed Course Attendees
See Also
- Automate a Course Management Process Project
- Create Your Data Model
- Create a Custom Object to Store Course Information
- Create a Custom Object to Store Course Delivery Information
- Create a Custom Object to Store Course Attendee Information
- Create a Before-Save Flow for Better Data Quality
- Create After-Save Record-Triggered Flows
- Create an After-Save Record-Triggered Flow for Changed Course Attendees
- Create a Screen Flow to Register Course Attendees
- Test and Activate All Course Management Flows
- Create a Button to Launch the Screen Flow
Did this article solve your issue?
Let us know so we can improve!