
You are here:
Plan Your Pipeline
A pipeline defines the sequence of stages that work items progress as they go through the release lifecycle from development through to production (or some other final release stage).
The pipeline consists of pipeline stages. Each pipeline stage corresponds to an environment (currently a Salesforce org), and a branch in the source control repository. The pipeline can’t be modified after any changes have been promoted through it.
How Many Pipeline Stages Do I Need?
Your pipeline can contain any number of pipeline stages. The configuration of your pipeline is entirely up to you, and is based on the development and business processes that you have in place.
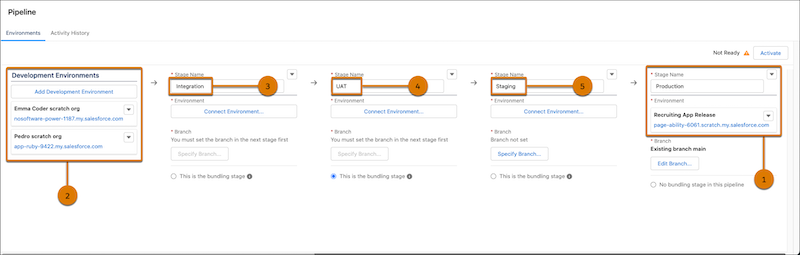
A pipeline requires only a final release environment (1). However, if your team performs some of its development work in sandboxes and scratch orgs, you can connect the development environments that you plan to use for this project when building the pipeline. (2). We recommend that you have at least one test stage besides your development and production stages. Each pipeline stage has an associated environment (org) and a corresponding branch in the source control repository.
To assist you with building a robust pipeline, which typically includes 2–3 test stages, we provide a pipeline template. This pipeline template includes these recommended stages:
| Stage | Description |
|---|---|
| Integration | The first test stage (after the development stage) is an integration stage (3) where all changes from the various development environments come together for the first time and can be tested in an integrated environment. This stage is where you identify conflicts and resolve them before you move forward. |
| UAT | You can have one or more stages in between “integration” and “staging” (4) where you can perform additional testing, including by business stakeholders, often called user acceptance testing (UAT). We indicate this stage as the bundling stage, where you version a group of related changes and move them together through the pipeline. |
| Staging | This last test stage (before production) is used for final validation or “staging” (5) before you promote the changes to production. |
| Production (Release) | The final destination for your changes (1). The org for this stage is your live Salesforce instance. |
Pipeline Stage Branches Must Be Unique Across Projects
You can use the same source control repository across projects. However, branches must be unique for each pipeline stage, except for the release branch (often called main), to ensure that conflicts don’t get introduced and changes don’t get overwritten.
Pipeline Configuration Options
Building and activating the pipeline are the last steps to complete configuration of your DevOps Center project.
Changes move through the pipeline when team members promote work items or work item bundles (a versioned group of changes that get promoted together). Upon promotion, changes are merged from the current stage branch (or feature branch) to the next stage branch, and then are deployed to the next stage org.
You can configure your pipeline in one of two ways:
- Allow team members to move work items individually through the entire pipeline.
- Allow team members to move work items individually in early stages of the pipeline, and as a versioned group of changes (work item bundle) in later stages. Keep reading to learn all about the benefits of work item bundles.
- Decide How to Build Your Pipeline
After you define development environments and a release (production) org, you have a basic pipeline. However, it’s not recommended that you deploy directly to production. You can use our template to build the pipeline, you can add more stages to the pipeline template, or you can build your own. - Best Practices When Naming Branches
Each pipeline stage has an associated branch in the source control repository, which contains the changes associated with your team’s work items. When building your pipeline, you can specify either an existing branch in the repository, or allow DevOps Center to create one for you. If you allow DevOps Center to create it for you, indicate a unique alphanumeric string. - Build Your Pipeline Using the Template
When you specified the release target (production) environment, it automatically became the last pipeline stage. DevOps Center also associates it with the default branch in the source control repository, which is often calledmainby default. We don’t recommend that you edit the branch for this final pipeline stage. - Build Your Own Pipeline
Quickly build your own pipeline by modifying the existing template pipeline. - Activate the Pipeline
A pipeline is ready for your team to use after you activate it. - What’s The Difference Between the Stages and Environments Tabs?
After the pipeline is activated, the Stages tab appears as a first tab on the Pipeline page. - To Bundle or Not to Bundle, That’s a Great Question
The process and mechanism for promoting changes from one stage to the next can vary as you move from “left to right” in the pipeline. In the earlier (left) stages of the pipeline, you often want more flexibility to promote individual work items from one stage to the next. As you move to the later (right) stages of the pipeline, it’s often desirable to have more predictability and ability to version the sets of changes that are promoted and ultimately released.