
You are here:
Create a DevOps Center Project Repository
Create a project in DevOps Center, which creates a corresponding GitHub repository with the required Salesforce DX project structure.
-
In DevOps Center, create a
DevOps Center project.
Select Create a repository for my project that uses the Salesforce DX project structure.
- To launch GitHub, click the Repository URL link.
Under Code, decide how you’re going to clone the repo. Click the Code button dropdown menu, then copy the HTTPS or SSH command, depending on your company’s security requirements.
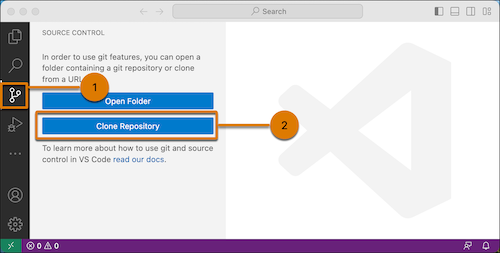
- Open VS Code then click the Code Fork icon (1), then click Clone
Repository (2).
- Paste the repository URL, then press Enter.
- Navigate to the desired location for the repository folder on your local file system, then click Select as Repository Destination.
- To view the files in VS Code Explorer, click Open.
- Click the .gitignore file to open it in the editor.
This file specifies which files and file types you don’t want to save in the repo. Later, you’re going to create a manifest file for seeding the repo. In most cases, you don’t need to keep this file. If you’d like to keep the file on your local file system but not store it in the repo, add package.xml to the .gitignore file, then save the file.
- Click the .forceignore file to open it in the editor.
This file specifies file and metadata types that you don’t want to deploy to or retrieve from your org. If you plan to add items to this file, we recommend doing it now so that all source control branches created in DevOps Center later contain the correct version of this file. See Determine What Metadata Types to Ignore During Development for recommendations on which metadata types and files to ignore. Updating the file later can be cumbersome. Don’t forget to save the file.
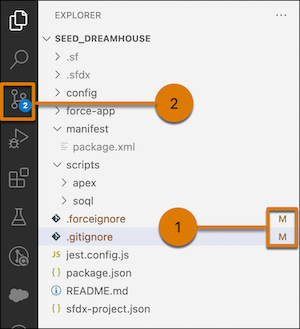
If you update any files, VS Code denotes modified files with an M (1), and updates the badge for the Code Fork icon (2).
Next: Authorize the org that contains the metadata to add to the source control repository.