
You are here:
Create Shifts in Bulk by Using a CSV File
Capture shift information in a CSV file, convert the CSV file to a JSON file, and then use Bulk API to create shifts in Salesforce Scheduler.
Required Editions
| Available in: Lightning Experience. |
| Available in: Enterprise and Unlimited Editions |
Note Shifts are supported only in versions 54.0 and later.
-
Create a CSV file with these columns: StartTime, EndTime, Status, ServiceTerritoryId,
ServiceResourceId, OwnerId, TimeSlotType, and WorkTypeGroupId (if necessary).
For more information about the fields that corresponds to the columns, see Shift.
Here’s an example of a CSV file with these fields:
StartTime,EndTime,Status,ServiceTerritoryId,ServiceResourceId,OwnerId,TimeSlotType,WorkTypeGroupId 2022-03-30T04:30:00.000Z,2022-03-30T16:30:00.000Z,Confirmed,0Hh5j000000UEnaCAG,0Hn5j000000pSOOCA2,0055j000006JjSqAAK,Normal,0VS5j000000HTXZGA4 -
In the CSV file, create a row for each shift that you want to create.
- In the StartTime and EndTime columns, enter the start time and end time in GMT format.
- In the Status column, enter Tentative, Published, or Confirmed.
- In the TimeSlotType column, enter Normal.
- Sign in to your Postman account or sign up for an account.
- Set Up Postman.
-
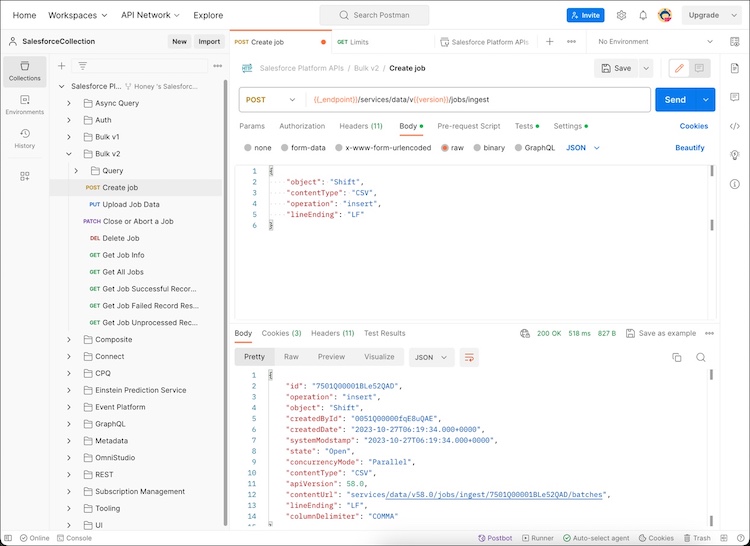
Create a bulk job.
- In Collections, click Salesforce Platform APIs | Bulk v2 | POST Create job.
-
Click Headers, and then add these values in the Headers
table.
Key Value Content-Type application/json; charset=UTF-8 Accept application/json -
On the Body tab, enter this code.
{
    "object": "Shift",
    "contentType": "CSV",
    "operation": "insert",
    "lineEnding": "LF"
}
Note Different operating systems use different characters to mark the end of a line. For Unix, Linux, or OS X, use LF (line feed, '\n', 0x0A), and for Windows or DOS, use CRLF (carriage return followed by line feed, '\r\n', 0x0D0A).
 -
Save your changes, and then click Send.
-
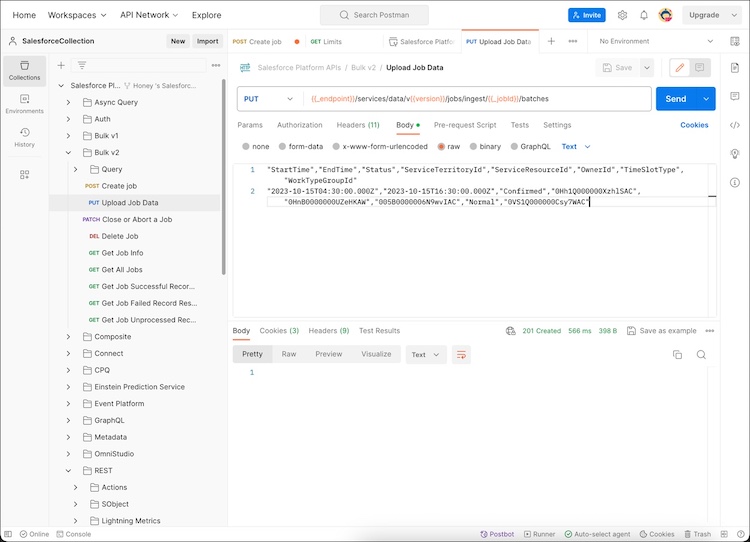
Upload the CSV data.
- In Collections, click Salesforce Platform APIs | Bulk v2 | Upload Job Data.
-
Click Headers, and then add these values in the Headers
table.
Key Value Content-Type text/csv Accept application/json -
On the Body tab, enter this code.
"StartTime","EndTime","Status","ServiceTerritoryId","ServiceResourceId","OwnerId","TimeSlotType","WorkTypeGroupId" "2023-10-15T04:30:00.000Z","2023-10-15T16:30:00.000Z","Confirmed","0Hh1Q000000XzhlSAC","0HnB0000000UZeHKAW","005B0000006N9wvIAC","Normal","0VS1Q000000Csy7WAC" -
Save your changes, and then click Send.
 The response contains a status code of
201 Created, which indicates that Salesforce successfully received the job data.
-
Close the job and instruct Salesforce to start processing the data.
- In Collections, click Salesforce Platform APIs | Bulk v2 | Close or Abort a Job.
- Click Headers.
- In the Headers table, deselect the check box for the Accept key.
-
Add these values.
Key Value Content-Type application/json; charset=UTF-8 Accept application/json -
On the Body tab, enter this code.
{ "state":"UploadComplete" } -
Click
Send.

-
When the state is UploadComplete, check the rows that were processed successfully.
- In Collections, click Salesforce Platform APIs | Bulk v2 | Get Job Info.
-
Click Send.
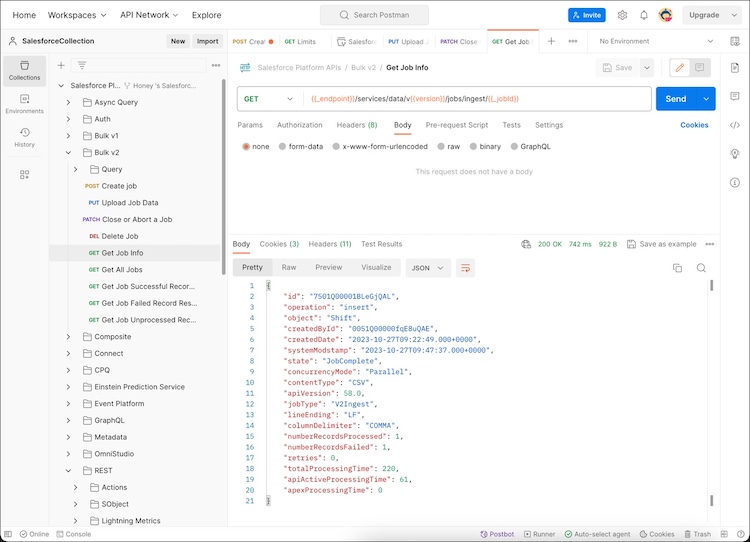
Here’s a sample of the failed processing response.
{
    "id": "7501Q00001CFNesQAH",
    "operation": "insert",
    "object": "Shift",
    "createdById": "005B0000006N9wvIAC",
    "createdDate": "2023-10-12T10:16:53.000+0000",
    "systemModstamp": "2023-10-12T10:40:13.000+0000",
    "state": "Failed",
    "concurrencyMode": "Parallel",
    "contentType": "CSV",
    "apiVersion": 59.0,
    "jobType": "V2Ingest",
    "lineEnding": "CRLF",
    "columnDelimiter": "COMMA",
    "numberRecordsProcessed": 0,
    "numberRecordsFailed": 0,
    "retries": 0,
    "totalProcessingTime": 0,
    "apiActiveProcessingTime": 0,
    "apexProcessingTime": 0,
    "errorMessage": "ClientInputError : LineEnding is invalid on user data. Current LineEnding setting is CRLF"
}
Did this article solve your issue?
Let us know so we can improve!