
You are here:
Migrate Community Users Between Licenses
You can move community users between certain licenses using Data Loader. For example, you can migrate users between the Customer Community Member and Customer Community Login licenses. Before moving a user to another license, set up a profile for the new license type you are moving the user to.
Required Editions
| Available in: both Salesforce Classic and Lightning Experience |
| Available in: Enterprise, Performance, Unlimited, and Developer Editions |
Migrating users to different licenses applies to the following scenarios.
- Between the Customer or Partner Community and Customer Community Login or Partner Community Login licenses
- Between the Customer Portal or Partner Portal and Customer Community or Partner Community
licenses
 Note Making this change results in admin work and requires the creation of a new user record.
 - Between the Customer Community and Customer Community Plus licensesNote Make sure that you want to give Customer Community users the more advanced sharing options available to Customer Community Plus users.
- Step 1: Export the User Report
-
- Log in to Data Loader.
- Click Export.
- Click Next.
- Select the User (User) object.
- For the extraction target, enter users.csv.
- Click Next.
- Select the query fields Id and ProfileId.
- For Fields, select IsActive.
- For Operator, enter equals.
- For Value, enter true.
- Click Add Condition.
- Add another condition.
- For Fields, select AccountId.
- For Operator, enter not equals.
- Leave Value blank.
- Click Add Condition.
- The generated query is
Select Id, ProfileId FROM User WHERE IsActive = true AND AccountId != 'null'.Note You can copy and paste the query from this step. - Click Finish.
- Click Yes.
- Step 2: Query Permission Set IDs
-
- In Data Loader, click Export.
- Click Next.
- Select Show all Salesforce Objects.
- Select the Permission Set (PermissionSet) object.
- For the extraction target, enter permissionsets.csv.
- Click Next.
- Choose the query fields Label and Id.
- The generated query is
SELECT Label,Id FROM PermissionSet.Note You can copy and paste the query from this step. - Click Extract.
- Click OK.
- Step 3: Query the Permission Set Assignments
-
- In Data Loader, click Export.
- Click Next.
- Select Show all Salesforce Objects.
- Click Next.
- Select the Permission Set Assignments (PermissionSetAssignment) object.
- For the extraction target, enter permissionsetassignment.csv.
- Click Next.
- Copy the following query from this Help topic and paste it into the generated query box:
SELECT AssigneeId,Id,PermissionSetId FROM PermissionSetAssignment WHERE Assignee.UserType IN ( 'PowerPartner','PowerCustomerSuccess','CspLitePortal').Note PowerPartner is the Partner Community license, PowerCustomerSuccess is the Customer Community Plus license, and CspLitePortal is the Customer Community license. Add or remove the licenses based on your query needs. - Click Finish.
- Click Yes.
- Step 4: Query Profile IDs
-
- In Data Loader, click Export.
- Click Next.
- Select Show all Salesforce Objects.
- Click Next.
- Select the Profile (Profile) object.
- For the extraction target, enter profiles.csv.
- Click Next.
- Copy the following query into the generated query box:
SELECT Name,UserLicense.Name,Id FROM Profile WHERE UserType IN ( 'PowerPartner','PowerCustomerSuccess','CspLitePortal').Note PowerPartner is the Partner Community license, PowerCustomerSuccess is the Customer Community Plus license, and CspLitePortal is the Customer Community license. Add or remove the licenses based on your needs. - Click Finish.
- Click Yes.
- Step 5: Update User Profiles
-
- Open the users.csv file you created.
- Rename the ProfileID column to OldProfileId.
- Add a column named ProfileID.
- In the new ProfileID column, add the profile ID that you want to move the user to using the profiles.csv file as your guide.
- Save the users.csv file.
- Open Data Loader, and click Update.
- Select the User (User) Salesforce object.
- Select the users.csv file.
- Click Next.
- Map the ProfileId field to the Profile ID column, and map the Id field to the User ID
column.
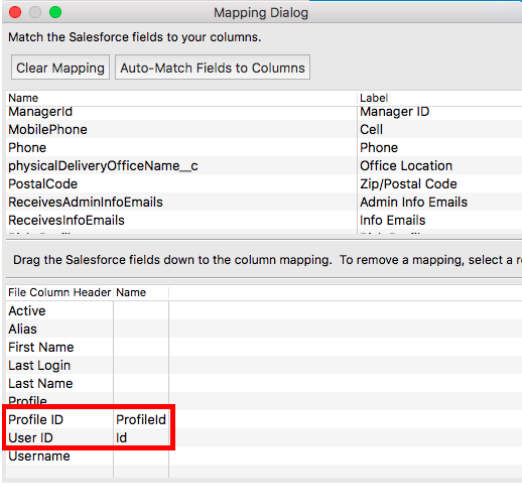
 Warning This step deletes all permission set assignments for these users. Before performing these updates, make sure that you’ve saved the permissions to the permissionsetassignment.csv file. Otherwise, you lose all history of which permission sets your site users had.
 - Click Next.
- Click Finish.
- Step 5: Insert Permission Set Assignments
-
- Open the permissionsetassignment.csv file.
- Rename the PermissionSetId column to OldPermissionSetId.
- Add a column named PermissionSetId.
- In the new PermissionSetId column, add the permission set ID that you want to move the user to using the permissionsetassignment.csv file as your guide.
- Save the permissionsetassignment.csv file.
- Open Data Loader, and click Insert.
- Select the Permission Set Assignment (PermissionSetAssignment) Salesforce object.
- Select the permissionsetassignment.csv file.
- Click Next.
- Map the PermissionSetId field to the PermissionSetId column, and map the Id field to the User ID column.
- Click Next.
- Click Finish.
Did this article solve your issue?
Let us know so we can improve!