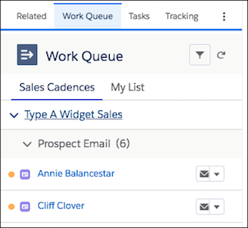
Add the Work Queue Component to Email Integration Panes for Outlook and Gmail
Sales reps can access the Sales Engagement Work Queue directly from the integrations
with Microsoft® Outlook® and Gmail™. Add the Work Queue component to its own tab in a new or
existing email application pane. Then assign the pane to your Sales Engagement
users.
Required Editions
Available in: Lightning Experience
Available with Sales Engagement, which is included with Sales in
Performance, Einstein 1, and Unlimited Editions, and
available for an extra cost in Professional and Enterprise Editions.
Sales Engagement is also available for an extra cost in Service and Lightning
Platform.
User Permissions Needed
To set up the email integrations to use custom email application panes:
Customize Application
To create and save Lightning pages in the Lightning App Builder:
Customize Application
Give your reps the flexibility to work through their queue from their email
application.
From Setup, enter Integration in the Quick Find box, then select
Outlook Integration and Sync or Gmail Integration and
Sync.
Expand Let users access Salesforce records from Outlook/Gmail and
enable Customize Content with App Builder.
Under Email Application Panes, click Create New Pane and select
With Inbox Features, or edit an existing pane in the list.
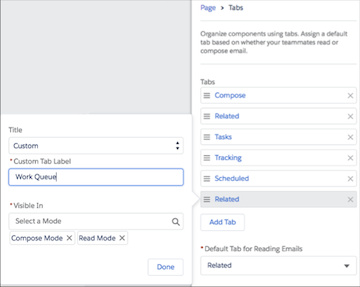
Click the Tabs component.
In the Tabs component properties, click Add Tab.
Click the tab and select Custom title.
Enter a descriptive title for the tab, such as Work Queue, or something that describes the
queue for your sales reps, and click Done.
Keep the tab visible in both Compose and Read modes.
Drag and move the tab in the Tabs list to where you want it to display.
Tabs are listed from top to bottom in the order they display from left to right in the
pane. To make sure that a tab is visible without extra clicks, place the tab in one of the
first few positions.
Drag the Work Queue component to the tab.
Tip To track links in emails started from the Work Queue in Outlook, also add the
Email Tracking component to a tab available in Compose mode.
Tip The My Feed tab in the Work Queue shows engagements and alerts for emails sent
from the Work Queue and tracked emails sent from outside the Work Queue. That information is
also shown in the Feed tab in the email integration pane. To prevent duplicate feeds for reps
who use the Work Queue, use the Lightning App Builder to remove the Feed tab from the email
integration pane.
Click Save.
Activate and assign the pane to the user profiles of reps who use Sales Engagement.
Did this article solve your issue?
Let us know so we can improve!
Loading
Salesforce Help | Article
Cookie Consent Manager
General Information
Required Cookies
Functional Cookies
Advertising Cookies
General Information
We use three kinds of cookies on our websites: required, functional, and advertising. You can choose whether functional and advertising cookies apply. Click on the different cookie categories to find out more about each category and to change the default settings.
Privacy Statement
Required Cookies
Always Active
Required cookies are necessary for basic website functionality. Some examples include: session cookies needed to transmit the website, authentication cookies, and security cookies.
Functional Cookies
Functional cookies enhance functions, performance, and services on the website. Some examples include: cookies used to analyze site traffic, cookies used for market research, and cookies used to display advertising that is not directed to a particular individual.
Advertising Cookies
Advertising cookies track activity across websites in order to understand a viewer’s interests, and direct them specific marketing. Some examples include: cookies used for remarketing, or interest-based advertising.