
You are here:
Create a Trailmix
Contribute to the learning experience by creating a trailmix. Each enablement site user can create up to 1,000 trailmixes.
Required Editions
| Available in: Enterprise, Performance, and Unlimited Editions |
| User Roles and Permissions | |
|---|---|
| Enablement Site User Roles | |
| This topic supports these enablement site roles: |
|
| Required System Permissions | |
| To access content on your enablement site: | Permission to access at least one content collection |
- On your enablement site, and click Trailmixes.
- On the Trailmixes page, click New Trailmix.
-
Enter a title, description, and URL.
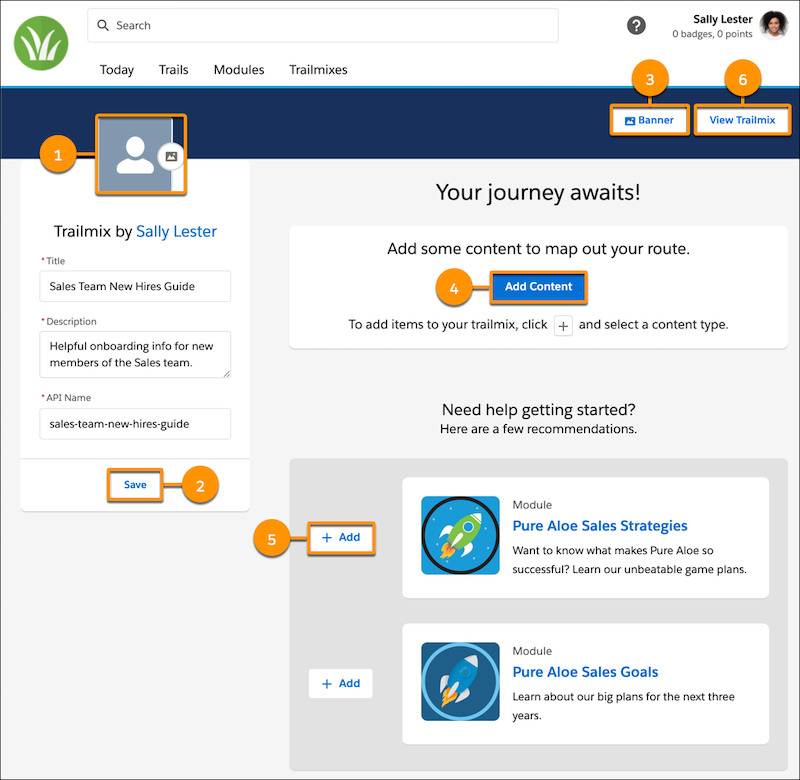
 Note The URL path that you enter is like the API name for a content collection, release, trail, module, or unit.Let’s say that you want to create a trailmix to onboard new members of the Sales team.
Field Value Title Sales Team New Hires Guide Description Helpful onboarding info for new members of the Sales team. URL sales-team-new-hires-guide -
Click Next, and add your trailmix’s details.
-
Add an icon (1) for the trailmix.
Use a .jpg, .png, or .gif file no larger than 5 MB. For trailmix icons, we recommend square images that are at least 256 px × 256 px.
-
Optionally, update the title, description, or API name (URL) that you entered previously,
and click Save (2).
 Important After you share the trailmix with other users, changing the API name breaks the link that they use to access your trailmix.
 -
Select a banner image (3) that you want to show on your trailmix page.
Use a .jpg, .png, or .gif file no larger than 5 MB. For banners, we recommend images that are at least 1,800 px × 160 px.
-
To add the trails or modules to a trailmix, click Add Content (4),
which opens a dropdown that contains options for the content that you want to add.
- To add enablement site content, select Trails or Modules, click the add button (+) on the trail or module that you want to add, and then select your trailmix.
- To add Trailhead content, navigate to the module, project, trail, or superbadge on Trailhead. Click the add button (+) on the content tile, and select your trailmix. Trailmixes that you create are included in the Add to Existing Trailmix list on your enablement site and Trailhead.
- To add a link or task, make sure that you have the Manage Trailmix Custom Steps permission enabled. For more information, see Add a Task or External Content to a Trailmix.
- Optionally, add content directly from the Edit Trailmix page, using content that's recommended based on your trailmix’s title. Click Add (5) next to the content that you want to include.
- To view your trailmix on your enablement site, click View Trailmix (6).
-
Add an icon (1) for the trailmix.
Note As you modify the content in the trailmix, your changes are saved automatically.
Did this article solve your issue?
Let us know so we can improve!