
You are here:
Create a Quota Plan
Determine targets that motivate sellers and achieve business objectives within the quota plans you create in Sales Planning. Allocate quota targets across your segments and products and add optional buffer values. Add insight to your quota plans by adding historical role and calculated data.
Required Editions
| Available in: both Salesforce Classic (not available in all orgs) and Lightning Experience |
| Available for an additional cost in: Enterprise, Performance, Unlimited, and Developer Editions with Sales Planning in English only, and only if you have Web Services API enabled |
| User Permissions Needed | |
|---|---|
| To create plans: | One of these:
AND One of these:
|
Set Up the Quota Plan
- In Sales Planning, open the segment for which you’re creating your quota plan.
-
Scroll to the Quota Plans card and click New.
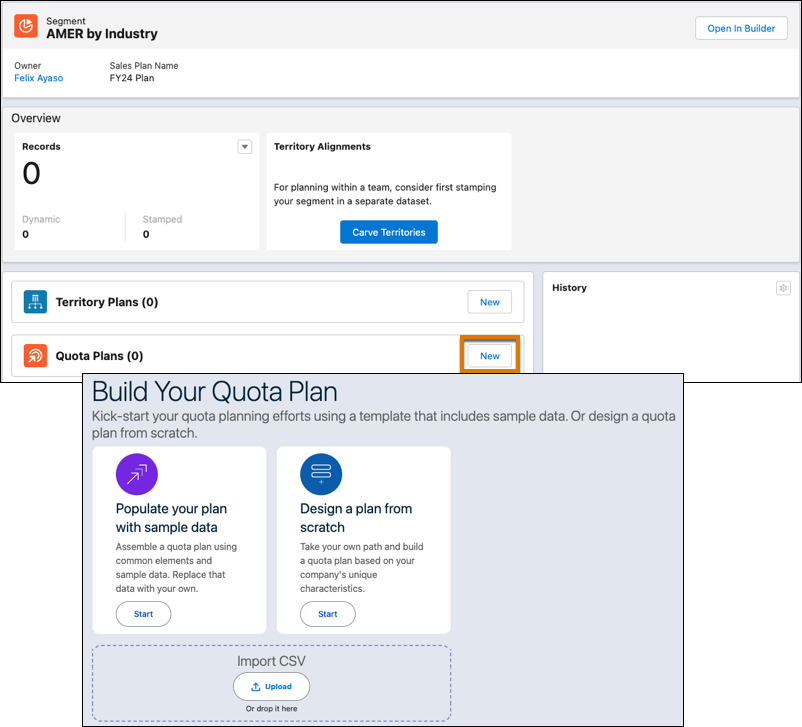
- Design a quota plan from scratch.
- Design a quota plan with sample data that you can replace.
- Design a quota plan from territory data from a stamped alignment. See Plan Quotas from Territory Alignments.
- Or, create a quota plan from an imported .csv file that includes
hierarchy, owner, and historical and role details.

The Quota Plan Builder opens, where you can allocate quota target values and add buffer values.
Allocate Quota Target Values
The quota plan shows the targets you specified so you can include them in your quota planning.
-
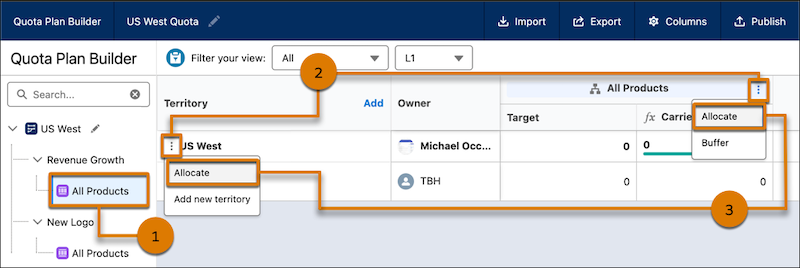
In Quota Plan Builder, select a product from the left panel (1).
To adjust the goals and targets that are visible, click the pencil icon
 in the left panel.
 - Click the three dots in the product header or territory (2) and select Allocate (3).
-
Select options in the Allocate window.
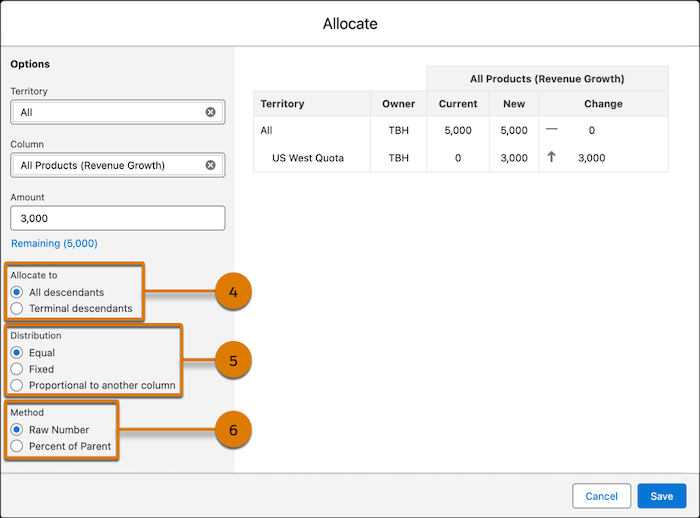
- Specify a territory, product column, and allocation amount.
- Specify whether you want to allocate to all descendents or only terminal (last) descendants (4).
- Specify whether the allocation amount is equal, fixed, or proportional to another column (5).
- Specify whether the allocation amount represents a raw number or a percent amount of a parent (6).
- Save your changes.
You can specify different quotas for different levels of the product hierarchy. Maybe you want sales reps to hit general targets overall but more specific targets for individual business units.
If you change the target values for your segments, the values are updated in the quota plan, too.
Add Buffer Values
After you allocate target values, add an optional buffer percentage to your targets. A buffer specifies an additional percentage that’s added to your quota targets to help protect your plan goals from low attainment, new hire ramp time, or other circumstances that negatively affect your team’s performance.
-
With a product selected in Quota Plan Builder, click the three dots in the product hierarchy (1) and select Buffer (2).
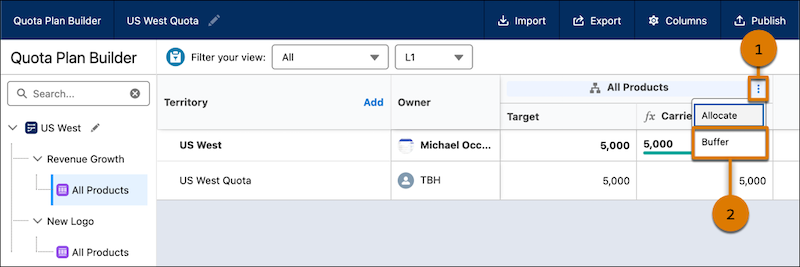
- In the Buffer window, enter the buffer percentage amount that you want to add.
- Save your changes.
Visualize Quota Targets
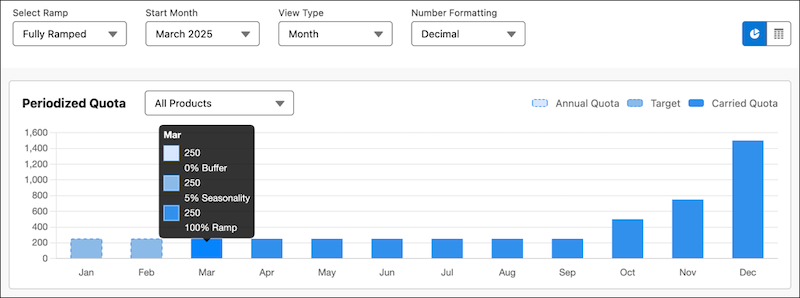
After you allocate targets and add a buffer, visualize your targets over time with a graph or chart.
-
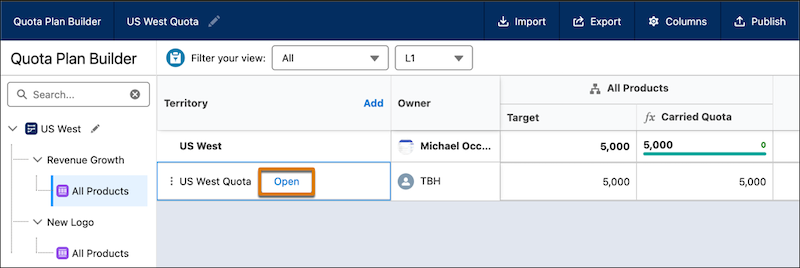
With a product selected in Quota Plan Builder, click Open on a territory.
- To change which information is shown, select a ramp profile, starting month, monthly or quarterly scope, and number formatting.
Manage Columns in Quota Plan Builder
Optionally, create, show, and hide columns in Quota Plan Builder.
- In Quota Plan Builder, click Columns.
- To add a column, click New.
-
Enter a label, specify a data type, and save your changes.
For example, maybe you add two number columns, Revenue and Units, and then you want to add a third column that calculates revenue per unit. Add a formula column that references those columns and performs a calculation.
[Revenue] / [Units] -
Make sure that the column appears in the Visible list.
You can also reorder visible columns that you added, or hide selected columns.