
You are here:
Set Up a Commission Expense Report in Salesforce Spiff
To create a commission expense report, set up general ledger accounts, establish fringe benefit rules, and create a commission expense portfolio.
Required Editions
| Available in: both Salesforce Classic (not available in all orgs) and Lightning Experience |
| Available in: Enterprise, Unlimited, and Developer Editions |
| Available for an additional cost in: Professional Edition with Web Services API Enabled |
| User Permissions Needed | |
|---|---|
| To create a commission expense report: | A Spiff user role with these permissions turned on.
|
Set Up a General Ledger Account
Set up general ledger accounts before you create expense portfolios and fringe benefit rules.
-
Click the Accounting Reports icon in the header.

- Click the + icon next to the search bar in the left-hand panel and select New General Ledger Account.
-
Enter the general ledger account details.
Name A description of the account. Number The account number in your accounting system. Type Whether the account is a Balance Sheet or P&L. - Enter all the general ledger accounts used for recording capitalization and amortization of commission expenses or fringe benefits.
Create a Fringe Benefit Rule
To account for extra bonuses in expense reports for certain deals, add fringe benefit rules to a portfolio. For example, a rep receives a retirement account match for deals that exceed a certain ARR amount.
- In the Accounting Reports view, click the + icon next to the search bar in the left-hand panel and select New Fringe Benefit Rule.
- Enter a name, description, incremental costs rule, and accounts for with the fringe benefit.
- Save your changes.
Create a Commission Expense Portfolio
Create a portfolio for your fringe benefit rule. If you have multiple types of commissions and several rules with different expense time lines, create a separate portfolio for each rule.
- In the Accounting Reports view, click the + icon next to the search bar in the left-hand panel and select New Expense Portfolio.
- Enter a name and description.
-
For Effective Date, specify an effective start date and optional end date.
These dates specify when the portfolio tracks expenses.
-
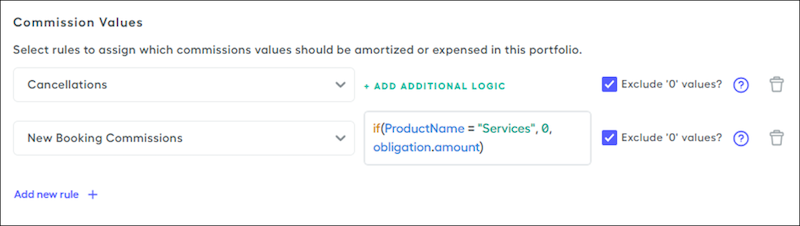
For Commission Values, select the commission values to expense.
- Click Add new rule and select an amount from any existing payout rule in Designer.
- To add other rules, click Add new rule again.
-
To specify logic for evaluating the rules, click Add Additional Logic and enter a function or expression, such as applying a calculation to a field or amount.
We recommend that you create a field upstream in Payout Rules that calculates the amount to expense, and then you can reference that field in this logic. Or, adding logic is helpful when you don’t want to expense the entire commission at one time or if you need to handle specific departments, products, or regions separately.Additional logic can add rows to the report with values of 0 for records that don’t satisfy the condition. To omit these rows from the report, select Exclude '0' values. For example, exclude deals with a Services product name that return a commission amount of $0.00.
-
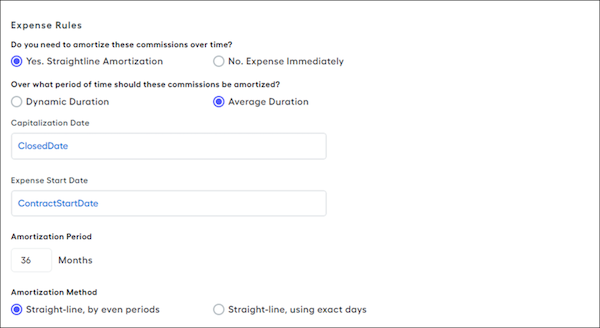
For Expense Rules, specify amortization options.
- To set up amortization that depends on the length of a contract, select Yes, Straightline Amortization and Dynamic Duration. For Start Date and End Date, specify the contract dates. You don’t have to track residual amortizations for each deal, because the tracking is dynamic and uses the same data that’s used for calculating commissions.
- To set up amortization for a perpetual contract with no defined start and end date, or if you want to amortize costs over the length of an average customer contract, select Yes, Straightline Amortization and Average Duration. Enter the average amortization period in months.
- To expense commissions immediately, select No, Expense Immediately. Enter the date to expense these amounts, such as statement_period.end_date.
- To do divide the expense from the purchase amount evenly across all periods, even partial periods, select the Straight-line, by even periods amortization method.
- To divide the amount equally over each day within the period and then sum the amount for the period, select the Straight-line, using exact days amortization method. Because each period can have a different number of days, each period can have a different amount.
The Capitalization Date and Start Date values can be different. The date fields support date functions and fields such as
end_of_month(CloseDate)orContract_Start_Date__c. Or, reference a custom date field in a datasheet, such as AmortizationStartDate, that calculates more specific logic, such asbeginning_of_month(months_ago(CloseDate, -3)). For any field you reference, calculate it within plan logic and include the field in the trace so the report can show it. See Connector Fields and Calculations in Salesforce Spiff Reports.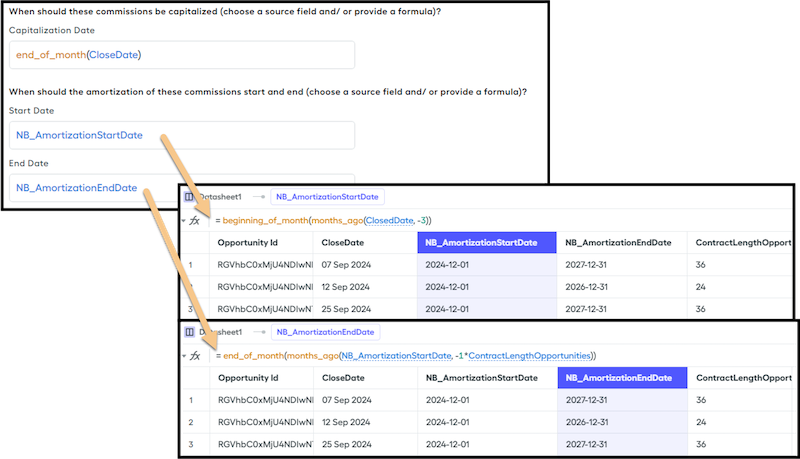
-
For Fringe Benefit Amortization Rules, select the fringe benefit rules you created.
If the benefit applies only to a certain time period, such as the end of the year, specify Effective As Of or Effective Until dates.
- For General Ledger Settings, select the general ledger accounts you created.
- Save your changes.
Create the Expense Report
After you create the portfolio, set up the report.
- In Reporting, select Expense Reports, and then click Custom Expense Report.
- Enter a name and optional description.
- For Report Time Frame, select start and end dates.
-
For Capitalization Time Frame, select start and end dates.
With this date range, you can include records where the capitalization date occurred before the Report Time Frame start date but that are still amortizing.
- Add portfolios to the report.
- Save your changes.
Manage and customize the expense report like other Spiff reports.